如何在沒有外掛的情況下建立免費的 WordPress 網站地圖
對於那些關心搜尋引擎優化 (SEO) 的人來說,網站地圖是必須的,因為它可以幫助 Google 等搜尋引擎更有效地抓取和索引您的網站。透過遵循我們的指南並學習如何在不使用外掛程式的情況下建立 WordPress 網站地圖,您將為搜尋引擎提供一種更輕鬆的方式來了解您網站的結構,最終提高您的線上知名度。讓我們開始吧!
在 WordPress 中建立網站地圖
簡而言之,網站地圖是一個 XML 文件,用作網站的路線圖,列出了所有重要的 URL 以及一些有趣的詳細信息,例如頁面上次更新的時間或更改的頻率。好消息?該 XML 檔案的結構遵循Sitemap 協議,因此使用 PHP 程式碼手動建立一個檔案非常簡單。
用於建立 XML 網站地圖的 PHP 程式碼
首先,您需要一些 PHP 程式碼來產生網站地圖。具體來說,您需要取得所有已發佈的貼文和頁面,將它們的 URL 新增至您的網站地圖檔案中,最後將網站地圖檔案儲存到您的根目錄中。
幸運的是,我們製作了一個現成的 PHP 程式碼片段,可以為您完成所有這些工作,因此您只需複製它:
// Function to create a sitemap.xml file in the root directory of the site

// You can uncomment the following lines if you wish to trigger the sitemap generation upon publishing a post or page

// add_action("publish_post", "eg_create_sitemap");

// add_action("publish_page", "eg_create_sitemap");
// This action triggers the sitemap generation whenever you save a post

add_action("save_post", "eg_create_sitemap");
// The main function responsible for generating the sitemap
function eg_create_sitemap() {
// Handle time offset for the site
if (str_replace('-', '', get_option('gmt_offset')) < 10) {
$tempo = '-0'. str_replace('-', '', get_option('gmt_offset'));
} else {
$tempo = get_option('gmt_offset');
}
if (strlen($tempo) == 3) {
$tempo. = ':00';
}
// Fetch posts and pages to be included in the sitemap
$postsForSitemap = get_posts(array(
'numberposts' => -1,
'orderby' => 'modified',
'post_type' => array('post', 'page'),
'order' => 'DESC'
));
// Initialize the sitemap XML string
$sitemap = '<?xml version="1.0"encoding="UTF-8"?>';
$sitemap. = "\n". '<urlset xmlns:xsi="http://www.w3.org/2001/XMLSchema-instance"xsi:schemaLocation="http://www.sitemaps.org/schemas/sitemap/0.9 http://www.sitemaps.org/schemas/sitemap/0.9/sitemap.xsd"xmlns="http://www.sitemaps.org/schemas/sitemap/0.9">'. "\n";
// Add homepage to the sitemap
$sitemap. = "\t". '<url>'. "\n".
"\t\t". '<loc>'. esc_url(home_url('/')). '</loc>'.
"\n\t\t". '<lastmod>'. date("Y-m-d\TH:i:s", current_time('timestamp', 0)). $tempo. '</lastmod>'.
"\n\t\t". '<changefreq>daily</changefreq>'.
"\n\t\t". '<priority>1.0</priority>'.
"\n\t". '</url>'. "\n";
// Loop through all posts and pages and add them to the sitemap
foreach ($postsForSitemap as $post) {
setup_postdata($post);
$postdate = explode("", $post->post_modified);
$sitemap. = "\t". '<url>'. "\n".
"\t\t". '<loc>'. get_permalink($post->ID). '</loc>'.
"\n\t\t". '<lastmod>'. $postdate[0]. 'T'. $postdate[1]. $tempo. '</lastmod>'.
"\n\t\t". '<changefreq>Weekly</changefreq>'.
"\n\t\t". '<priority>0.5</priority>'.
"\n\t". '</url>'. "\n";
}
// Close the XML string
$sitemap. = '</urlset>';
  // Write the XML to a custom-sitemap.xml file

  $fp = fopen(ABSPATH.  "custom-sitemap.xml", 'w');

  fwrite($fp, $sitemap);

  fclose($fp);

}
將程式碼貼到 WordPress 主題編輯器中
準備好生成網站地圖的 PHP 程式碼後,您可以將其貼到 WordPress 主題編輯器中:
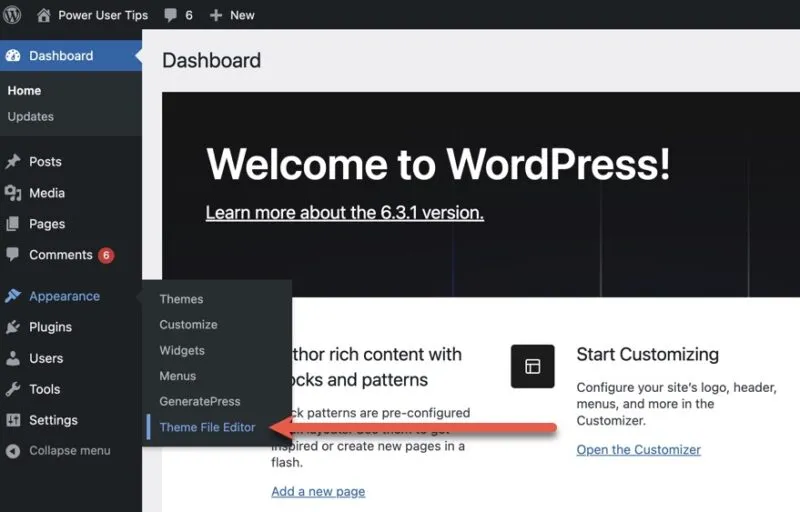
登入 WordPress 管理儀表板並導覽至Appearance -> Theme File Editor。
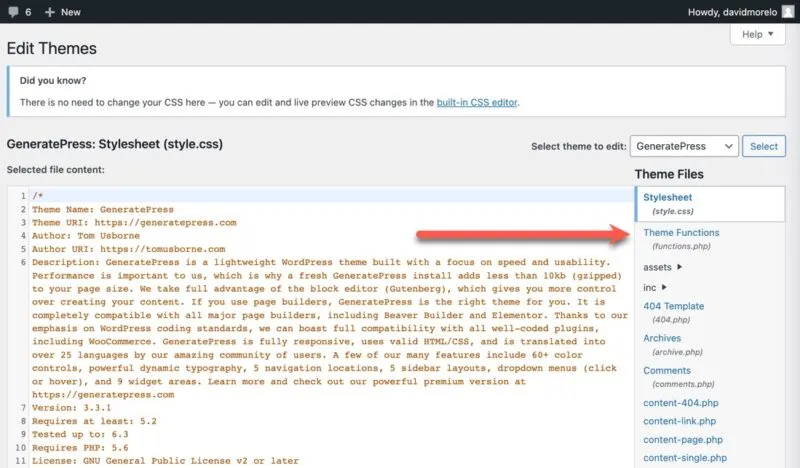
選擇右側邊欄中的主題函數 (functions.php)檔案。
滾動到該文件的底部並貼上我們之前提供的程式碼片段。貼上後,點擊更新檔案按鈕儲存變更。
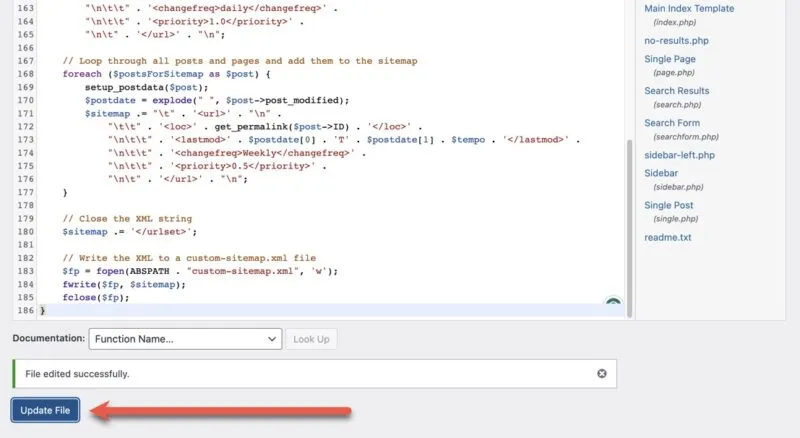
如果一切順利,那麼您應該會看到「文件編輯成功」確認訊息。
向 Google 提交您的 WordPress 網站地圖
好吧,您已經完成了最困難的部分 – 創建沒有外掛程式的WordPress 網站地圖。現在是時候告訴谷歌這件事了。透過向 Google 提交網站地圖,您可以幫助搜尋引擎巨頭更有效地抓取您的網站並將其編入索引。您需要執行以下操作:
1. 前往Google Search Console,然後新增並驗證您網站的所有權。
2.在左側窗格中選擇網站地圖類別。
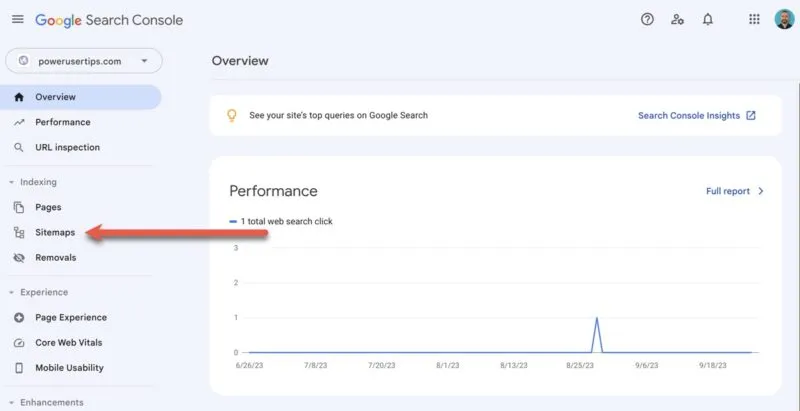
3. 在新增網站地圖欄位中輸入網站地圖的 URL(在本例中為 https://website.com/custom-sitemap.xml),然後按一下提交。
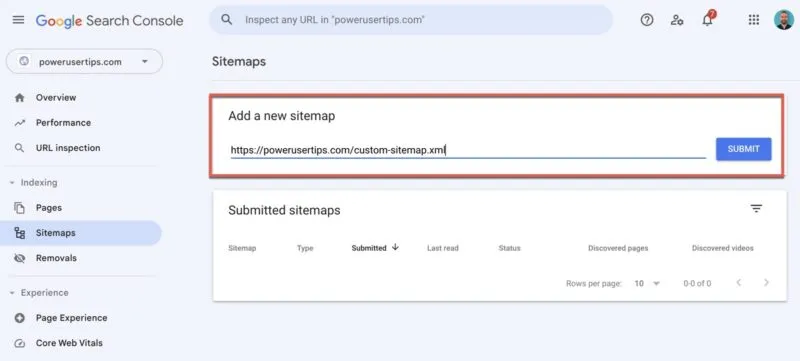
您應該會看到一條確認訊息,表明您的網站地圖已提交並將很快得到處理。現在您只需要等待 Google 根據網站地圖抓取您的網站並為其建立索引。這可能需要幾個小時到幾天的時間,具體取決於網站大小和抓取速度等各種因素。您可以直接從 Google Search Console 帳戶監控狀態和任何潛在問題。同時,我們建議您了解如何為 WordPress 設定 Google 追蹤程式碼管理器 (GTM)。
經常問的問題
WordPress 有內建網站地圖嗎?
是的,自從 WordPress 5.5 發布以來,內容管理系統自動在/wp-sitemap.xml. 根據您的需求,預設網站地圖可能可以解決問題。但是,如果您希望自訂網站地圖,則需要自行建立。
如果我已經有 XML 網站地圖,我的 WordPress 網站還需要視覺化網站地圖嗎?
可視網站地圖通常供人類讀者使用,而 XML 則供搜尋引擎使用。雖然如果您已經有 XML 網站地圖,則不一定需要視覺化網站地圖,但它對於大型網站的導航目的可能會有所幫助。
哪個是 WordPress 最好的免費網站地圖外掛?
如果您想走外掛路線,強烈推薦 Yoast SEO、Google XML Sitemap Generator 和 All in One SEO 等選項,因為它們易於使用且功能強大。
圖片來源:Unsplash。所有螢幕截圖均由 David Morelo 製作。
發佈留言