
如何使用 WSA 和 BlueStacks 在 PC 上使用線程
要知道什麼
- 您可以在 PC 上獲取並使用 Android 版本的 Threads。您可以使用適用於 Android 的 Windows 子系統或適用於 PC 的 Android 模擬器(例如Bluestacks)來運行該應用程序。
- 您可以從 Microsoft Store 下載適用於 Android 的 Windows 子系統,同時還有大量 Android 模擬器可供選擇,您可以在其官方網站上找到它們。
Threads 是一個全新的社交媒體平台,似乎正在席捲全球。Threads 由 Meta 開發,是一個與 Instagram 集成的微博平台,利用其龐大的用戶群,考慮到其用戶數量已超過 1 億,該平台似乎進展順利。
主題允許您加入公共對話並發布回复或您自己的主題。您可以使用它來與志同道合的用戶聯繫並找到具有相似興趣的人。但是,Threads 目前只能通過 Android 和 iOS 的移動應用程序使用。這讓世界各地許多想要在使用 PC 時繼續使用該平台的人望而卻步。因此,如果您也有同樣的情況,那麼這裡有兩個解決方法可以幫助您在 PC 上使用線程。
如何在 PC 上使用線程
要使用 Threads,您需要在 PC 上安裝 Android 應用程序。為此,您可以使用 Windows Subsystem for Android (WSA) 或 Android 模擬器。我們在下面介紹了這兩種方法。您可以選擇在 PC 上使用線程。
我們建議使用 WSA,因為它本身適用於 Windows 11,並且在資源使用方面非常高效。然而,這個過程可能有點乏味。因此,如果您正在尋找一種相對簡單的方法,只需單擊幾下即可使用 Threads,那麼我們建議您選擇使用 Android 模擬器。
方法 1:使用適用於 Android 的 Windows 子系統
適用於 Android 的 Windows 子系統允許您在 Windows 11 上本機運行 Android 應用程序。按照以下步驟安裝和使用 WSA,以便在您的 PC 上使用 Threads。讓我們開始吧。
第1步:安裝WSA
以下是在您的 PC 上安裝 WSA 的方法。
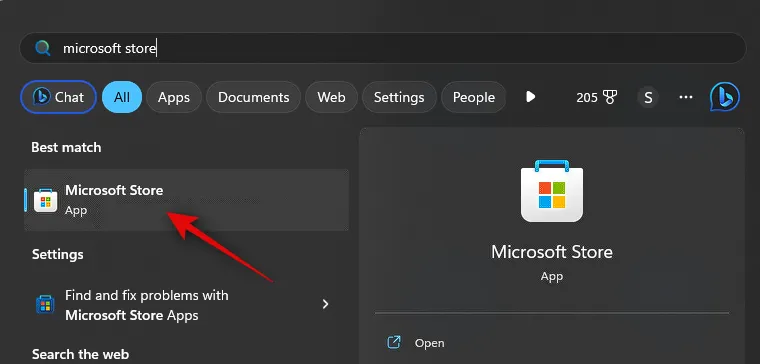
在您的電腦上打開Microsoft Store 。
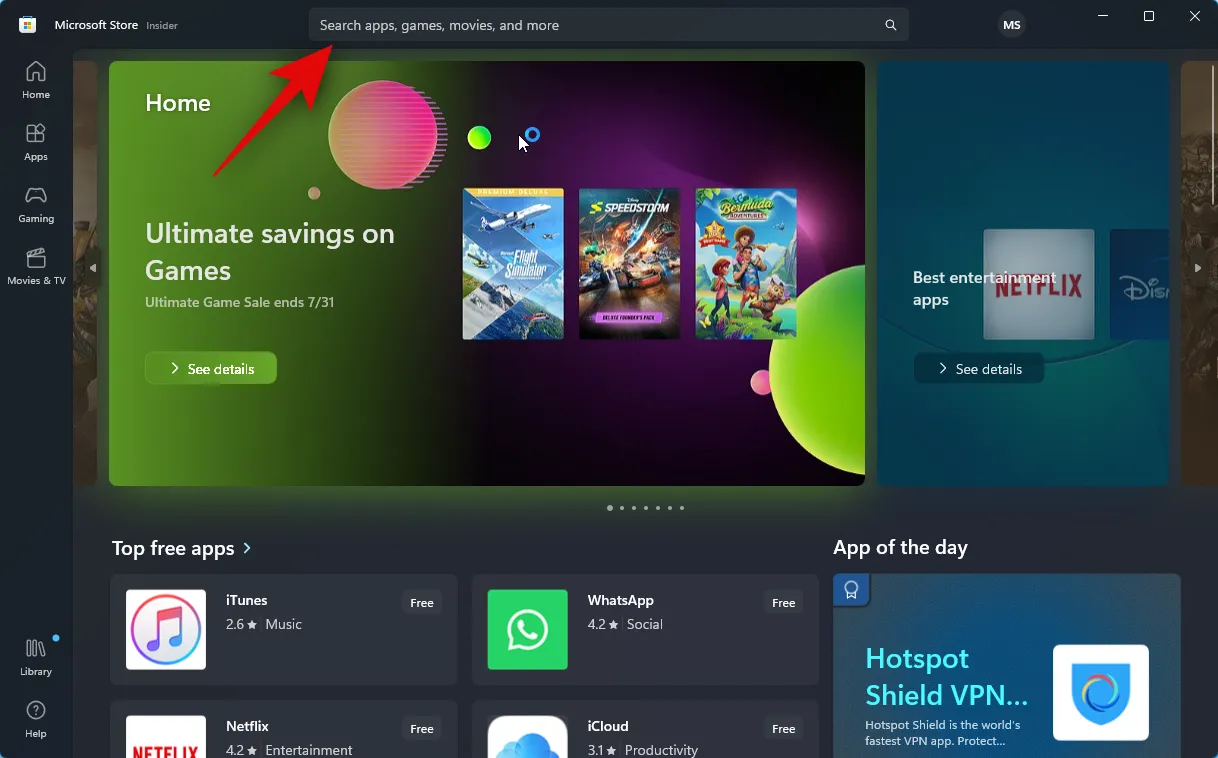
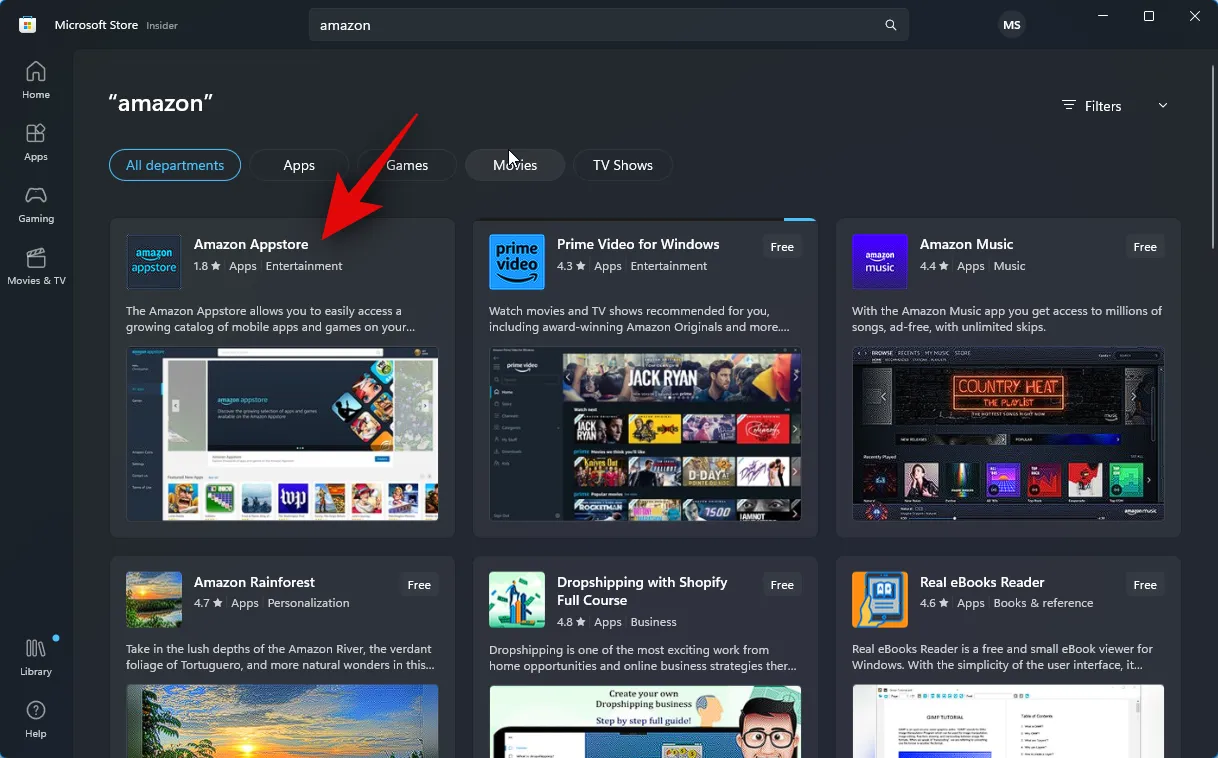
現在單擊頂部的搜索欄並蒐索Amazon Appstore。
單擊 並從搜索結果中選擇相同的內容。
單擊安裝。
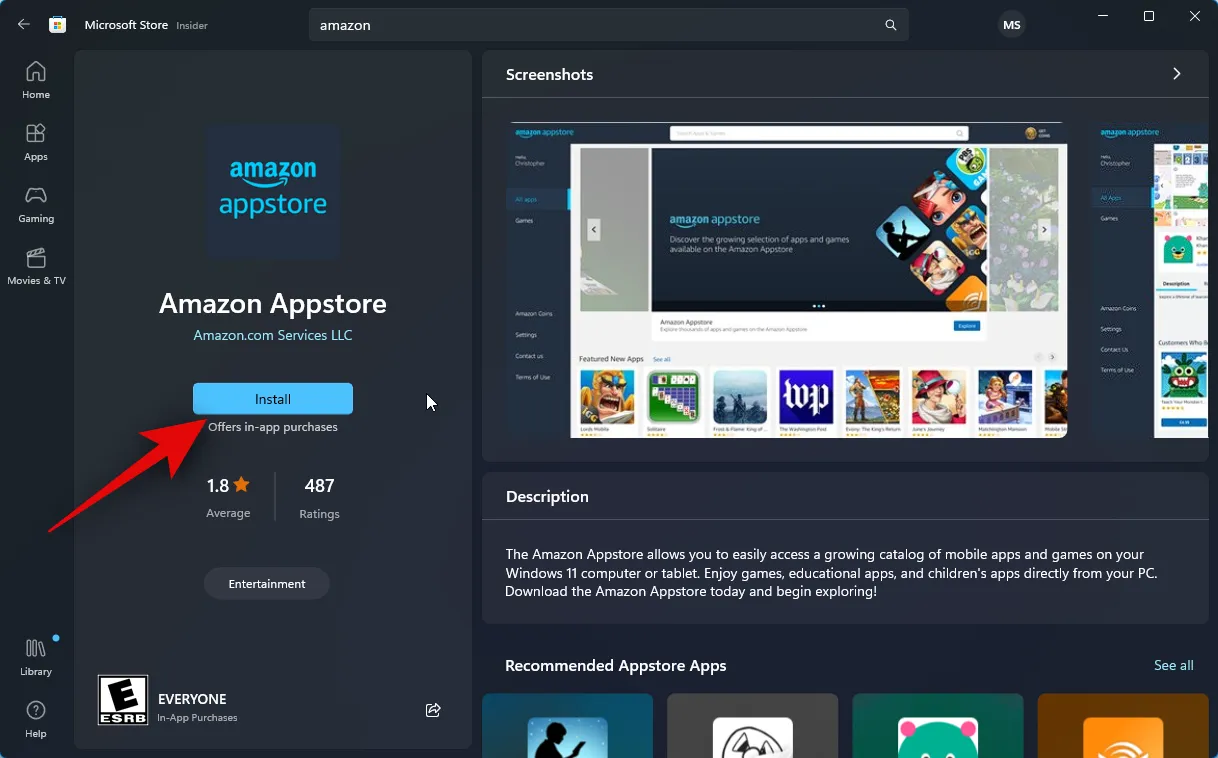
現在您將被告知您需要 WSA 才能使用 Appstore。單擊右下角的“下載”即可開始。
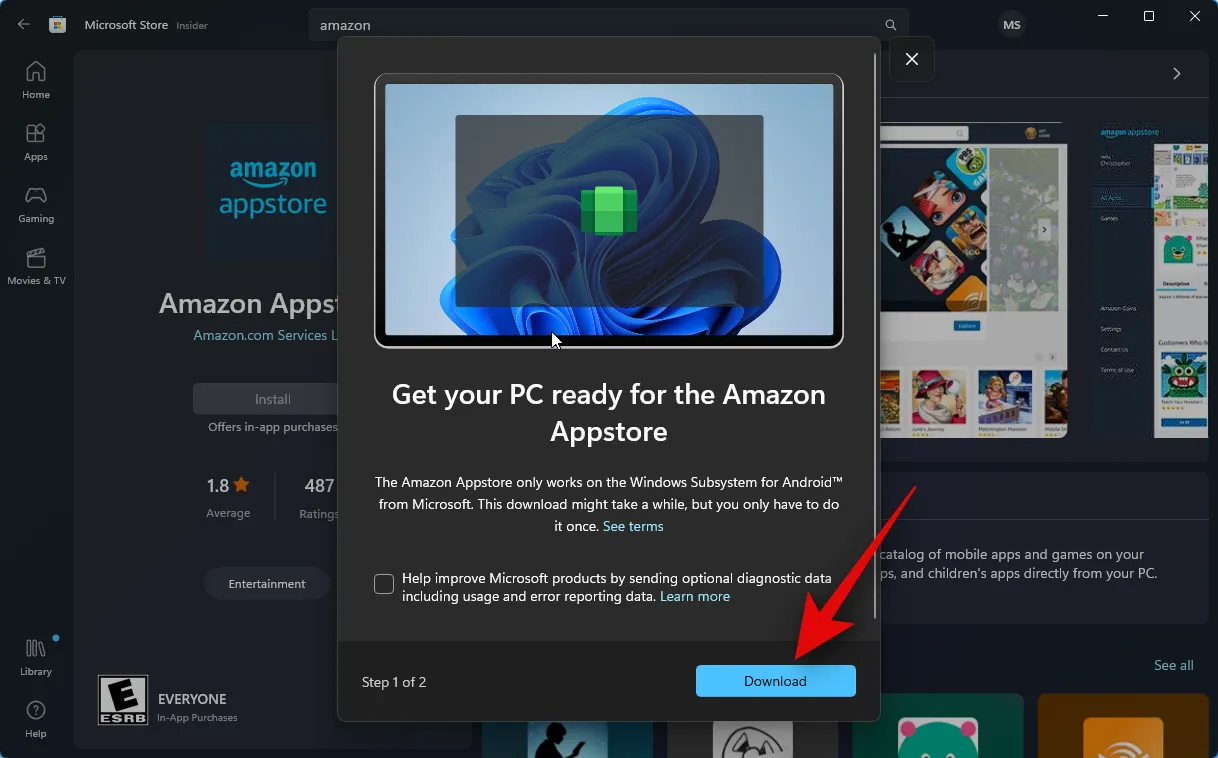
現在將下載適用於 Android 的 Windows 子系統並將其安裝到您的 PC 上。

完成後,您可以使用下一部分在您的 PC 上安裝和使用 Threads。
第2步:安裝和使用Threads
現在,適用於 Android 的 Windows 子系統已安裝在您的 PC 上,我們可以在您的 PC 上旁加載和使用線程。請按照以下步驟操作以幫助您完成該過程。
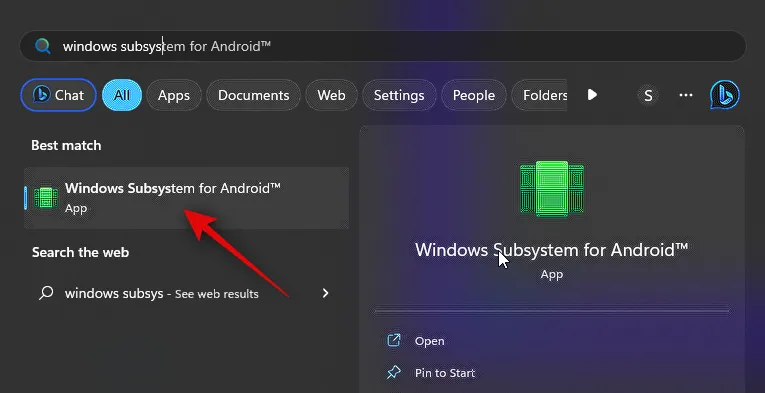
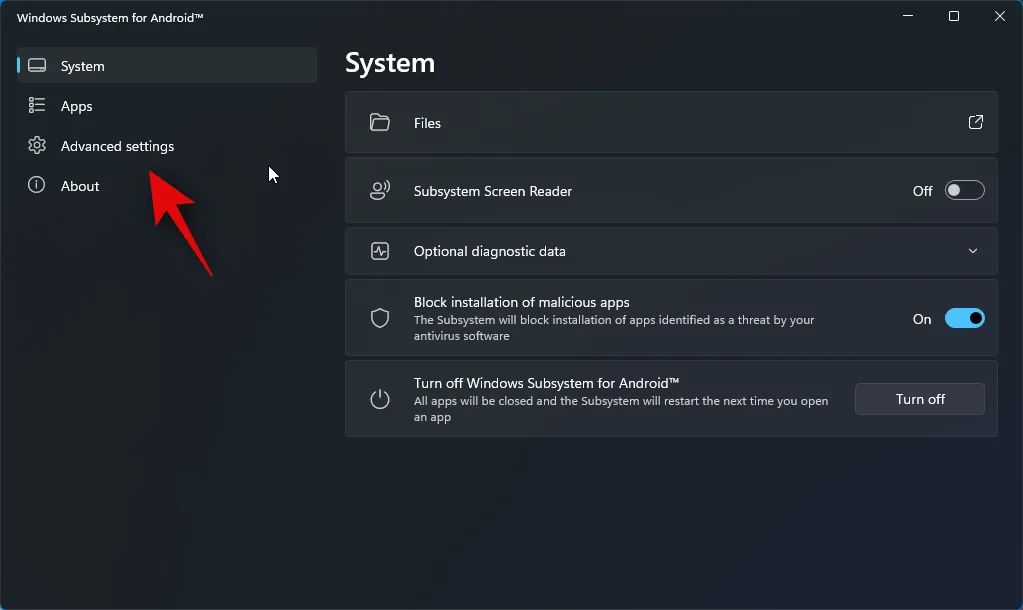
打開“開始”菜單,搜索並啟動適用於 Android 的 Windows 子系統。
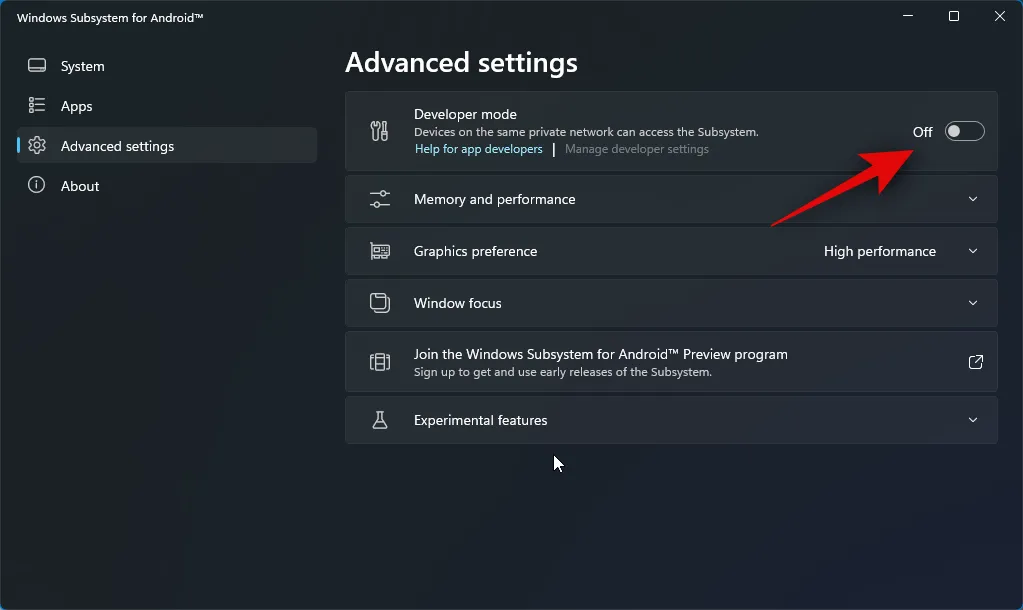
現在單擊左側的高級設置。
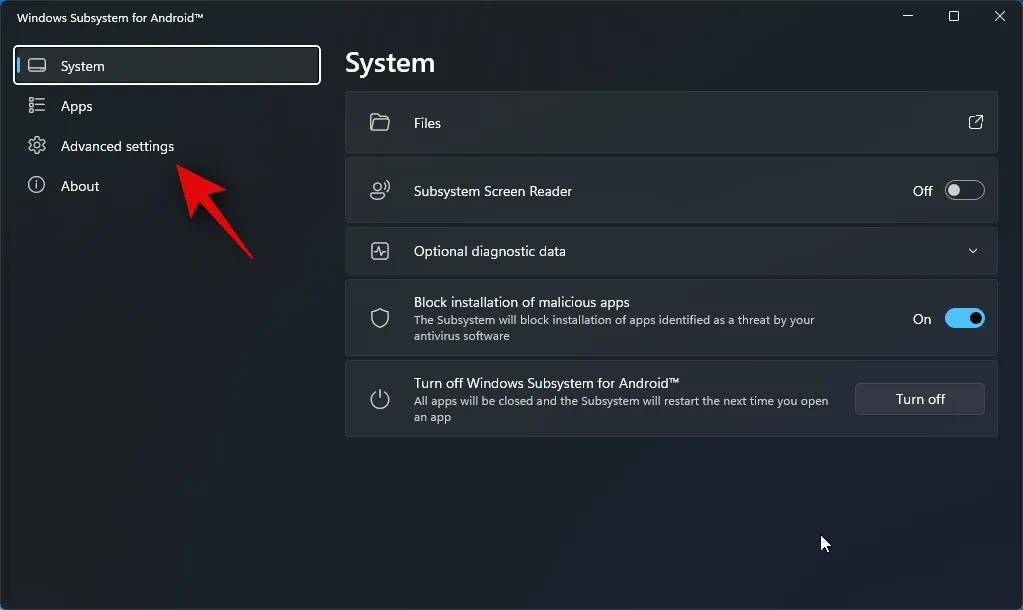
單擊並啟用開發人員模式的切換。
單擊管理開發人員設置。這將啟動 WSA 並允許您訪問開發人員設置。

滾動開發人員設置並檢查“調試”下的“USB 調試”開關。單擊並打開開關(如果已關閉)。

現在關閉 WSA 和開發人員設置,然後從“開始”菜單重新啟動 WSA。

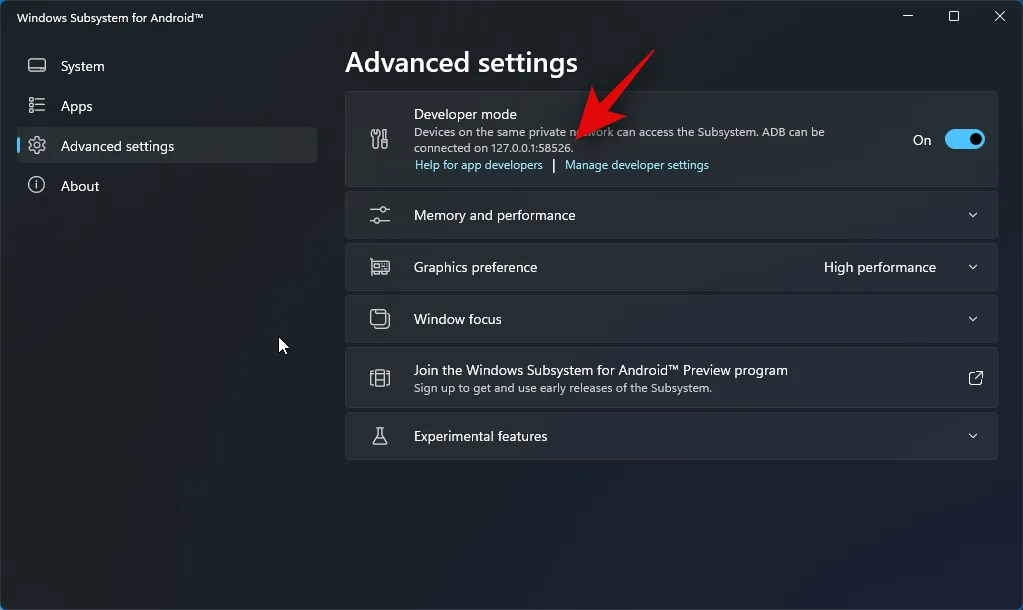
再次單擊左側邊欄中的高級設置。
現在檢查右側的開發者模式列表。您應該看到127.0.0.1:58526作為我們可以連接 ADB 的地址。
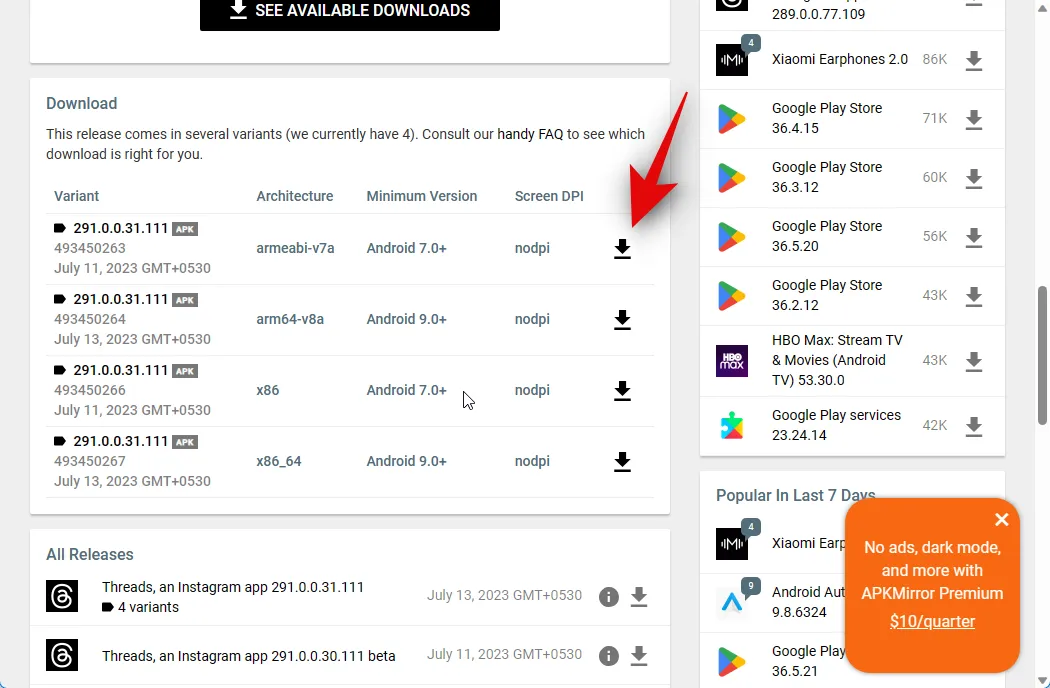
接下來,訪問下面的鏈接從 APKMirror 下載Threads。
- 線程 APK | 下載鏈接

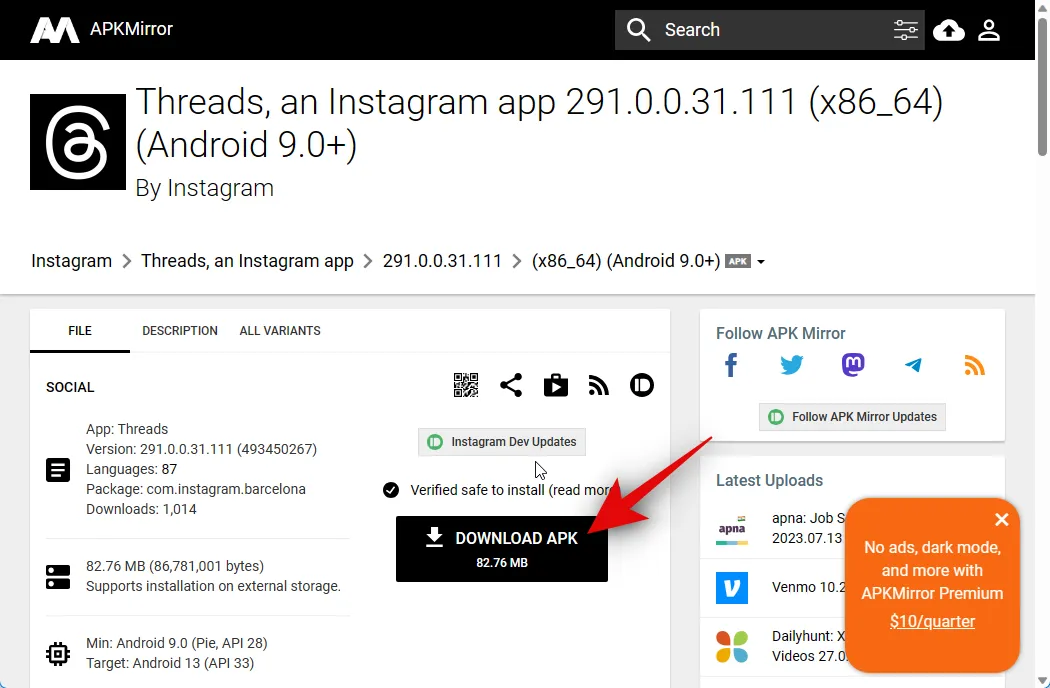
向下滾動並單擊所有版本下的最新版本。
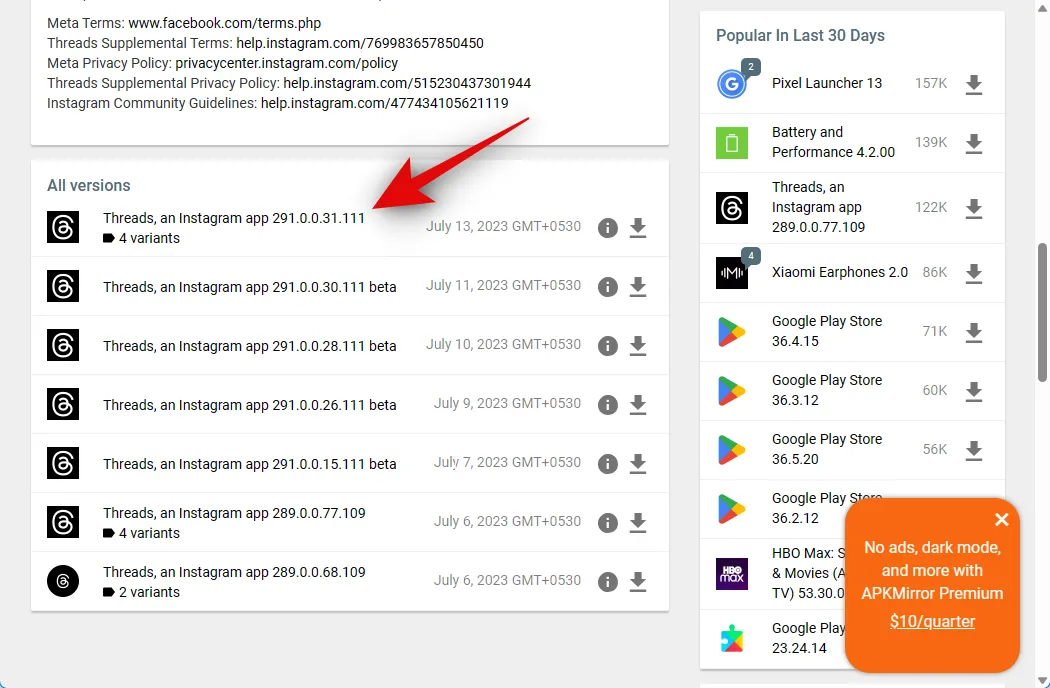
現在,單擊x86_64架構APK 旁邊的下載圖標。

接下來,單擊“下載 APK”。現在將啟動 APK 的下載。將文件保存在 PC 上方便的位置。
完成後,訪問下面的鏈接下載 Google 的 SDK 平台工具。
- SDK平台工具| 下載鏈接
向下滾動並單擊與您的 PC 相關的下載鏈接,無論您使用的是 Windows、Mac 還是 Linux。

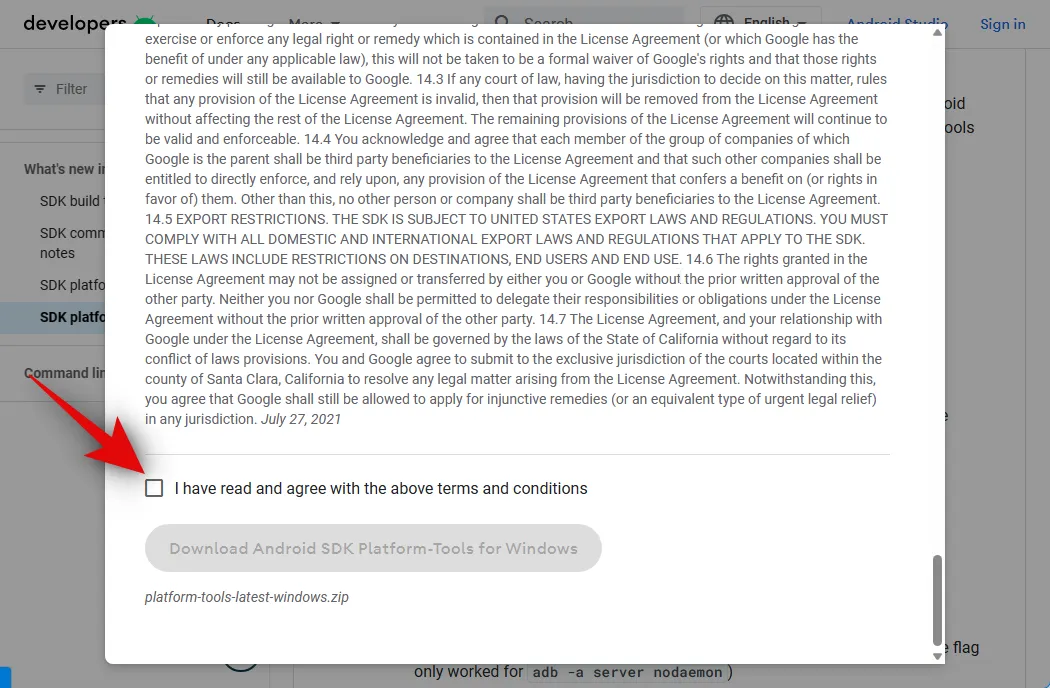
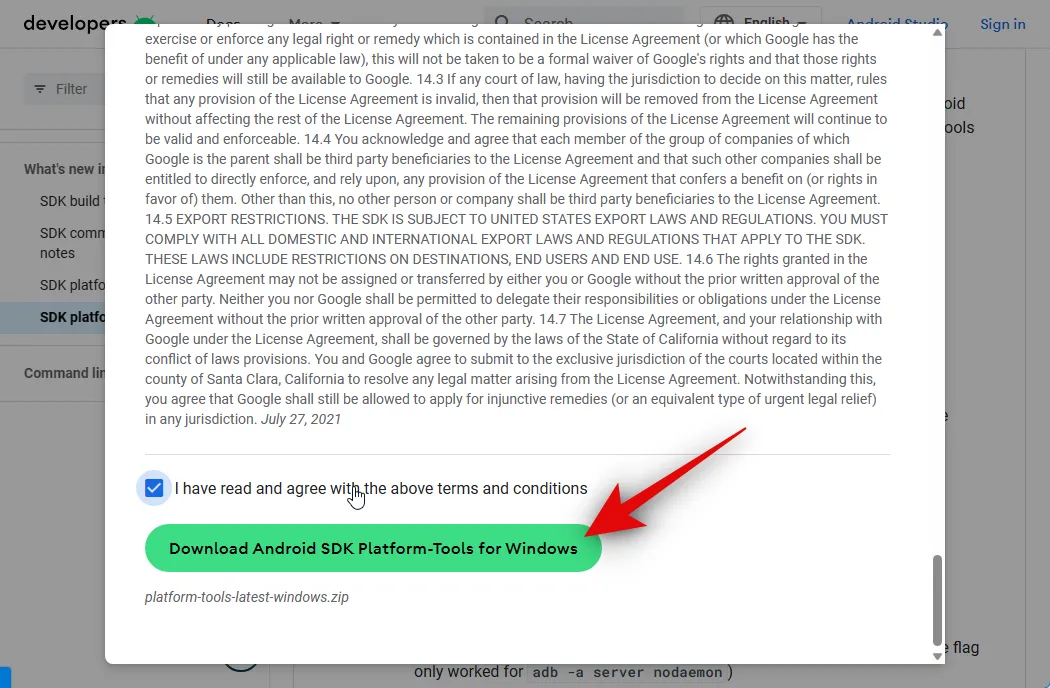
現在,您將看到 SDK 平台工具的條款和條件。滾動到底部並選中我已閱讀並同意上述條款和條件的框。
完成後,單擊Download Android SDK Platform-Tools for Windows。如果您使用的是 Mac 或 Linux 計算機,此選項將會有所不同。
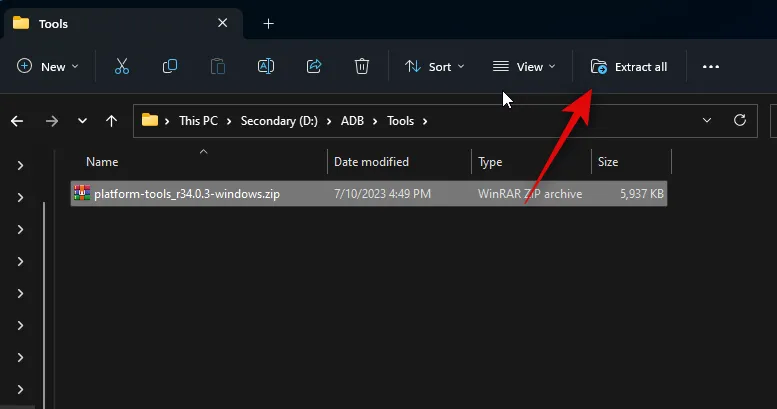
SDK 平台工具現在將下載到您的 PC 上。將存檔保存到方便的位置。下載後,使用您喜歡的工具提取存檔。如果您使用的是 Windows,則可以使用右鍵單擊上下文菜單或頂部功能區菜單中的全部提取來執行相同的操作。
單擊瀏覽…並選擇您希望將存檔解壓到的位置。

如果未選中,請選中完成後顯示提取的文件複選框。

單擊提取。

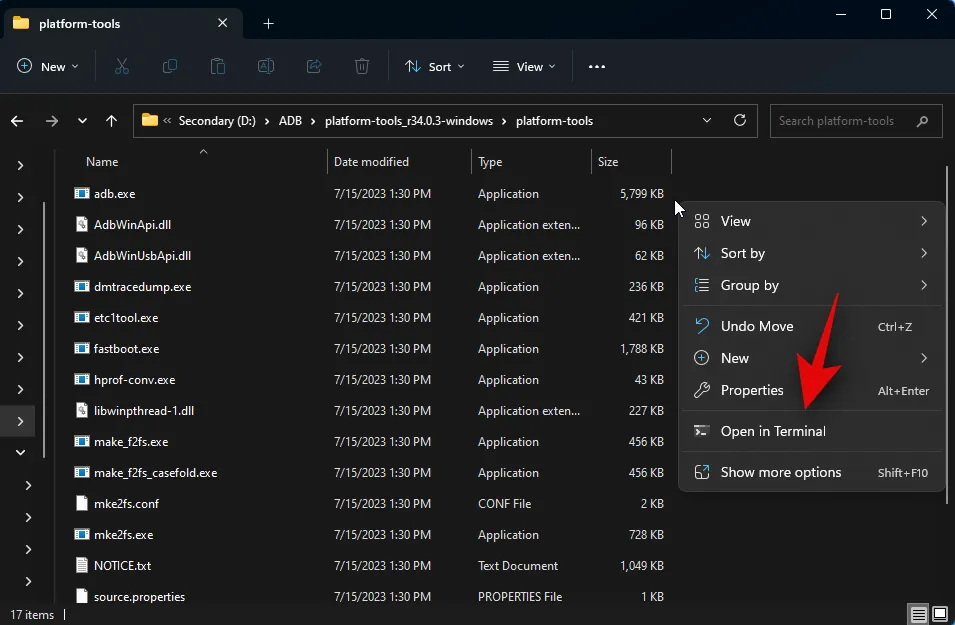
提取存檔後,導航到平台工具文件夾並右鍵單擊空白區域。
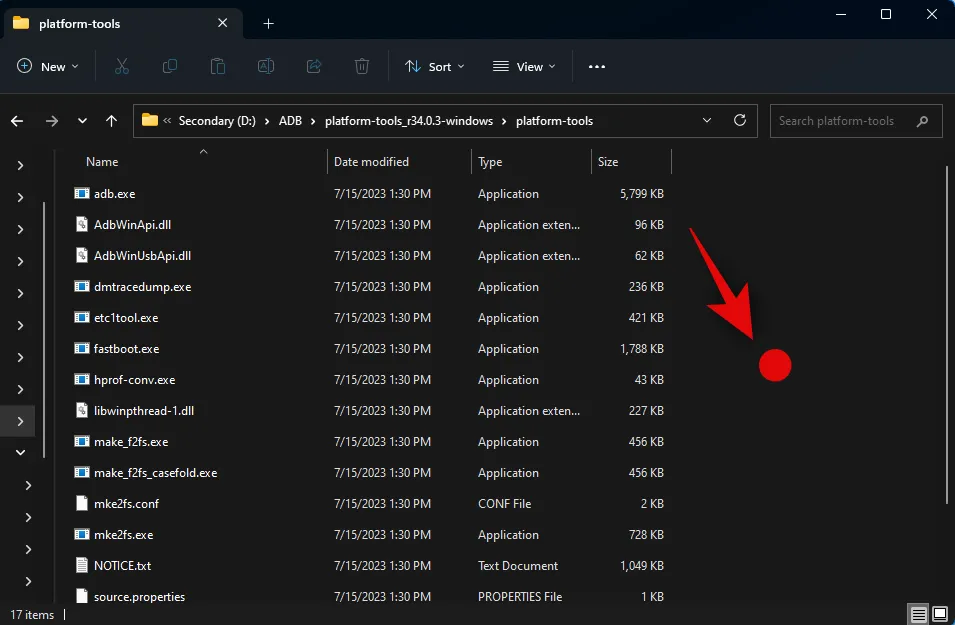
現在單擊“在終端中打開”。
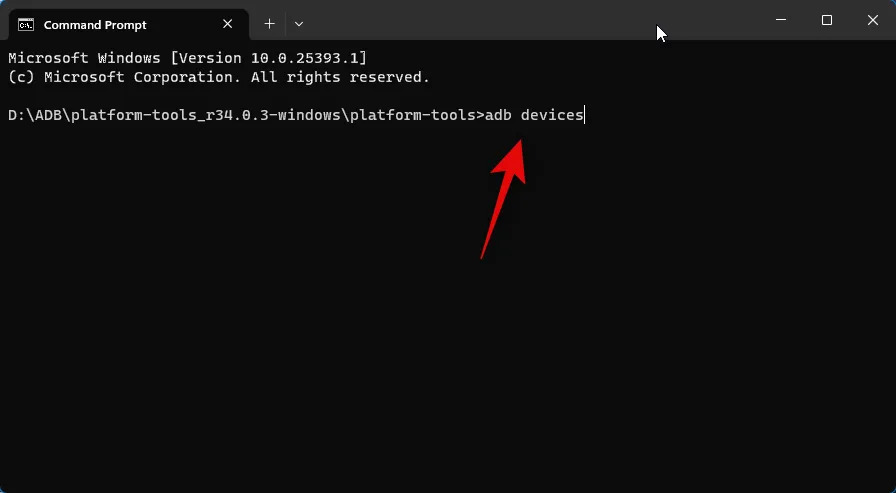
鍵入以下命令並按 Enter 鍵。
adb devices
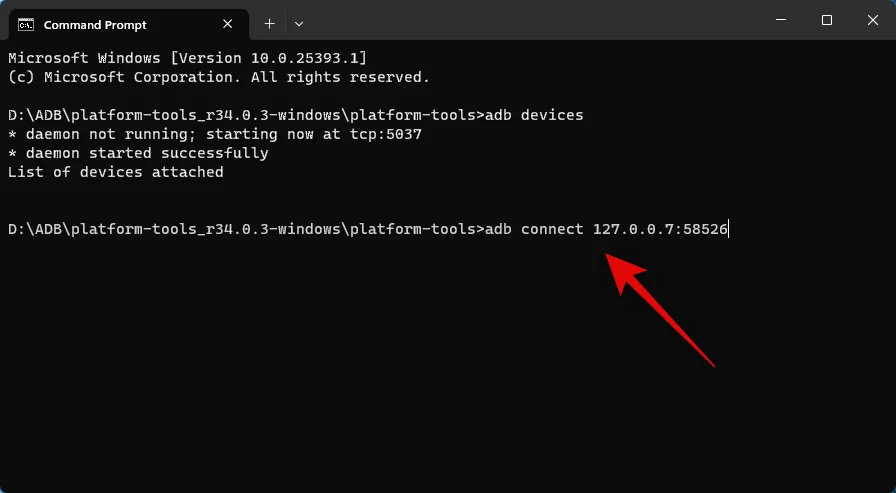
接下來,使用以下命令連接到您的 PC。
adb connect 127.0.0.1:58526
現在,系統將要求您在新的 WSA 窗口中驗證連接。如果您希望授予對您電腦的無限期訪問權限,請選中“始終允許從此計算機”複選框。
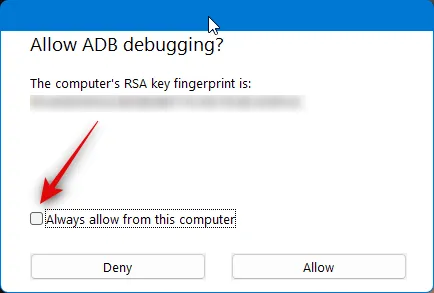
單擊“允許”以授予必要的權限。

現在再次使用此命令來檢查連接的設備。如果一切按預期進行,您的電腦現在應該會出現。
adb devices

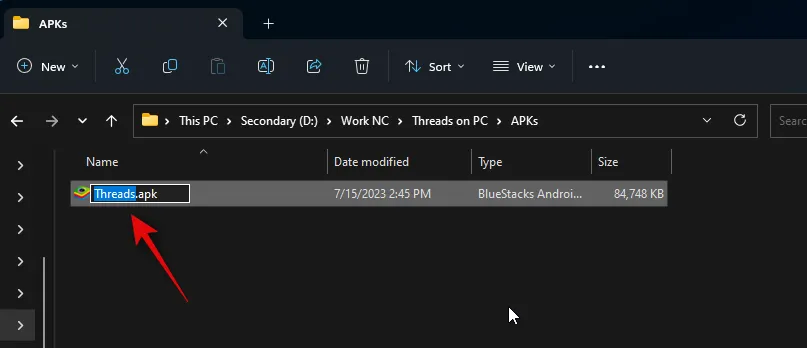
接下來,打開文件資源管理器並導航到我們之前下載的 APK。選擇 APK 並按鍵盤上的F2 。

將 APK 重命名為Threads,然後按鍵盤上的 Enter。
現在復製或剪切 APK 並將其粘貼到platform-tools文件夾中。
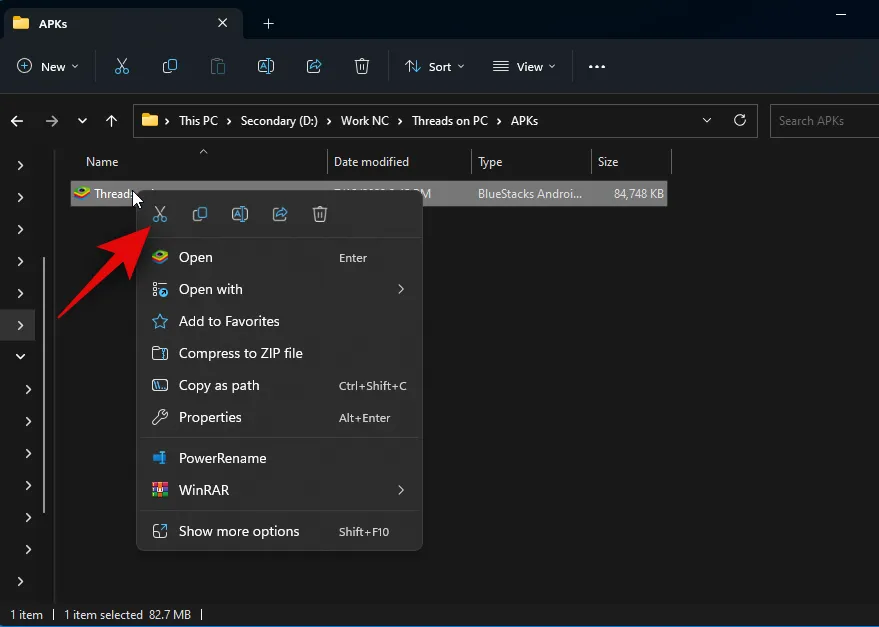
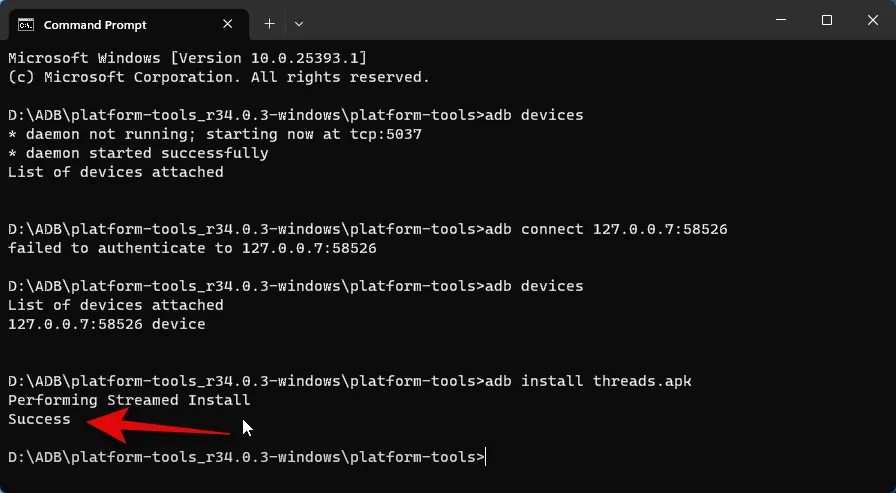
切換回終端並使用以下命令安裝 APK。
adb install Threads.apk
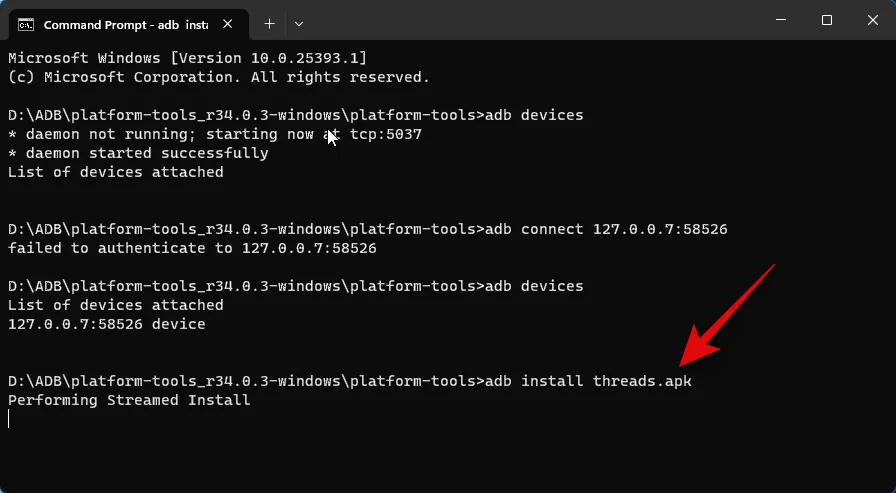
Threads 現在將安裝在您的 PC 上。如果一切順利並且應用程序安裝成功,您應該會看到如下所示的成功。
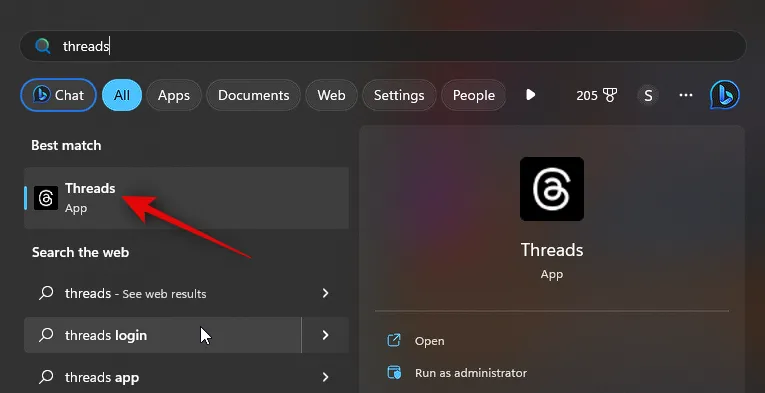
使用“開始”菜單搜索“Threads”。該應用程序出現在搜索結果中後,單擊它即可在您的電腦上啟動它。
現在將安裝該應用程序。您現在可以單擊“使用 Instagram 登錄”並使用您的憑據登錄。

就是這樣!在您的 PC 上安裝 APK 後,您現在可以隨時使用 Threads。
方法二:使用Android模擬器
有大量的 Android 模擬器可供您在 PC 上獲取和使用 Threads。我們將在這個例子中看看 Bluestacks。但是,您可以選擇使用您喜歡的任何其他 Android 模擬器。
第 1 步:獲取並安裝 Bluestacks
以下是您在 PC 上下載並安裝 Bluestacks 的方法。請按照以下步驟操作以幫助您完成該過程。
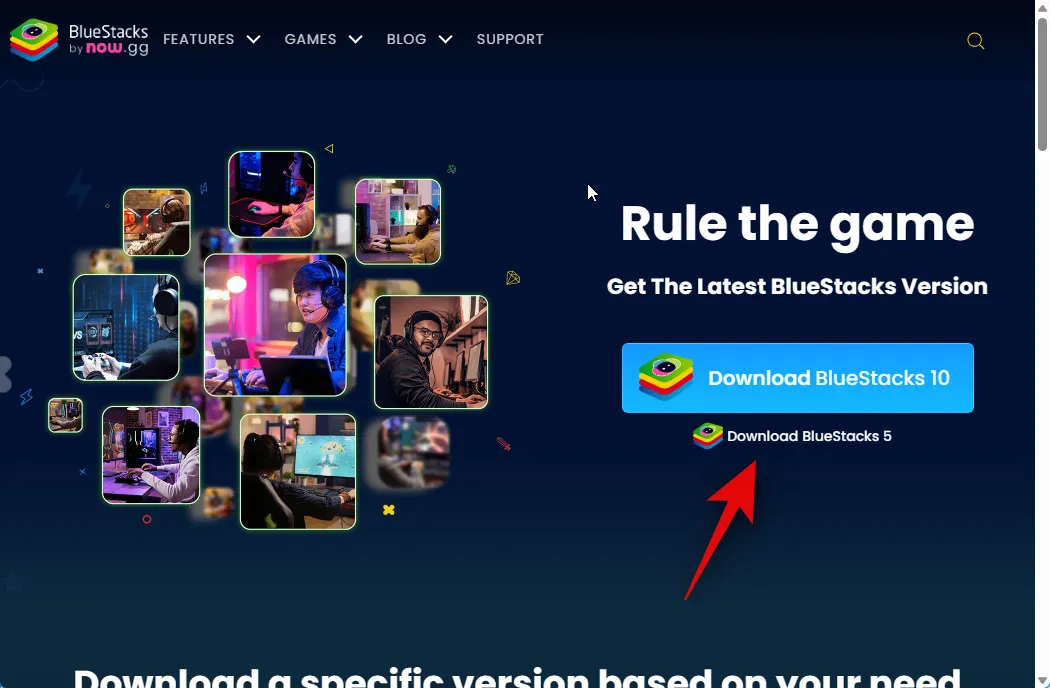
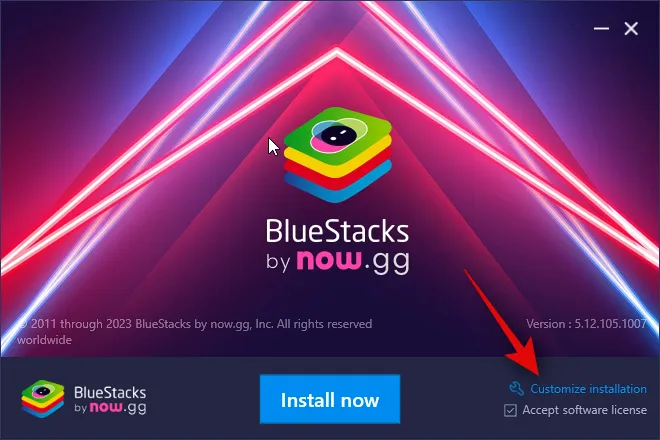
打開瀏覽器並訪問bluestacks.com/download.html。該選項卡打開後,單擊“下載 Bluestacks 5”。
現在將開始下載。將設置保存在您的電腦上,下載後雙擊並啟動它。
單擊右下角的自定義安裝。
單擊更改文件夾。
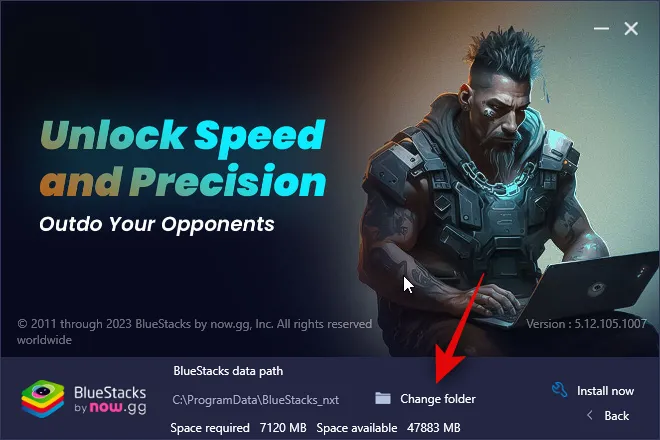
現在選擇您希望安裝 Bluestacks 的位置。
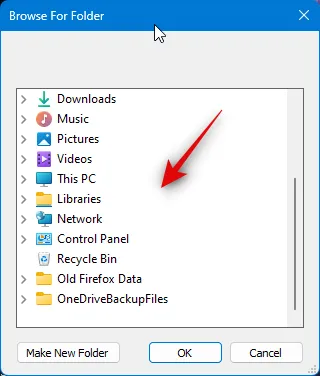
選擇首選文件夾後,單擊“確定”。

完成後單擊立即安裝。

現在將下載 Bluestacks 並將其安裝到您的 PC 上。這可能需要幾分鐘的時間,具體取決於您當前的網絡。

安裝完成後,您應該會看到主頁。
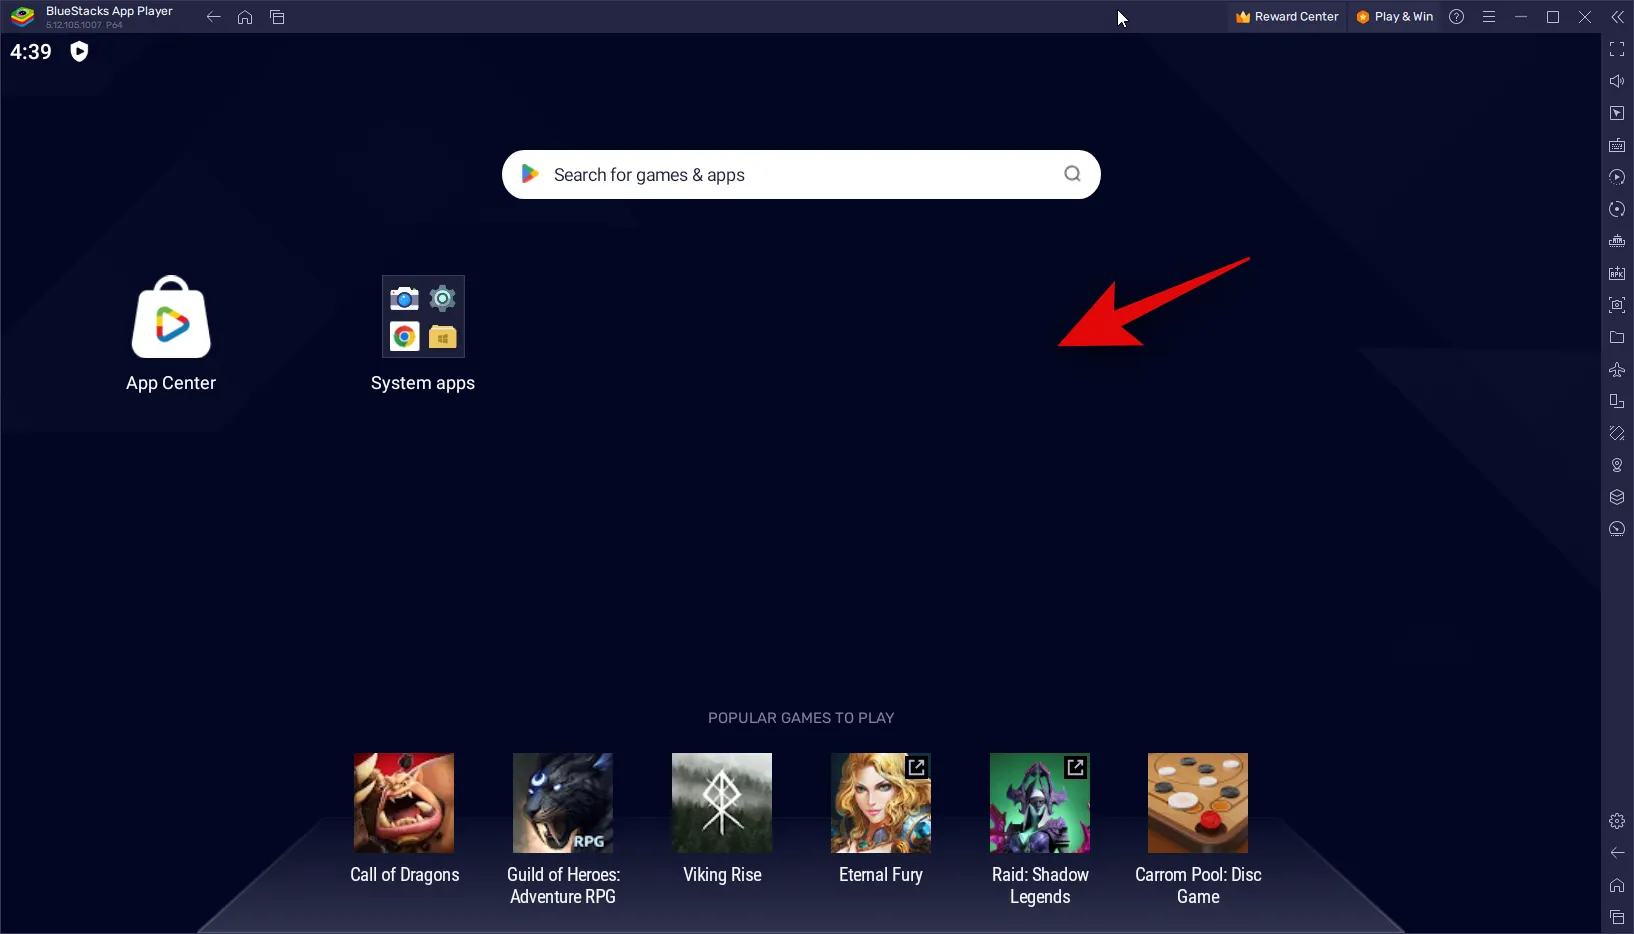
就是這樣!Bluestacks 現在將安裝在您的 PC 上,您現在可以使用下一步在您的 PC 上下載和使用 Threads。
第2步:安裝和使用Threads
現在 Bluestacks 已下載並安裝到您的 PC 上,您現在可以安裝和使用 Threads。雖然 Bluestacks 有自己的應用程序商店,但我們將下載並安裝 APK。這是因為在 Bluestacks 中使用應用程序中心需要您使用 Google 帳戶登錄。這可能有點粗略,因此我們建議避免這樣做。請按照以下步驟操作以幫助您完成該過程。
請訪問下面的鏈接下載 Threads 的 APK。
- 線程 APK | 下載鏈接

現在單擊All versions下的最新 Threads 版本。

接下來,向下滾動並單擊為x86_64開發的 APK 旁邊的下載圖標。
單擊頂部的“下載 APK” 。

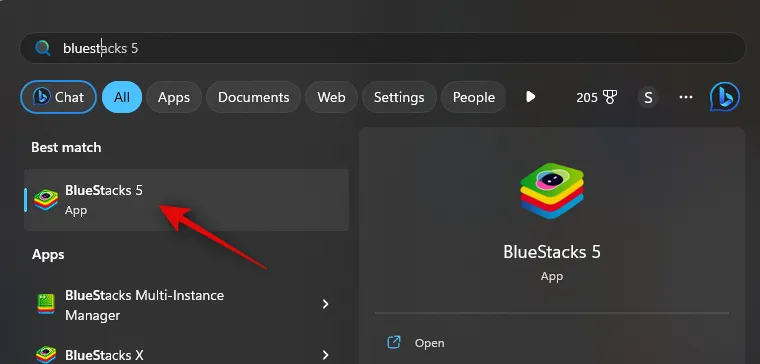
現在將開始下載。將 APK 保存到 PC 上方便的位置。下載後,打開“開始”菜單,搜索Bluestacks,然後從搜索結果中啟動它。
在屏幕上打開 Bluestacks 後,按Ctrl + Shift + B。

現在導航您的本地存儲並選擇我們在上述步驟中下載的 APK。
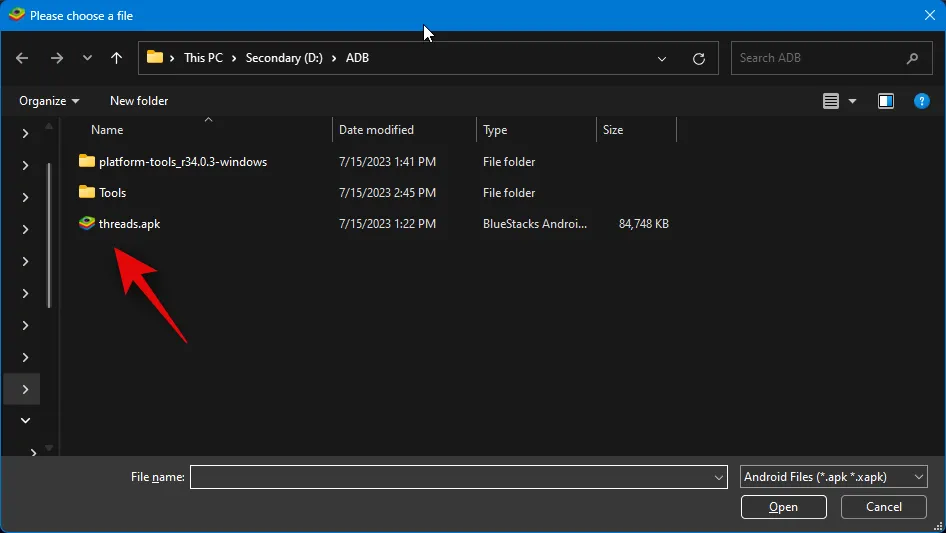
選擇後單擊“打開” 。

現在將安裝該應用程序。您可以在底部跟踪其進度。

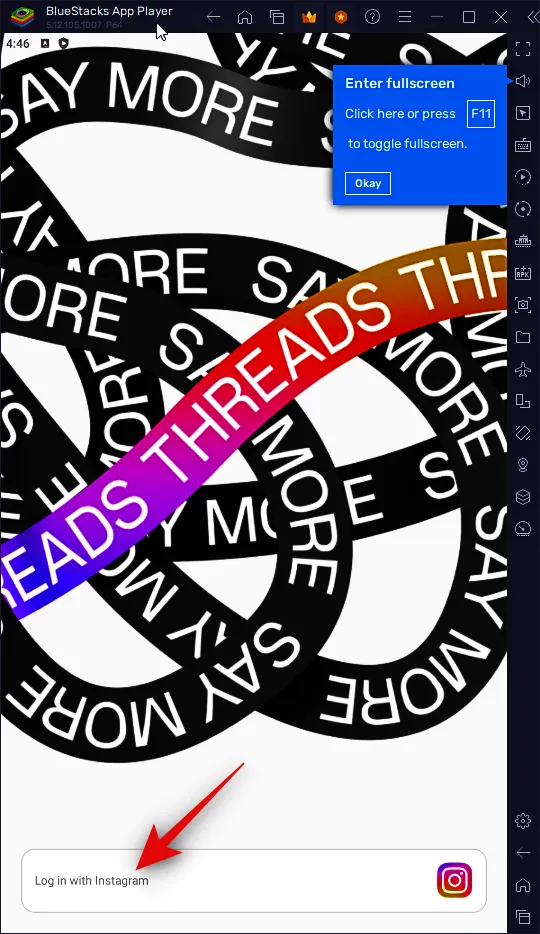
安裝後,該應用程序將顯示在您的主屏幕上。單擊它即可啟動Threads。

線程現在將在您的 PC 上啟動。您現在可以單擊“使用 Instagram 登錄”並使用您的憑據登錄 Threads。
這就是您如何使用 Bluestacks 在 PC 上使用線程。
我們希望這篇文章可以幫助您在 PC 上輕鬆獲取和使用 Threads。如果您遇到任何問題或有任何其他疑問,請隨時使用下面的評論與我們聯繫。


發佈留言