How to take screenshot on Windows 11 using Snipping Tool
- On Windows 11, use the “Print” key (or “Windows key + Shift + S” shortcut) to bring up the Snipping Tool toolbar and take a screenshot.
- You can also open the Snipping Tool, choose the type of screenshot, and click the “New” button to take a screenshot.
- Alternatively, use the “Windows key + Print” shortcut to take a full-screen screenshot that will save directly in the “Pictures” folder.
On Windows 11, you can take a screenshot of an area of the screen or the entire desktop in several ways (for example, using the “Windows key + PrtScrn” keyboard shortcut), but using the Snipping Tool is perhaps the best way to complete the task.
The Snipping Tool app for Windows 11 replaces the legacy “Snipping Tool” and “Snip & Sketch” apps. The new version combines the two previous applications into a modern experience that looks similar to the old Snipping Tool and integrates the best features of Snip & Sketch. (The tool also includes a feature to take screen recordings.)
The app integrates with the operating system to make it easy to take screenshots without opening the app using the“Windows key + Shift + S” shortcut. You can even change the settings to configure the “Print” key to take screenshots with a single button. In the app, you can choose different screenshot modes and other settings, like the ability to add a delay before taking the screenshot. The app even provides editing tools, such as cropping, text extraction and redaction, and annotation options like shapes.
In this guide, I will teach you how to use the Snipping Tool to take screenshots on Windows 11.
- Take screenshots on Windows 11 using Snipping Tool
- Edit screenshots on Windows 11 using Snipping Tool
Take screenshots on Windows 11 using Snipping Tool
Although there are many third-party apps, using the Snipping Tool is the easiest way to take and annotate screenshots for Windows 11 users.
Capture with or without print key
To take a screenshot on Windows 11, use the “Print” (PrtSc or PrtScn) key to bring up the Snipping Tool toolbar to take a screenshot of the entire or select part of the screen.

If the key isn’t working, you may have to enable the Print key to open the screen capture on Windows 11. Alternatively, you can use the “Windows key + Shift + S” keyboard shortcut.
Once you complete the steps, the Snipping Tool app will open, allowing you to use tools to crop and annotate the image.
You can also use the “Windows key + PrtScrn” (PrtSc or PrtScn) keyboard shortcut, the system’s default feature, to screenshot the entire screen.
When invoking this keyboard shortcut, Windows 11 will capture a screenshot of the entire screen. The screenshot will be saved as a “.png” file in the “Screenshots” folder inside the “Pictures” folder.
https://www.youtube.com/watch?v=IrJLJOl1Ezk
Capture with hardware shortcut
If you have a Surface device, press and hold the “Power” button and press and release the “Volume Up” button to a screenshot.
Similar to using the keyboard shortcut, when invoking the hardware shortcut, the system will take a full-screen screenshot. The capture will be saved as a “.png” file in the “Screenshots” folder inside the “Pictures” folder.
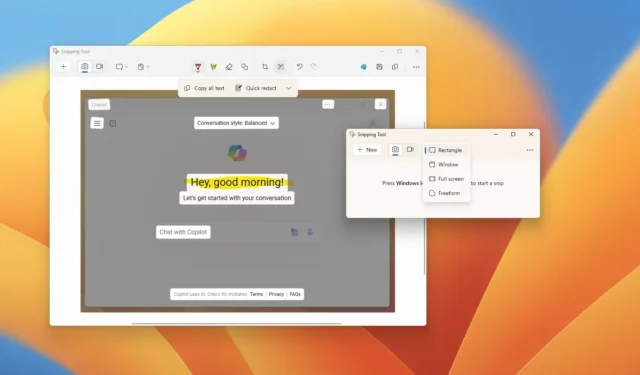
Capture rectangle screenshot with Snipping Tool
To take a screenshot of a selected area on Windows 11, use these steps:
-
Open Start on Windows 11.
-
Search for Snipping Tool and click the top result to open the app.
-
Click the Snip button (if applicable).
-
Choose the “Rectangle” option from the “Snipping Mode” setting.

-
(Optional) Select the delay time (3, 5, or 10 seconds) to take the screenshot.

-
Click the New button.

-
Select the area to capture with the mouse cursor around.

Capture window screenshot with Snipping Tool
To take a screenshot of an active window, use these steps:
-
Open Start.
-
Search for Snipping Tool and click the top result to open the app.
-
Click the Snip button (if applicable).
-
Choose the “Window” option from the “Snipping Mode” setting.

-
(Optional) Select the delay time (3, 5, or 10 seconds) to take the screenshot.

-
Click the New button.

-
Select the active window or app to capture.

Capture full screen screenshot with Snipping Tool
To take a full-screen screenshot on Windows 11, use these steps:
-
Open Start.
-
Search for Snipping Tool and click the top result to open the app.
-
Click the Snip button (if applicable).
-
Choose the “Full screen” option from the “Snipping Mode” setting.

-
(Optional) Select the delay time (3, 5, or 10 seconds) to take the screenshot.

-
Click the New button to take a full-screen capture.

Capture freeform screenshot with Snipping Tool
To take a screenshot using the freeform option with Snipping Tool, use these steps:
-
Open Start.
-
Search for Snipping Tool and click the top result to open the app.
-
Click the Snip button (if applicable).
-
Choose the “Freeform” option from the “Snipping Mode” setting.

-
Click the New button to take a full-screen capture.

-
Draw a free-form shape around an object.

Once you complete the steps, the screenshot will load in the Snipping Tool editor, where you can edit the capture with various tools (see steps below).
Edit screenshots on Windows 11 using Snipping Tool
The Snipping Tool editor allows you to edit the capture with shapes, emojis, pen, and highlighter. You can also use AI tools to extract and redact text from screenshots (see steps below).
Add shapes to screenshot with Snipping Tool
To add shapes to a screenshot on Windows 11, use these steps:
-
Open Start.
-
Search for Snipping Tool and click the top result to open the app.
-
Choose the capture option from the “Snipping Mode” setting.
-
Click the New button.
-
Screenshot the entire or part of the screen.
-
Click the Shapes tool in the Snipping Tool toolbar.
-
Choose the shape, including rectangle, circle, line, or arrow.

- Choose the outline size, color, and opacity.
-
Draw the shape on the screenshot.

-
(Optional) Click on the Emoji shape and choose the emoji to insert on the screenshot.

-
Click the Save button from the top-right to save the capture as “.png” or “.jpg” file on your computer.
Crop screenshot with Snipping Tool
To crop a screenshot with the Snipping Tool, use these steps:
-
Open Start.
-
Search for Snipping Tool and click the top result to open the app.
-
Choose the capture option from the “Snipping Mode” setting.
-
Click the New button.
-
Screenshot the entire or part of the screen.
-
Click the Crop tool in the Snipping Tool toolbar.

-
Use the elements on the edges to crop the image.
-
Click the Apply button.

-
Click the Save button from the top-right to save the capture as “.png” or “.jpg” file on your computer.
Annotate screenshot with Snipping Tool
To annotate a screen capture on Windows 11, use these steps:
-
Open Start.
-
Search for Snipping Tool and click the top result to open the app.
-
Choose the capture option from the “Snipping Mode” setting.
-
Click the New button.
-
Screenshot the entire or part of the screen.
-
(Option 1) Use the Highlighter to highlight text or an element on the image.

-
(Option 2) Use the Pen to annotate the image.

-
(Option 3) Click the Text actions button in the toolbar.

-
Click the Copy all text to copy the text from the image.
-
Click the Quick redact option to redact sensitive information like phone numbers and emails from the image.
-
Click the Save button from the top-right to save the capture as “.png” or “.jpg” file on your computer.
Once you complete the steps, the shapes and other annotations will be saved into the screenshot.


Deixe um comentário