How to Solve Camera Error 0xA00F4291 on Windows
Did you encounter a camera error 0xA00F4291 while opening your Webcam on a Windows 11/10 PC? Since you are here, you must have been there and that’s the reason why you are looking for answers. Well, in this post, we will try to figure out the reasons causing this problem and five workarounds that might help you to overcome this error code.
|
Several users reported getting the same error code when they were using Zoom, Skype, Meet, etc. Upon encountering this error code, you may receive this error message as well – |
What causes this Camera error in the first place?
This error code might appear when your device meets one or a combination of the following issues –
- Windows firewall is blocking the Camera app.
- The Cameras or Display Adapters have been corrupted somehow.
- The required permissions are not allowed for that application.
- Incorrectly configured registry editor.
- Windows Camera, itself has corrupted somehow.
What Should You first check when encountering an error 0xA00F4291?
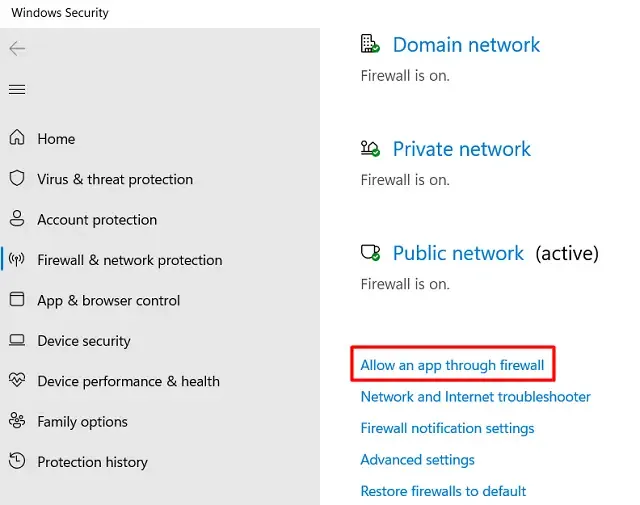
If you are facing trouble opening your Camera app, there’s a possibility that the Windows Defender or Firewall is blocking the access. Here’s how to check and allow access to the Camera inside Windows Firewall.
- Go to Windows Search (Win + S), and type Windows Firewall.
- Click on the first result i.e. “Firewall and Network Protection“.
- On the right pane, come down to the link – “Allow an app through Firewall“.
- The system will default redirect you to the below path –
Control Panel\System and Security\Windows Defender Firewall\Allowed apps
- Click Change Settings to view all allowed apps and features.
- Scroll down to Windows Camera, and check both its boxes under Public as well as Private.
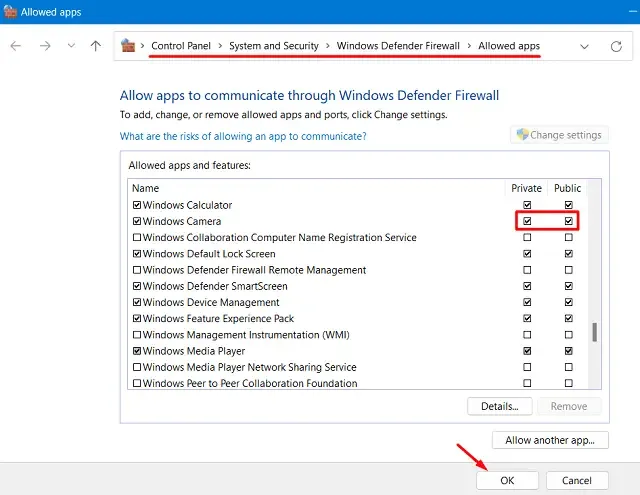
- Click OK to confirm the recent changes, and restart your PC.
Now that you have ensured both Private and Public checkboxes are marked next to Windows Camera, restart your PC. If you are using third-party antivirus, launch the same and head over to its Firewall settings. Now, check and allow the Camera access for all apps running on your computer.
Ways to Fix Camera Error 0xA00F4291
To solve this Camera opening error on a Windows 11/10 PC, consider applying the below fixes and check if the issue resolves. The solutions involve doing the following changes to the computer –
- Update Camera Drivers
- Check Camera Permissions
- Repair or Reset the Camera App
- Try Windows Camera Troubleshooter
- Modify the EnableFrameServerMode entry inside the registry
1. Update Camera Drivers
One should time and again update all his device drivers on a Windows 11/10 PC. If you fail to do so regularly, the existing drivers might become corrupt over a while. As a result of this, the error 0xA00F4291 might occur.
Go and check if some new versions are available for the Webcam driver, Sound, Video, and Game Controllers. Here’s how to find and update these device drivers –
- Press Win + X, and select Device Manager.
- Alternatively, one may also open it by running ”
devmgmt.msc” in the Run dialog (Win + R). - On the Device Manager, click “>” available left of Cameras, and right-click on the driver inside.
- Select Update driver, and opt for “Search automatically for drivers“.
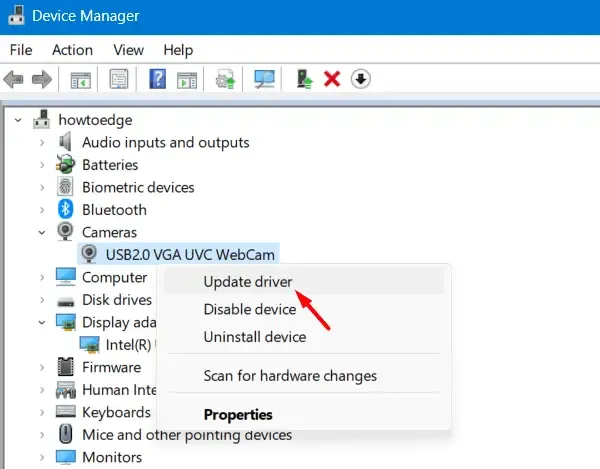
- The system will check for the available updates for the searched item, and report the same.
- In case it doesn’t find any pending updates, click – “Search for updated drivers on Windows Update“.
Repeat the above steps for the drivers available under “Sound, video, and game controllers” . Restart your PC and check if the Webcam starts functioning normally.
Uninstall the Camera & Display adapters
If all your device drivers are updated, you may fix this Camera error 0xA00F4291 by simply uninstalling and then reinstalling the Camera and display adapters. For this, you need to follow these steps –
- Launch Device Manager and go to Cameras.
- Right-click on your webcam driver, and select Uninstall device.
- Check the box – “Attempt to remove the driver for this device” , and hit Uninstall.
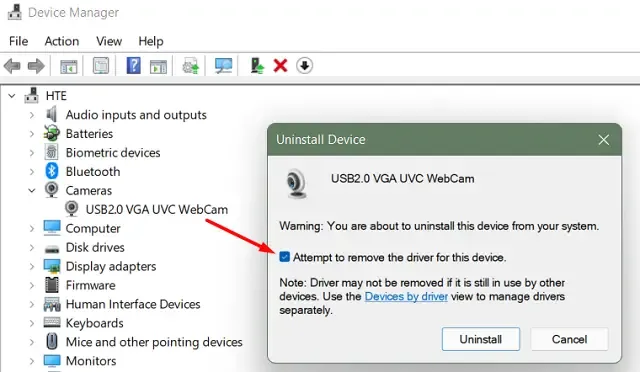
- The driver will uninstall next and thus remove the Cameras section as well.
- Repeat the above steps to remove the driver available inside the “Display Adapters” as well.
Now, that you have successfully removed both Camera and Display Adapters, you need to reinstall both these drivers. Reboot your device and all your removed drivers will come on their own.
Alternatively, you may also click “Scan for hardware changes“, and this will bring back the uninstalled drivers on your Windows PC.
2. Check Camera Permissions
Many a time, not allowing the required permissions to the Camera app might also cause an error code 0xA00F4291 on Windows 11/10. Follow the below steps to allow the essential permissions to the system or third-party Camera apps.
Windows 11:
- Press Win + I to launch Settings.
- Select Privacy & Security from the left navigation.
- Head over to the right pane, and scroll down to Camera under App permissions.
- Click on Camera and when this expands, turn On the toggle switch next to “Camera access“.
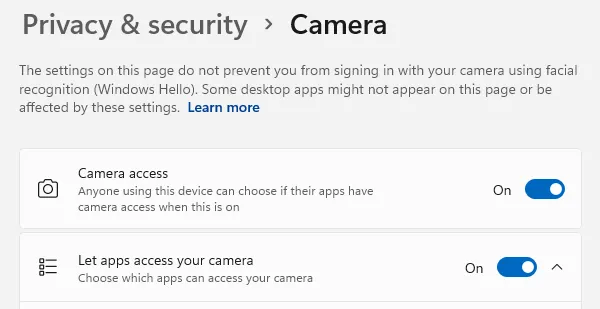
- Under “Let apps access your camera” , locate the application on which you are getting an error code 0xA00F4291.
- Once found, check its current status. If the Camera access is denied to this application, turn On its toggle switch.
That’s it, restart your Windows 11 PC and check if the problem resolves this way.
Windows 10:
- Right-click on the Windows icon and select Settings.
- Go to Privacy > Camera, and head over to the right pane.
- Turn On all the toggle switches available for the Camera.
- Check Allows apps to access your camera, find the faulty app, and re-enable its toggle switch.
Restart your Windows 10 PC, and check if the Camera error fixes moving forward.
If you are still getting the Camera Error 0xA00F4291 while opening your Webcam, you should try repairing or resetting its core application. Doing so will delete all the records available inside the AppData folder.
3. Repair or Reset the Camera App
Each application on Windows has some data stored inside the AppData folder. The Camera Error 0xA00F4291 could be the result of this interaction. So, we suggest repairing or resetting the Camera app first and checking if the error resolves this way. Here’s how to either repair or reset its core application on Windows 11/10 –
Windows 11:
- Press Win + X, and select Installed Apps.
- Type Camera in the Search Apps field. See the Snapshot below –
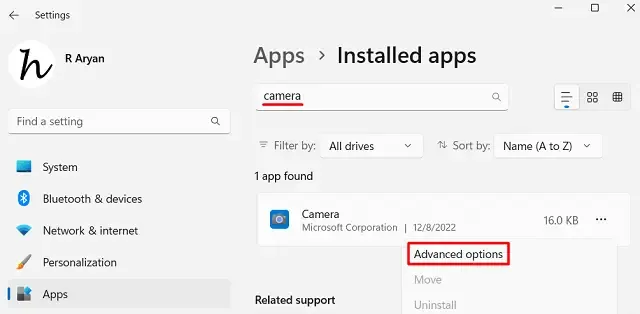
- When you see the Camera app appearing on the display screen, click the three dots available next to it.
- Select Advanced options from this pop-up menu.
- On the next screen, scroll down to the Reset section, and hit the Repair button first.
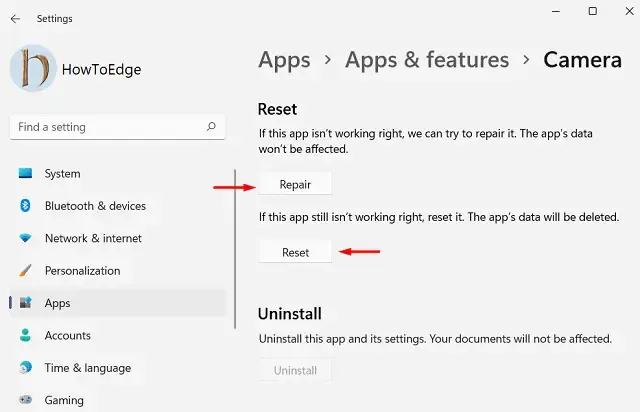
- Wait for a few seconds, while the system is repairing your Camera app. This process, in no way, will delete the data associated with your account.
- In case the problem persists even after repairing the Camera app, you should reset it next.
- To do so, go to Settings > Installed Apps > Camera > Reset, and hit the Reset button. The system will ask for your permission. Well, hit the Reset button again.
Restart your PC and when it reloads, check if you can launch your Camera without getting into some error code. I hope this fix alone resolves the error code 0xA00F4291 on your Windows PC. If not, follow the next set of solutions.
Windows 10:
The process to repair or reset the Camera app on Windows 10 is similar to that of Windows 11 with a few changes here and there. On Windows 10, you need to visit the below path and do exactly what is mentioned in the above section.
Settings (Win + I) > Apps and Features > Camera > Advanced options
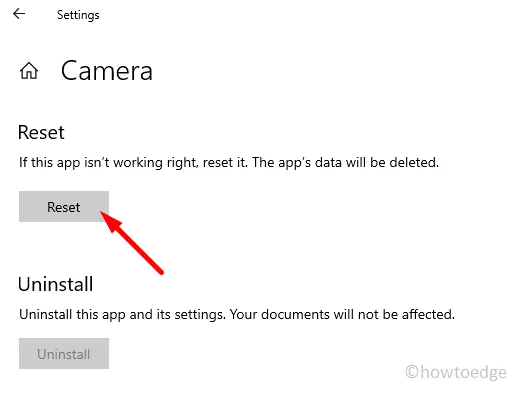
Scroll down to the Reset section, and hit the Repair/Reset button. Resetting the Camera app will remove all the stored information on your device. So, try the Repair button first. Only when it fails to resolve the error code 0xA00F4291, go for resetting the Webcam.
4. Try Windows Camera Troubleshooter
There’s an in-built tool on Windows that you may use to troubleshoot Camera-related issues. This goes by the name Camera Troubleshooter. Follow the below instructions on how to find this tool and troubleshoot the Camera on your Windows 11/10 PC.
Windows 11:
- Press Win + I to launch Settings.
- Go to System > Troubleshoot > Other troubleshooters next.
- On the subsequent screen, scroll down to Camera, and click the Run button available just next to it.
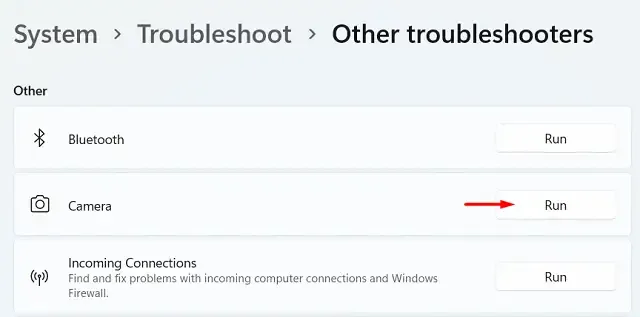
- Wait for this tool to automatically detect and repair the underlying causes on your Webcam.
- You will see a message stating whether the troubleshooter has sorted out the issue on your computer or not.
Windows 10:
The process here on Windows 10 is again similar to that of Windows 11. The only difference lies in the path from where you can access the troubleshooter. For Windows 10, the path is as follows –
Settings > Update & Security > Troubleshoot > Additional troubleshooters
Scroll down to the Other section, and click to expand Camera. When this section expands, hit the button – “Run the troubleshooter“.
How do I troubleshoot hardware and devices on Windows 11/10?
If you are encountering an error 0xA00F4291 while opening your external webcam, you should troubleshoot hardware and devices on your Windows 11/10 PC. For this, you must launch CMD as administrator first, and execute the below command on it –
msdt.exe -id DeviceDiagnostic
- When the concerned troubleshooting window appears, hit Next and follow the on-screen instructions.
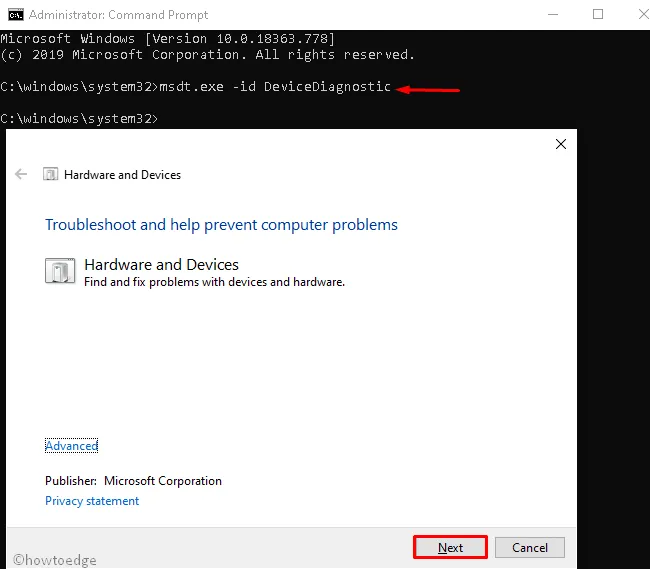
- By the time the troubleshooter completes scanning/repairing hardware and device issues, do nothing on your computer.
After this is over, you may try again running the troubleshooter on your respective Windows version.
5. Tweak the registry
The registry controls all system processes and services including the camera functions. One should cautiously modify any entry inside the registry. If you remember any recent changes made to the registry, go and check the Camera entry. There’s a possibility that the Camera’s EnableFrameServerMode entry must have been corrupted somehow.
If that’s the case, you need to reconfigure the incorrect Camera entries inside the registry. Before you proceed ahead, make sure to create a full backup of the registry editor. After the registry backup is created, do the following –
- Right-click on the Windows icon, and select Run.
- Type “Regedit” and hit OK to launch the Registry Editor.
- Click Yes on the UAC window to authorize opening the registry.
- When the registry editor opens, navigate to the below path –
HKEY_LOCAL_MACHINE\SOFTWARE\Microsoft\Windows Media Foundation\Platform
- Head over to the right pane and locate the entry – “EnableFrameServerMode” .
- Double-click on this entry, and change its Value data to “0” .
- Click OK to confirm the recent changes, come out of the registry window, and restart your PC.
Sign back into your device again and check if the error code 0xa00f4291 resolves this way.
Does Running SFC solve Camera Error 0xa00f4291?
If this camera error is due to the presence of corrupt system files and folders, one should definitely try running the System File Checker Utility Program. This tool checks for missing as well as damaged files and repairs them on your computer. Here’s how to perform this task –
- Press Win + R to launch the Run dialog.
- Type “CMD” on it and hit ctrl + shift + enter keys altogether.
- Doing so will launch the Command prompt as an administrator.
- Copy/paste the following on it and press Enter –
sfc /scannow
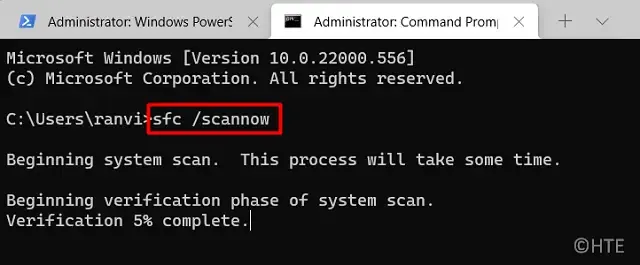
- Wait for this command to reach 100%.
After the scanning/repairing process completes, close CMD, and restart your Windows PC. Sign back into your device again and check if the camera error 0xa00f4291 resolves on your computer.


Deixe um comentário