Configure Microsoft Defender Application Guard settings using GPEDIT and REGEDIT
If you want to configure Microsoft Defender Application Guard settings on Windows 11/10, here is how. With the help of the Registry Editor or the Local Group Policy Editor, you can enable, disable, and modify settings and use this security feature according to your requirements.

Configure Microsoft Defender Application Guard settings using GPEDIT
To manage Microsoft Defender Application Guard settings using Group Policy Editor, follow these steps:
- Press Win+R > type gpedit.msc, and hit the Enter button.
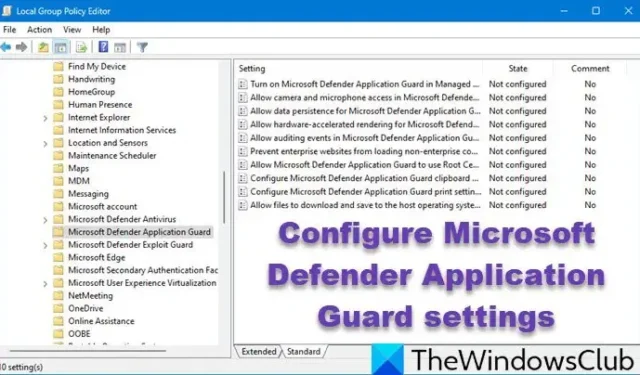
- Navigate to this path: Computer Configuration > Administrative Templates > Windows Components > Microsoft Defender Application Guard.
- Double-click on a particular setting.
- Choose the Enabled/Disabled option.
- Enter values if required.
- Click the OK button.
- Sign out and re-sign into your user account.
To get started, you need to open the Local Group Policy Editor. To do that, press Win+R to open the Run prompt, type gpedit.msc and hit the Enter button.
Then, navigate to this path:
Computer Configuration > Administrative Templates > Windows Components > Microsoft Defender Application Guard
Here you can find these settings:
1] Allow auditing events in Microsoft Defender Application Guard: This setting helps Microsoft Defender Application Guard collect data from events and system logs of your device.
2] Allow camera and microphone access in Microsoft Defender Application Guard: If you enable this setting, your device’s camera and microphone will be used by apps inside Microsoft Defender Application Guard.
3] Allow data persistence for Microsoft Defender Application Guard: Enabling this setting is necessary if you want to keep your data from previous sessions.
4] Allow files to download and save to the host operating system from Microsoft Defender Application Guard: By default, Microsoft Defender Application Guard saves or downloads files in a virtual or isolated environment. However, if you want to save files to the host operating system, turn this setting ON.
5] Allow hardware-accelerated rendering for Microsoft Defender Application Guard: Want to render graphics using hardware? This setting needs to be turned ON.
6] Allow Microsoft Defender Application Guard to use Root Certificate Authorities from the user’s device: At times, you might need to share the root certificate from your device with the Microsoft Defender Application Guard. If so, you need to enable this setting.
7] Configure Microsoft Defender Application Guard clipboard settings: This option allows you to synchronize clipboards between the host computer and the Microsoft Defender Application Guard environment. You can enable, disable, or modify the clipboard synchronization settings.
8] Configure Microsoft Defender Application Guard print settings: It is the same as clipboard settings. However, there are other options. You can enable or disable printing, specific file printing, network printing, etc.
9] Prevent enterprise websites from loading non-enterprise content in Microsoft Edge and Internet Explorer: If you want to allow non-enterprise content in the Microsoft Defender Application Guard environment, you need to disable this setting.
10] Turn on Microsoft Defender Application Guard in Managed Mode: It helps you enable or disable Microsoft Defender Application Guard.
Let’s say you want to configure the print settings. For that, you need to double-click on the Configure Microsoft Defender Application Guard print settings and choose the Enabled option.

Then, you need to enter a value. As there are many options, you need to decide on the kind of printing you want to allow. Then, enter the value per the requirements and click OK.
Manage Microsoft Defender Application Guard settings using REGEDIT
To configure Microsoft Defender Application Guard settings using Registry Editor, follow these steps:
- Open Registry Editor on your computer.
- Navigate to Microsoft in HKLM.
- Right-click on Microsoft > New > Key.
- Name it as AppHVSI.
- Right-click on AppHVSI > New > DWORD (32-bit) Value.
- Name it as AllowAppHVSI_ProviderSet.
- Double-click on it and set the Value data as 0/1/2/3.
- Click the OK button.
- Create another REG_DWORD value named AllowAPPHVSI and set the Value data as 0.
- Repeat the same steps to create REG_DWORD values for other settings as mentioned below.
- Close all windows and restart your computer.
To learn more about these steps, continue reading.
First, you need to open the Registry Editor on your computer. Then, navigate to this path:
HKEY_LOCAL_MACHINE\SOFTWARE\Policies\Microsoft
Right-click on Microsoft > New > Key and name it AppHVSI.

Next, right-click on AppHVSI > New > DWORD (32-bit) Value and name it as AllowAppHVSI_ProviderSet.

Double-click on it to set the Value data as follows:
- Disable Microsoft Defender Application Guard: 0
- Enable Microsoft Defender Application Guard for Microsoft Edge ONLY: 1
- Enable Microsoft Defender Application Guard for isolated Windows environments ONLY: 2
- Enable Microsoft Defender Application Guard for Microsoft Edge AND isolated Windows environments: 3

Then, click the OK button.
Next, you need to create another REG_DWORD value, name it as AllowAPPHVSI, and keep the Value data as 0.
These two REG_DWORD values must be kept while configuring other Microsoft Defender Application Guard settings.
1] Allow auditing events in Microsoft Defender Application Guard:
- REG_DWORD Value name: AuditApplicationGuard
- Value data: 1 to Enable and 0 to Disable.
2] Allow camera and microphone access in Microsoft Defender Application Guard:
- REG_DWORD Value name: AllowCameraMicrophoneRedirection
- Value data: 1 to Enable and 0 to Disable.
3] Allow data persistence for Microsoft Defender Application Guard:
- REG_DWORD Value name: AllowPersistence
- Value data: 1 to Enable and 0 to Disable.
4] Allow files to download and save to the host operating system from Microsoft Defender Application Guard:
- REG_DWORD Value name: SaveFilesToHost
- Value data: 1 to Enable and 0 to Disable.
5] Allow hardware-accelerated rendering for Microsoft Defender Application Guard:
- REG_DWORD Value name: AllowVirtualGPU
- Value data: 1 to Enable and 0 to Disable.
6] Allow Microsoft Defender Application Guard to use Root Certificate Authorities from the user’s device:
- String Value name: CertificateThumbprints
- Value data: As per the root certificate.
7] Configure Microsoft Defender Application Guard clipboard settings:
- REG_DWORD Value name: AppHVSIClipboardSettings
- Block clipboard operations: 0
- Enable clipboard operation from an isolated session to the host: 1
- Enable clipboard operation from a host to the isolated session: 2
- Enable clipboard operation in both directions: 2
- REG_DWORD Value name: AppHVSIClipboardFileType
- Allows text copying: 1
- Allow image copying: 2
- Allow both text and image copying: 3
8] Configure Microsoft Defender Application Guard print settings:
- REG_DWORD Value name: AppHVSIPrintingSettings
- Value data:
- Disables all print functionality: 0
- Enables only XPS printing: 1
- Enables only PDF printing: 2
- Enables both PDF and XPS printing: 3
- Enables only local printing: 4
- Enables both local and XPS printing: 5
- Enables both local and PDF printing: 6
- Enables local, PDF, and XPS printing: 7
- Enables only network printing: 8
- Enables both network and XPS printing: 9
- Enables both network and PDF printing: 10
- Enables network, PDF, and XPS printing: 11
- Enables both network and local printing: 12
- Enables network, local, and XPS printing: 13
- Enables network, local, and PDF printing: 14
- Enables all printing: 15
9] Prevent enterprise websites from loading non-enterprise content in Microsoft Edge and Internet Explorer:
- REG_DWORD Value name: BlockNonEnterpriseContent
- Value data: 1 to Enable and 0 to Disable.
After setting up all the REG_DWORD values and Value data, you must restart your computer to apply the changes.
That’s all! I hope this guide helped you.
How to turn on Microsoft Defender Application Guard Managed Mode using GPO?
To turn on Microsoft Defender Application Guard Managed Mode using GPO, open the Local Group Policy Editor and go to this path: Computer Configuration > Administrative Templates > Windows Components > Microsoft Defender Application Guard. Double-click on the Turn on Microsoft Defender Application Guard in Managed Mode setting and choose the Enabled option. Enter the value as per the requirements and click the OK button.
How do I enable Windows Defender in GPEDIT?
To enable Windows Defender or Microsoft Defender using GPEDIT, open the Local Group Policy Editor and go to this path: Computer Configuration > Administrative Templates > Windows Components > Microsoft Defender Antivirus. Double-click on the Turn off Microsoft Defender Antivirus setting and choose the Not Configured or Disabled option. Click the OK button.


Deixe um comentário