How do I uninstall or remove Printer driver on Windows 11
Four different ways that will let you uninstall or remove the Printer driver on Windows 11 – Settings, CMD, PowerShell, and Print Management.
With the latest developments in technology, gadget capabilities, and the entrance of Cloud-based data, you can now print documents with ease from anywhere. For example – you may now even connect your smartphone to any PC and get the printing job done successfully.
Many users have a habit of adding new printers to their computers and then forget about it. With more and more printing devices attached to your PC, you will notice an increase in the overall system resource consumption.
As a result, your computer will start running slowly or performing very poorly. To avoid your device becoming inefficient then, you must remove all of the recently added Printers on the computer.
Ways to Remove a Printer Driver on Windows 11
To remove a printer and driver from your computer is a two-step process.
1. Through Settings
This is the easiest of all four methods that I am going to explain below. Here’s a complete guideline on how to remove a printer driver via Local Settings –
- Press WinKey + I to launch the Settings app.
- Select Bluetooth & Devices and jump to the right side.
- Locate and click upon the section – Printers & Scanners.
- A list of added printers will appear on the subsequent page.
- Click over the Printer that you no longer require on Windows 11, and hit the Remove button.
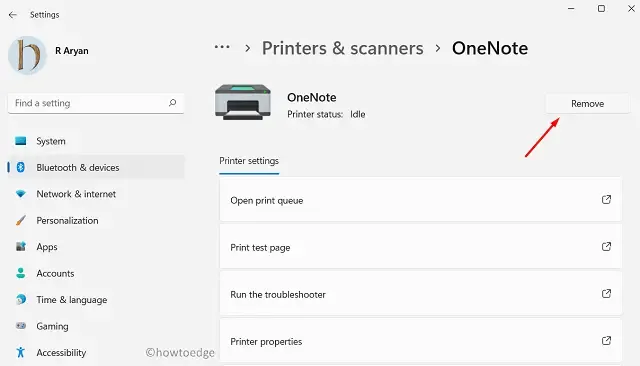
- In case any prompt appears asking if you want to proceed with this setting, hit Yes.
- The printer driver will uninstall automatically.
Restart your PC next to make the changes effective from the next login.
2. Remove the Printer Driver via Print Management
Print Management is another useful tool that you can use to remove any printer driver on your computer. Here’s how this process goes –
- Launch the Search window by pressing Win + S.
- Type “Print Management” on the search bar, and double-click on the top result.
- Expand the Custom Filters and hit All Drivers.
- A list of printer drivers will appear on the center page.
- Right-click on the driver that you want to remove, and hit – Remove Driver Package.
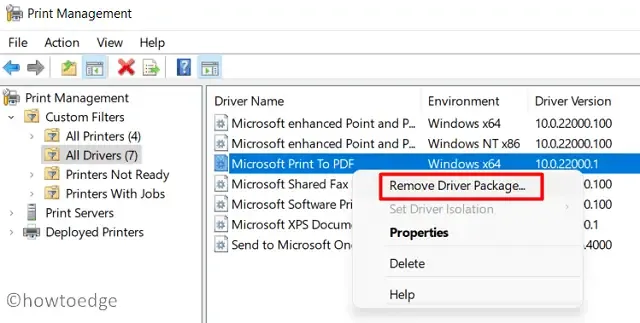
- A prompt may appear if you want to proceed with the driver deletion, hit Yes.
The chosen driver will uninstall immediately afterward. In case you want to remove any additional printer, re-follow the above steps, and delete that.
3. Uninstall a printer driver through Command Prompt
You may uninstall a printer driver by running a few codes on the Command Prompt as well. To know how it is done via CMD, use these steps –
- Launch Command Prompt as an administrator.
- When the user account control window appears, tap Yes.
- On the elevated console, type the following, and press Enter –
wmic printer get name
- After that, type the below command and hit the Enter key again –
printui.exe /dl /n "YOUR-PRINTER-NAME"
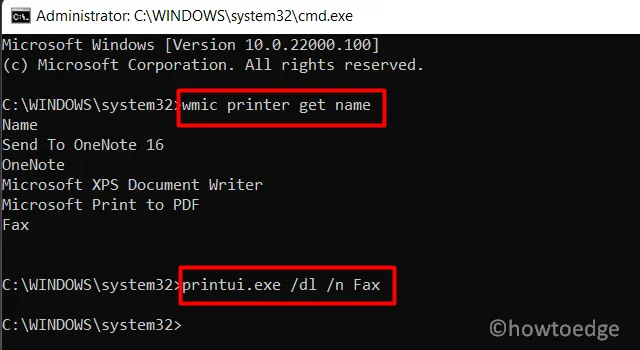
- The chosen printer will be removed soon afterward. Don’t forget to restart your PC after this.
4. Using PowerShell Commands
In case you prefer PowerShell instead of running codes on Command Prompt, do the following –
- Press Win + X, and choose – Windows PowerShell (Admin).
- Click on the Yes button if UAC prompts on the display screen.
- When the blue console opens up, type the below cmdlet followed by the Enter key.
Get-Printer | Format-List Name
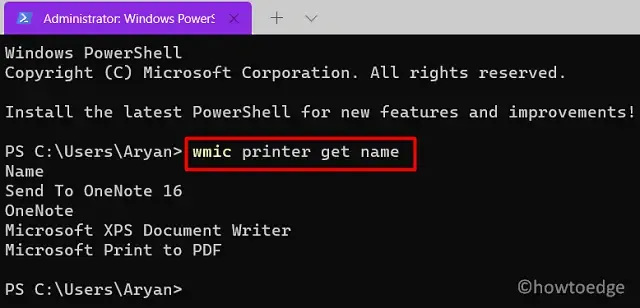
- Now, that you get to know all printing drivers on your device, run this code next –
Remove-Printer -Name "YOUR-PRINTER-NAME"
- Replace “Your-Printer-Name” with your actual print driver’s name, and hit Enter.
- Restart your device to delete any residual or leftover files.
That would be all!


Geef een reactie