Unable to Ping IP on Windows 11/10 [Fix]
![Unable to Ping IP on Windows 11/10 [Fix]](https://cdn.thewindowsclub.blog/wp-content/uploads/2023/04/unable-ping-windows-640x353.webp)
We generally use the ping command to ping an IP address to check if the IP is online or down. However, if you are unable to ping IP on Windows 11 or Windows 10 computer, this article will be handy for you. Here are some tips to help when you cannot ping an IP via Command Prompt on your Windows PC.
Unable to Ping IP on Windows 11/10
If you are unable to ping IP on Windows 11/10, follow these solutions:
- Allow ping through Windows Firewall
- Disable third-party firewall software temporarily
- Verify internet connection
- Disable VPN and proxy temporarily
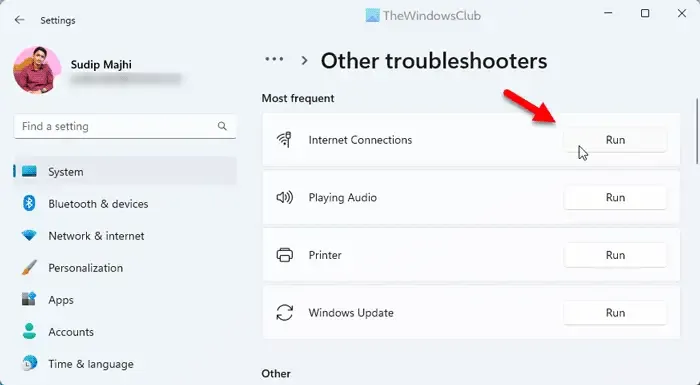
- Run Internet Connections Troubleshooter
- Check DNS settings
To learn more about these tips, continue reading.
1] Allow ping through Windows Firewall
If you have disabled ICMP Echo requests in Firewall, you cannot use the Ping command on your Windows 11/10 command. That is why it is the first thing you need to check when you cannot ping an IP address on your computer. Although many administrators often disable this feature for security concerns, you need to enable it on your home computer to ping IP addresses. Follow this guide to allow ping through Windows Firewall.
2] Disable third-party firewall software temporarily
The in-built firewall and a third-party firewall app could cause this problem on your computer. If you use third-party firewall software and have things incorrectly, all the incoming and outgoing traffic will be blocked automatically. In other words, you cannot ping any IP address. That is why it is recommended to temporarily disable the third-party firewall software and check if it resolves the issue.
3] Verify internet connection
To ping an IP, you must have a valid internet connection. If you do not have a valid internet source, you cannot find it in any way. That is why it is recommended to verify whether you have a working internet connection. If you have some issues with the internet connection, you can follow these tips to fix common network and internet connection issues on Windows.
4] Disable VPN and proxy temporarily
If you use a VPN or proxy and have some issues with those servers, you cannot use the ping command correctly. Those faulty servers will prevent you from using the ping command even if you have a valid internet connection. That is why it is recommended to disable VPN and proxy temporarily.
5] Run Internet Connections Troubleshooter

- Press Win+I to open the Windows Settings.
- Go to System > Troubleshoot > Other troubleshooters.
- Find the Internet Connections Troubleshooter.
- Click the Run button.
- Follow the screen instructions.
Finally, you might need to restart your computer before reusing the ping command.
6] Check DNS settings

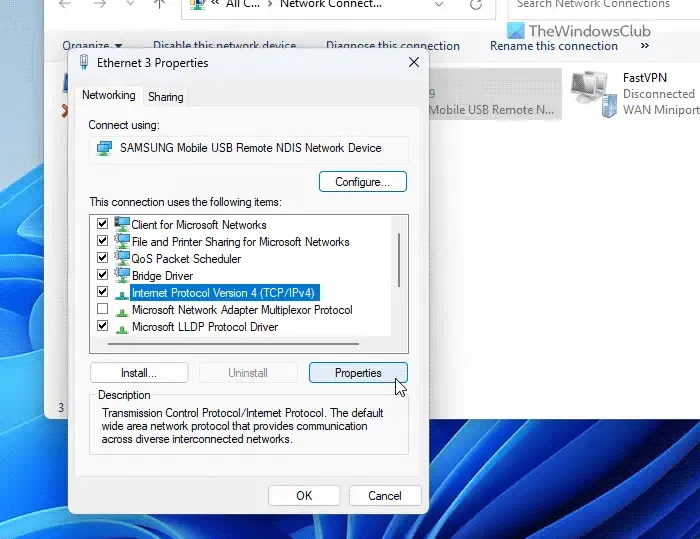
The ping command is somehow interlinked with the DNS you use on your computer. You might need to check your router’s settings if you use a WiFi connection. However, if you use Ethernet, you must head to the Network Connections wizard and verify your DNS settings. For that, do the following:
- Press Win+R to open the Run prompt.
- Type ncpa.cpl and hit the Enter button.
- Right-click on the active internet source and click on the Properties.
- Select the Internet Protocol Version 4 and click the Properties button.
- Ensure that you are using the correct DNS setting.
- Click the OK button.
- Recheck the ping status.
How do I fix ping on Windows 11?
There are several ways to fix ping issues on Windows 11 or Windows 10 computers. However, you should verify whether your internet connection is up and running or not first. Next, you can allow ping or via Windows Firewall, disable additional firewall apps temporarily, verify DNS settings, etc. You could also run the Internet Connections Troubleshooter to get rid of this problem.
How do I ping an IP address in Windows 11?
To ping an IP address in Windows 11, you need to open the Command Prompt or Run prompt first. Then, enter a command in this format: ping xx.xx.xx.xx -t where xx.xx.xx.xx needs to be replaced with an original IP address. Finally, press the Enter button to execute the ping command.
Leave a Reply