Photoshop is taking forever to save [Fix]
Photoshop has lots of tools and features that will make graphic editing and creating very easy for professionals and novices alike. Some users have reported that when trying to save a file, Photoshop is taking forever to save!
Photoshop is saving slowly
Photoshop does not take forever to save every file that you try to save. You will notice that some files will save faster than others. You may realize that files with more layers and higher resolution takes more time to save. You may notice that you have to wait a long time for the file to save. This can be a problem if you have to save often and you have limited time for a project.
Photoshop is taking forever to save
Keep reading to find out why Photoshop will save slowly and what you can do to fix or prevent it.
- Large file size
- Complicated design
- Many layers
- File compression turned on
- Saving to a network or external drive
1] Large file size
Photoshop files can be very large especially when they have a high resolution. These files will take up a lot of space in RAM as you work on them. If you remember, as you work on a file, Photoshop will hold these files in RAM so that you can make updates as you work. As you work, Photoshop has a temporary file that has the most recent updates. This means that you will have the current file and its temporary file. This will take up a lot of space on your hard drive and your computer’s RAM. This can cause Photoshop to slow down and this can also cause Photoshop to take forever to save.
Solution:
If your computer is slow due to low RAM or a slow hard drive, you can upgrade these if possible. You should also decrease the number of History states and increase the Cache. This History states that is what allows you to undo mistakes. The more History states that you have to more undos you can do. However, the more History states, the more RAM you will use up.
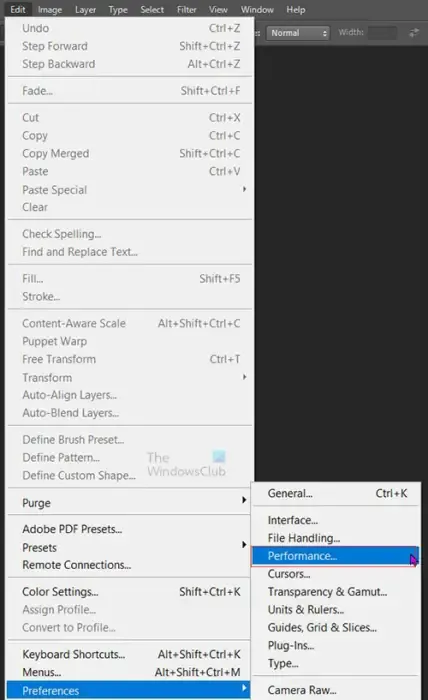
To decrease the History state go to the top menu bar and press Edit then Preferences then Performance.
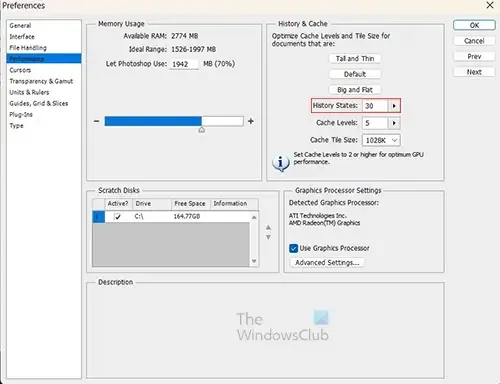
The preferences window will appear, look for the History state and lower the value. You can choose a History state number that you are comfortable with. You then press Ok to keep the changes and close the Preferences options window.
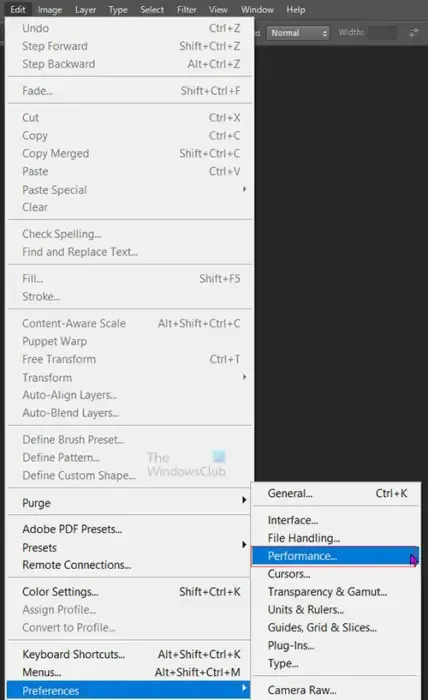
To increase the cache go to the top menu bar and press Edit then Preferences then Performance.
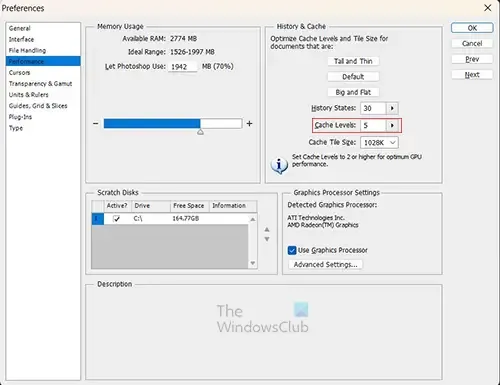
The preferences window will appear, look for the Cache level, and increase the cache level. The recommendation is a minimum of 2 and the highest it will go is 8. When you have changed the Cache level, press Ok to keep the changes and close the Preferences options window.
2] Complicated design
Photoshop files with complicated designs can take up a lot of RAM to process. When you go to save your file, you will notice that it is slow to save. Complicated designs are also slow to save in cases where you do not have a dedicated graphics card. this means that the computer’s RAM will have to be shared to take up the job of the graphic card. This means that the complicated designs will require more processing power, which will put more pressure on the RAM, this will then make Photoshop take forever to save the file.
Solution:
If possible, get a computer with a dedicated graphics card. If this is not possible, you can try to upgrade your computer’s RAM. This will make saving much faster.
3] Many layers
Photoshop uses layers to make up your artwork. Layers are like transparent sheets that you place your elements on. If your document has a lot of layers, this could make Photoshop save slowly.
Solution:
A way to make the file smaller and save faster is to merge the layers. When layers are merged, they can no longer be individually edited. You can merge some of the layers in the layers panel and leave others unmerged. To merge the layers, click one of the layers you want to merge then hold Ctrl and click the others. When the layers are selected, go to the top menu bar and click Layer then Merge layers or press Ctrl + E.
4] File compression turned on
When you are working on your artwork in Photoshop, you will notice that Photoshop will save some files slowly. You may have a fast hard drive and more than enough RAM but it is still taking forever to save. You may think of updating your hardware to make saving faster. However, you may not have to make expensive updates, just tweak Photoshop.
Turn off file compression
File compression is what Photoshop uses to make sure that your Photoshop files don’t fill up your hard drive too fast. As you work and save your work, Photoshop will compress the file while it saves. While this is good, it slows down the save process. You can disable the compression so that the file saves faster. This will make the file much larger on your hard drive. You can choose to compress the file after you have finished making all your changes.
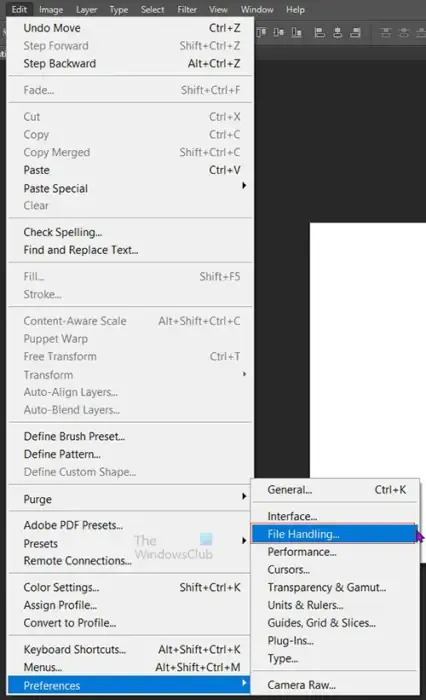
To disable the compression, go to the top menu bar then press Edit then Preferences then File handling.
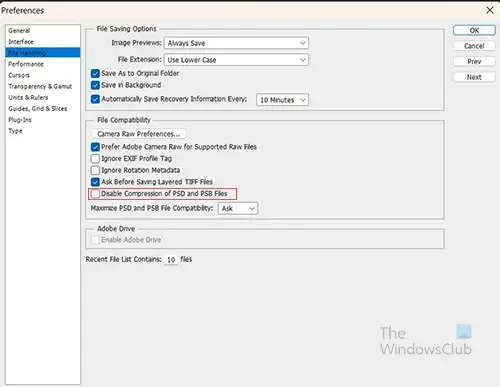
The preferences options window will open and here you will see the heading File compatibility. Under the heading, File compatibility select the option Disable compression of PSD and PSB files. You will then notice that your files save faster when you are working and when you save your editable PSD files in Photoshop. You will also notice that the files are larger and take up more space on your hard drive.
When you have completed all edits to the file, you can then enable file compression by following the same steps that you used to disable it. You just need to unselect Disable compression of PSD and PSB files. When you have enabled file compression, you then save the file. The file will then be compressed and made smaller.
5] Saving to a network or external drive
When Photoshop has to connect to a file that is saved on a network drive or an external drive, it will be slower. When Photoshop has to work with and save the file onto a network or external drive it can take forever to save. Computers will save faster on their internal drives faster than they save on a network or external drive.
Solution:
Whenever you work in Photoshop, it is best to have the file you are working on, saved on the computer. You can take the file off the network drive or external drive and place it on the computer. You would then work on it in Photoshop. When you are finished working on the file, you then save it, and you can then place it on the network drive or external drive.
How do I make Photoshop save faster?
Photoshop will often save slower if your files are large, complicated, have many layers, compression is turned on, or if they are being saved to a network drive or external device. If a few or all of those are associated with your file then you will be saving even slower. You may think that increasing your computer’s hardware will help, but this may not help if you have those associated with your file.
To make Photoshop save files faster you should disable compression of PSD and PSB files until you are finished doing all editing then you can enable compression for the last file. You should also save directly to the computer instead of on a network drive or an external drive. You can also reduce the number of history states that are saved and increase the cache size.
How do I free up RAM and clear the clipboard in Photoshop?
When you work in Photoshop, the history states and the cache will hold files temporarily. This also happens when you copy and paste. These can affect the speed of Photoshop as they take up RAM space. To clear these and allow Photoshop and other programs to have more access to RAM and move faster, you will need to do a purge. To do a purge go to the top menu bar and press Edit then Purge then All. You can also follow those steps but instead of doing all, you can clear the Clipboard or the History.
Leave a Reply