Overwatch Voice Chat not working on Windows PC
Is Voice chat not working in Overwatch on your PC? Some Overwatch gamers have reported that their voice chat is not functioning in the game. A few affected users said that they can hear others in voice chat, but they can’t speak through their mics. For some users, the voice chat is not working completely. Some of them also get voice chat errors while chatting in the game. We will learn why these voice chat issues occur in Overwatch and how to fix them in this post.
Why isn’t my mic working on Overwatch PC?
Your microphone might not work in Overwatch on your Windows PC due to several reasons. One of the primary reasons is that your mic is damaged or is not connected correctly to your computer. Also, incorrect sound settings on your PC, including the default input audio device, can be another reason. Also, if your in-game voice chat settings in the Overwatch game are not configured correctly, you will face this problem.
If your voice chat feature is disabled in your Battle.net account settings or parental controls, it can also cause this issue. Besides that, outdated or faulty microphone drivers often cause the microphone to malfunction on your computer. If you have enabled Exclusive Mode for your microphone, the voice chat feature might not work in Overwatch. Another reason for the same can be the corrupted Battle.net app cache.
Now, if you can also not do voice chat in Overwatch on your computer, this post will interest you. Here, we will discuss multiple working fixes that should get voice chat work in Overwatch.
Overwatch Voice Chat not working on Windows PC
If voice chat is not working fine in Overwatch on your Windows PC, you can use the following solutions to fix the issue:
- Ensure that your headset is properly connected and working fine.
- Check if voice chat is enabled in your privacy settings or if you are using parental controls.
- Update or reinstall your microphone drivers.
- Adjust in-game audio settings in Overwatch.
- Make sure microphone access is enabled and the correct default input device is selected.
- Delete the Battle.net app cache.
- Disable Exclusive Mode for your headset.
1] Ensure that your headset is properly connected and working fine
First and foremost, you have to make sure that your headset is properly connected to your computer. You can unplug your microphone and then plug it back into your PC to check if the problem is fixed. Besides that, you can also try plugging your headset into a different USB port and see if it helps.
Additionally, ensure that your mic is functioning properly and is not physically damaged. You can check your headset in other apps or devices and see if it is working fine. If the problem continues in other programs, consider replacing your headset or using a different microphone.
If your device is working fine, you can use some other solution to resolve the problem.
2] Check if voice chat is enabled in your privacy settings or if you are using parental controls.
Another thing you need to ensure is that the voice chat function is enabled and configured correctly in your Battle.net account’s settings. First, open the Battle.net client and click on the Blizzard drop-down menu. Now, select the Settings option and go to the Voice Chat tab. Next, set the correct input device as well as set a higher volume. After doing so, check if you are able to use the voice chat function in Overwatch.
Besides that, if you have enabled Parental Control in Battle.net, make sure the voice chat feature is activated for the game.
3] Update or reinstall your microphone drivers

This problem is likely to occur when your audio driver is out-of-date or corrupted. So, if the scenario is applicable, make sure your audio drivers including microphone drivers are up-to-date. You can check for pending audio driver updates in Windows Settings. Open Settings by pressing Win+I, go to Windows Update and click on Advanced options > Optional updates. Now, tick the audio driver update and tap on the Download & install button to update audio drivers.
To update your microphone driver in Windows 11/10, use the below instructions:
- Firstly, open the Device Manager app from the Win+X shortcut menu.
- After that, locate the Audio input and outputs category and expand it.
- Now, right-click on your microphone device and click on the Update driver option from the appeared context menu.
- Next, follow the onscreen steps to complete the driver update process and let Windows update your microphone driver.
- Finally, restart your computer and try using the voice chat function in Overwatch to check if the problem is resolved.
You might also be dealing with a corrupted driver. Hence, in that case, you can uninstall the faulty driver and reinstall a clean copy of the latest version of your driver. For that, open Device Manager, right-click on your microphone under Audio input and outputs, and select the Uninstall device option. Once the driver is uninstalled, click on the Actions > Scan for hardware changes option to reinstall the missing microphone driver. See if this fixes the problem for you.
4] Adjust in-game audio settings in Overwatch
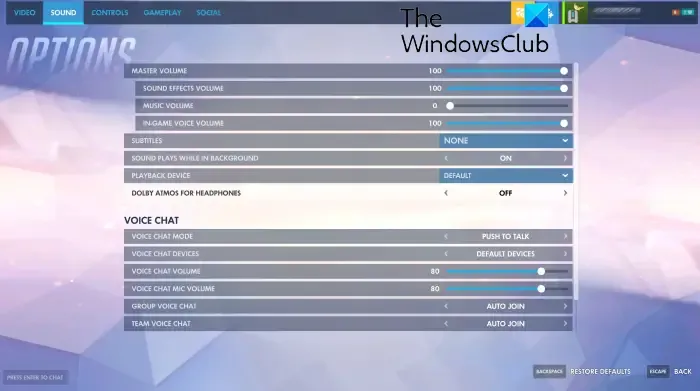
If you have tried the above solutions but the problem remains the same, it might be your in-game audio settings causing the issue. In case your in-game audio configurations are incorrect, the voice chat won’t work in Overwatch. Hence, if the scenario is applicable, change Overwatch’s in-game audio settings to fix the problem.
Here’s how:
- First, open the Overwatch game and click on the Options menu.
- Now, move to the Sound section and make sure all volumes are set to 100% or audible level.
- Next, under the VOICE CHAT section, set both the GROUP VOICE CHAT and TEAM VOICE CHAT options to AUTO JOIN and select the correct device for the VOICE CHAT DEVICES option.
- After that, set VOICE CHAT MODE to PUSH TO TALK and configure other voice chat settings correctly.
- Once done, check if voice chat is working properly in Overwatch.
In case your in-game voice chat settings are correct but still you face this issue, you can use the next fix.
5] Make sure microphone access is enabled and the correct default input device is selected

This problem might occur due to incorrect sound settings on your PC. It might be the case that you have previously disabled microphone access to all or certain apps and games on your system which is causing the problem. Hence, make sure microphone access is granted to the game. For that, open the Settings app and go to the Privacy & security tab. Now, under the App permissions section, click on the Microphone option. Next, make sure the toggle associated with Microphone access is enabled. Also, ensure that microphone access for Battle.net and Overwatch is turned On.
If an incorrect input audio device is set as default on your system. Sometimes, Windows is not automatically able to detect your recording device which it does ideally. So, if there are multiple input audio devices, you can manually set your primary microphone as default and then see if the problem is resolved. Additionally, if there are multiple devices listed that are not in use anymore, you can remove such audio devices and check if it helps.
Here are the steps to do that:
- First, ensure that the headset that you want to use is properly connected to your computer.
- Next, open the Settings app using Win+I and click on the System > Sound option.
- After that, scroll down and click on the More sound settings option under the Advanced section.
- In the Sound window, choose your active headset in the Playback tab and press the Set Default button.
- Then, move to the Recording tab and select your active microphone and press right-click on it.
- Now, select the Set as Default Device option from the appeared context menu.
- After that, right-click on an unused device and select the Disable option. Do this for all unused devices.
- Lastly, click on the Apply > OK button to save new settings.
6] Delete the Battle.net app cache
A corrupted app cache might cause issues in properly working certain features, including voice chat. So, if the scenario is applicable, you can follow the below steps to clear the Battle.net app cache on Windows 11/10:
7] Disable Exclusive Mode for your headset

For some affected users, disabling the Exclusive Mode feature for the headset helped them fix the problem. This Exclusive Mode enables some audio software to take exclusive control of the driver of your audio device so that other apps are unable to play any sound simultaneously. However, this feature can also prevent Blizzard games like Overwatch from accessing your microphone. Hence, if the scenario is applicable, you turn off the Exclusive Mode feature for your headset device and see if the issue is fixed.
Here’s how:
- First, launch the Settings app using Win+I and go to the System tab.
- Now, click on the Sound option and press the More sound settings option.
- Next, go to the Recording tab and right-click on your microphone.
- From the appeared context menu, select the Properties option.
- After that, move to the Advanced tab and untick the Allow applications to take exclusive control of this device checkbox.
- Lastly, press the Apply > OK button to save changes.
Hopefully, voice chat will work fine for you now in Overwatch now!
Why isn’t my audio working on OverWatch?
If audio or sound is not working in the Overwatch game or you can’t hear anything, ensure the sound settings are correctly configured and your PC is not on mute. In addition, the correct default input and audio devices are chosen. Apart from that, check your in-game audio settings and ensure that the volume and other configurations are correct. Also, update your audio drivers to their latest version to fix the issue.
Leave a Reply