NVIDIA automatic performance tuning not working or turning on
Is the automatic performance tuning feature in Nvidia Geforce Experience not working on your PC? Automatic tuning is a handy feature that enabled NVIDIA graphics users to adjust graphics settings for their games automatically. It analyzes your system performance using advanced algorithms and then optimizes your game settings accordingly.
You can easily enable the automatic tuning function in the Geforce Experience app. But, some users have complained that this feature is not turning on or working properly on their PC. However, a few of them reported that closing all the background apps helped them fix the issue. So, you can also try doing the same and see if the issue is resolved. If not, you can use the fixes we have mentioned in this post.
NVIDIA automatic performance tuning not working or turning on
If the automatic tuning feature in Nvidia Geforce Experience is not working or turning on, you can use the below methods to fix the issue:
- Reinstall your graphics drivers.
- Turn off Instant Replay.
- Troubleshoot in a clean boot state.
1] Reinstall your graphics drivers

The issue might be caused due to faulty or corrupted NVIDIA graphics drivers. So, if the scenario applies, you can uninstall the graphics drivers and then reinstall them on your PC. Here are the steps to do that:
First, press Win+X and then choose the Device Manager app from the shortcut list to open it.
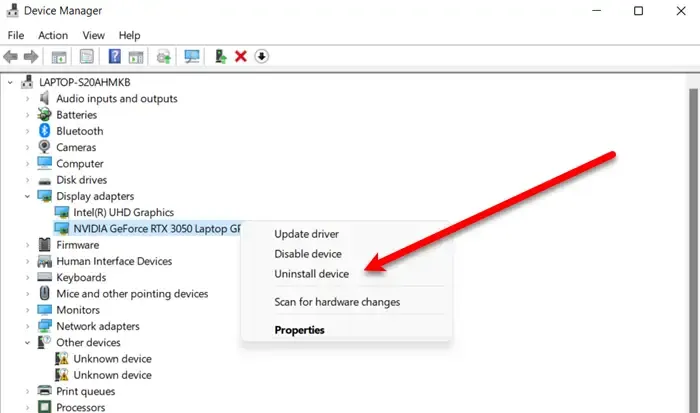
In Device Manager, locate the Display adapters category and expand it. Under this category, you will be able to see your NVIDIA graphics driver. Right-click on your GPU driver and choose the Uninstall device option from the context menu. After that, follow the prompted instructions to complete the uninstallation process.
Once done, go to the Action menu and press the Scan for hardware changes option. The missing graphics driver will be automatically reinstalled. Or, you can also simply restart your computer and Windows will reinstall the graphics drivers automatically.
When your graphics driver is reinstalled, check if you are able to turn on the automatic tuning feature in Nvidia Geforce Experience or if it is working fine or not.
2] Turn off Instant Replay

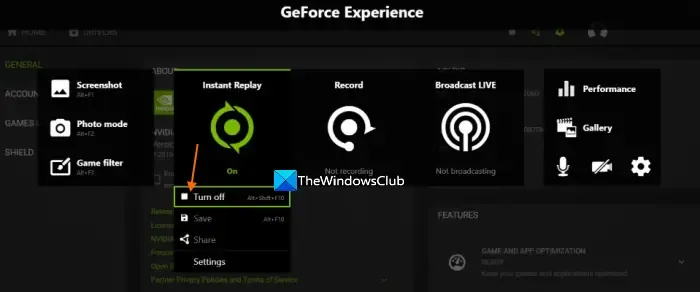
As per some user reports, switching off the Instant Replay function in Nvidia Geforce Experience helped them fix the issue. So, you can try doing the same and see if the issue is resolved. Here are the steps to switch off Instant Replay:
- First, open the Geforce Experience app.
- Now, press the Alt+ Z hotkey to adjust overlay settings.
- Next, click on the Instant Replay option and turn it off.
- After that, exit the overlay settings and check if the problem is resolved.
3] Troubleshoot in a clean boot state
The issue might be caused due to third-party software conflicts. Hence, if the scenario applies, you can reboot your computer in a clean boot state and see if the problem is resolved. Here’s how to do that:
If the problem is resolved in a clean boot state, you can try enabling third-party services one by one and determine which one was causing the issue. When you find out about the conflicting program, you can disable it or uninstall the program to fix the problem permanently.
Why doesn’t NVIDIA Performance Overlay work?
If the NVIDIA GeForce Experience overlay feature is not working on your PC, the problem is likely to be caused due to outdated or faulty drivers. Other than that, third-party software conflicts, issues with the Visual C++ Redistributable package, missing Media Feature Pack, lack of administrator rights, and your capture settings in Steam can be other reasons for the issue.
How do I enable high-performance NVIDIA GPU?
To enable high performance for NVIDIA GPU, you can open the NVIDIA Control Panel and then move to the 3D Settings > Manage 3D settings option from the left-side pane. Now, from the Global Settings tab, click on the Preferred graphics processor drop-down button and choose the High-performance NVIDIA processor option. Finally, press the Apply button to save changes.
Leave a Reply