Mouse not captured in Remote Desktop session
If you use an old version of Hyper-V and it displays an error message saying Mouse not captured in Remote Desktop session, here is how you can eliminate the issue. Even if you get this problem on a newer version of Hyper-V, you could still follow the same tips to troubleshoot the issue.
Mouse not captured in Remote Desktop session
If the Mouse is not captured in a Remote Desktop session, follow these solutions:
- Insert Integration Services Setup Disk
- Turn on Enhanced Session mode
- Enable Data Exchange in Hyper-V Manager
- Start Hyper-V Data Exchange Service
- Reinstall mouse driver
To know more about these solutions, keep reading.
1] Insert Integration Services Setup Disk
If you use an old version of Hyper-V, you need to insert the Integration Services Setup Disk. That said, this setup disk is nothing but the ISO of the setup file. In the earlier edition, users needed to choose it manually. For that, you need to keep the ISO first. If so, click on the Action menu and choose the Insert Integration Services Setup Disk option.
Then, choose the ISO file.
However, if you use a new edition of Hyper-V, there is no need to go through this step. As it mainly arises on older editions of Hyper-V, this solution works fluently.
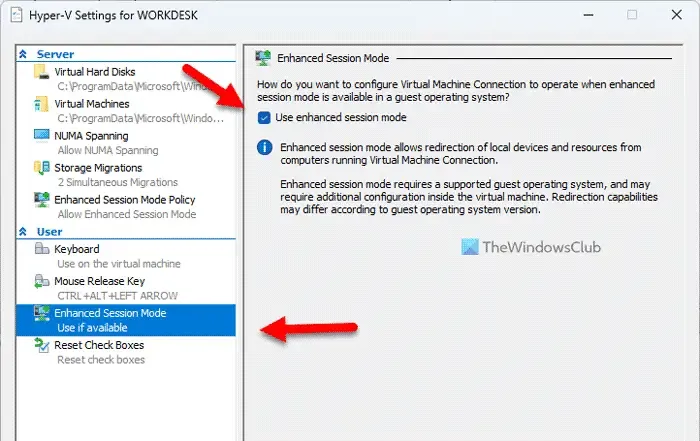
2] Turn on Enhanced Session mode

As the Remote Desktop sessions are dependent on the Enhanced Session mode in Hyper-V, you need to turn it on. Even if you turned it on earlier, you could disable and re-enable the same setting. For your information, you can find two options to enable the Enhanced Session mode in Hyper-V.
3] Enable Data Exchange in Hyper-V Manager

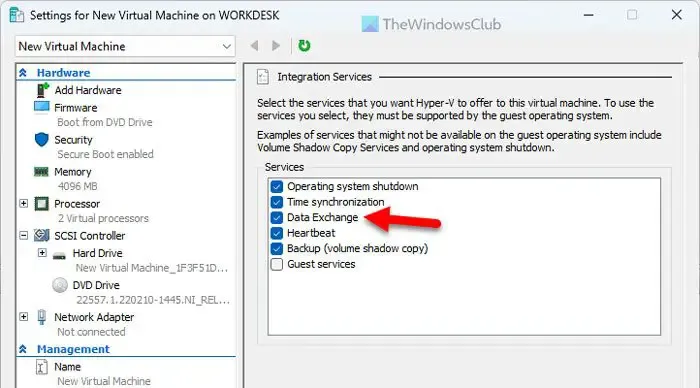
To enable Data Exchange in Hyper-V Manager, follow these steps:
- Open the Hyper-V Manager on your computer.
- Choose the virtual machine.
- Click on the Settings option on the right-hand side.
- Head to the Integration Services menu.
- Tick the Data Exchange checkbox.
- Click the OK button.
Then, restart the Hyper-V and check if the problem has been resolved or not.
4] Start Hyper-V Data Exchange Service

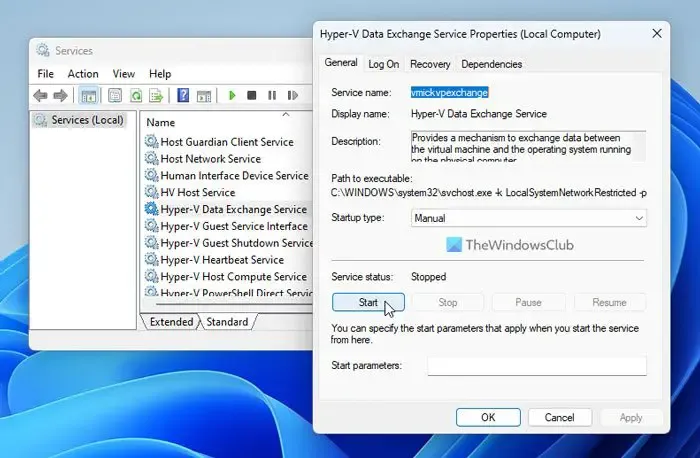
Hyper-V Data Exchange Service lets you exchange data between your host and virtual computers. If this service is disabled in any way, numerous problems could appear. For example, you may not be able to use mouse on the Remote Desktop session. That is why it is recommended to verify the service. For that, do the following:
- Search for services.msc in the Taskbar search box.
- Click on the individual search result.
- Find the Hyper-V Data Exchange Service setting.
- Double-click on this setting.
- Choose the Startup type as Manual.
- Click the Start button.
- Click on the OK button.
However, if it is already running, you need to click on the Stop button first and then go through the rest of the steps as mentioned above.
5] Reinstall mouse driver
In most cases, you do not need to install a driver to use a mouse on Windows 11. However, some gaming and high-end mouses require you to install a driver in order to work fluently. If you haven’t installed the driver and tried to use it on Hyper-V, there is a chance of getting the above-mentioned problem. That is why it is suggested to install the mouse driver – no matter whether you have this problem on Windows 11, Windows 10, or any other version.
Why is my mouse not showing in RDP?
There could be various reasons why your mouse is not showing in RDP or Restore Desktop session. However, the most common reason could be the corrupt driver of your mouse. In that case, it is highly recommended to reinstall or update the driver to the latest version before heading to the other solutions.
How do I capture mouse input in Hyper-V?
You can enable or disable the mouse pointer in Hyper-V by clicking on the virtual machine screen. However, if it doesn’t do anything, you can press the Ctrl+Alt+Left arrow on your keyboard. At times, the mouse may get stuck due to some reasons, and this keyboard shortcut could release it on the Hyper-V virtual machine.
Leave a Reply