HyperX Cloud Stinger mic is not working, detected or recognized in Windows 11
If the HyperX Cloud Stinger mic is not working, detected, or recognized on your Windows 11/10 PC, then tho post will help you. HyperX is a popular brand that creates high-quality gaming products, including headsets, mice, keyboards, etc. One of its headset series is called HyperX Cloud Stinger, which is a lightweight headset with greater sound quality.
How do I connect my HyperX headset to Windows 11?
To connect a HyperX Cloud2 Mic with a headphone jack and a microphone jack to Windows 11/10 PC, you need to connect the 3.5mm plug of your headset to the female jack on your PC extension cable. Also, plug the audio and microphone cables into the respective ports on the extension cable. Once you have connected the headset, set it as a default device in your Sound Control Panel.
Why is my computer not detecting my HyperX Cloud mic?
If your computer cannot detect your HyperX Cloud microphone, the problem is likely to be caused due to a loose connection. Ensure the cable is correctly plugged into your headset and computer’s ports. Besides that, the problem can also occur if your audio drivers are out-of-date. Another reason why your HyperX Cloud Stinger mic might not work properly is due to incorrect sound settings. For example, if you haven’t allowed microphone access or the mic is not set as the default input device, it won’t function properly. Apart from that, in-game settings and background apps can also cause this problem.
HyperX Cloud Stinger mic is not working, detected or recognized in Windows 11
If the HyperX Cloud Stinger mic is not working, detected, or recognized on your Windows 11/10 PC, you can use the below methods to get rid of this issue:
- Make sure your HyperX Cloud Stinger mic is connected properly.
- Grant microphone permission to your headset.
- Check your Sound settings.
- Outdated headset drivers? Update them right away.
- Terminate background apps having access to your microphone.
- Check your in-game settings.
- Contact the headset manufacturer.
Before you try these solutions, make sure your headset is not physically damaged and you have installed all pending Windows updates on your system.
1] Make sure your HyperX Cloud Stinger mic is connected properly
The first thing you should do is to ensure that your HyperX Cloud Stinger mic is properly connected to your PC. So, check all physical connections and ensure that there is no loose connection. You can also try unplugging your headset and then plugging it into another port to check if the problem is resolved.
Another thing to make sure of is that your mic is not mute. And, the volume is not set too low that you are unable to hear. Just check the volume knob on the right ear and make sure the volume is set to high.
You can also try connecting your headset to a different computer or device and see if it is working fine. If it is not working properly, the problem might lie with your headset. You can directly contact the device manufacturer and see what can be done.
In case you are using the headset’s controller box, check whether the mute switch is enabled. If so, disable the mute switch and then check if the problem is resolved.
2] Grant microphone permission to your headset
It might be the case that you haven’t allowed microphone access on your PC knowingly or unknowingly. As a result, you are unable to use the HyperX Cloud Stinger microphone. Hence, if the scenario is applicable, change your settings and enable microphone access on your computer.
Here’s how to do that:
- First, open the Settings app using Win+I.
- Now, go to the Privacy & security tab from the left-side pane.
- Next, scroll down to the App permissions section and click on the Microphone option.
- After that, switch on the toggle associated with the Microphone access option.
- Then, make sure the microphone access for the app or game for which you are using the HyperX Cloud Stinger mic is enabled.
- Once done, exit the Settings app and check if the problem is resolved.
3] Check your Sound settings

Your PC’s default sound settings can be the main culprit for this issue. Suppose, if you have other headsets connected to your PC previously, and HyperX Cloud Stinger is not set as the default input device, you will face this issue. Hence, if the scenario applies, change your sound settings and see if the issue is fixed.
Here are the steps to do that:
- First, open Settings using Win+I and go to the System > Sound section.
- Now, click on the More sound settings option.
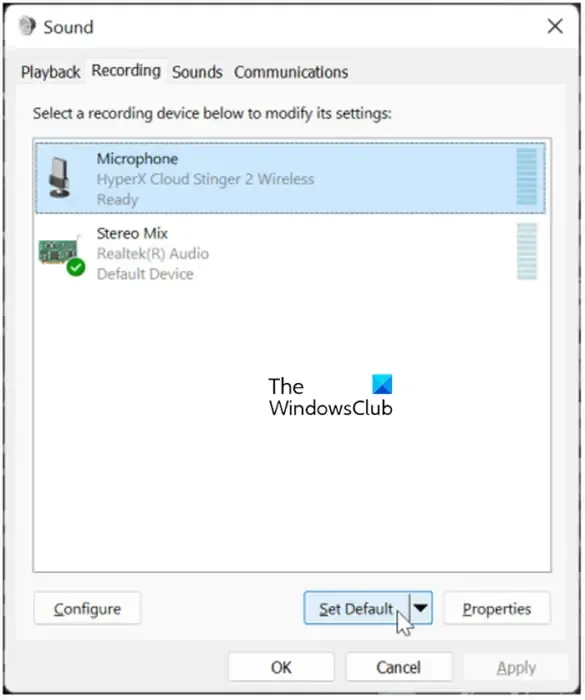
- Next, move to the Recording tab and ensure that the HyperX Cloud Stinger microphone is enabled.
- After that, select the mic and press the Set Default button to set it as a default input device.
- Then, right-click on your microphone and choose the Properties option from the appeared context menu.
- Now, move to the Levels tab and Microphone volume slider to the maximum value.
- Finally, press the Apply > OK button to save changes.
See if this method works for you.
4] Outdated headset drivers? Update them right away

Outdated device drivers are known to cause issues in the functioning of your hardware devices. In case your headset or sound drivers are outdated, you are likely to experience this problem. Hence, update your headset driver in Windows 11/10 to fix the issue. Here’s how:
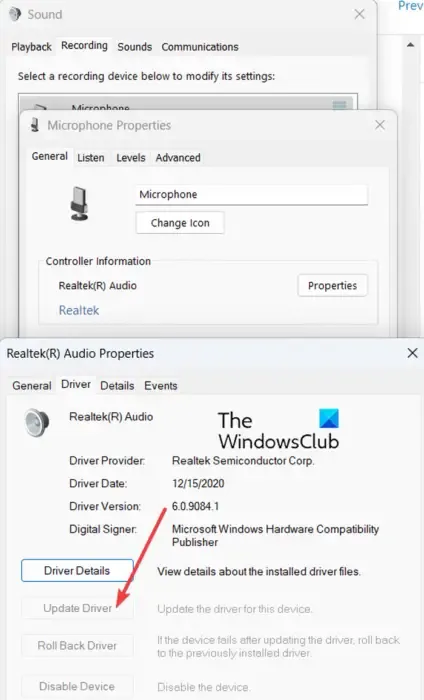
- First, open Settings, navigate to System > Sound, and press the More sound settings option.
- Now, go to the Recording tab, right-click on your HyperX Cloud Stinger mic, and choose the Properties option.
- Next, under the Controller Information section in the General tab, press the Properties option.
- After that, go to the Driver tab in the opened dialog window and tap on the Update Driver button.
- Then, follow the prompted instructions and complete the update process.
- When done, reboot your computer and check if the problem is resolved.
There are some other methods to update your audio drivers. Hopefully, you won’t face the same problem after updating your audio drivers. But if you do, you can use the next fix.
5] Terminate background apps having access to your microphone
You can also try closing background apps like Discord, Skype, etc., that are having access to your microphone and ensure that Windows OS has the default control over your headset. In case you have third-party audio software, close it and check if the problem is resolved.
6] Check your in-game settings
Sometimes, the problem might be caused due to your in-game settings. If you are unable to use the HyperX Cloud Stinger mic in specific games, it might be the case that your in-game settings are incorrectly configured. So, open your in-game settings and make sure voice chat, volume level, microphone level, and other audio settings are rightly set up.
7] Contact the headset manufacturer
If none of the above methods worked for you, the last resort is to directly contact the official support team of your headset manufacturer. They should be able to help you troubleshoot this problem.
That’s it.
Leave a Reply