How to Update Drivers on Windows 11: 7 Essential Methods [November 2024]
Essential Information
- You can update drivers via Device Manager, either automatically or by selecting specific driver files you have downloaded.
- Your computer’s manufacturer (OEM) websites usually have downloadable drivers and tools to simplify the updating process.
- Typically, Windows Updates manage the downloading and updating of drivers as required.
Device drivers are crucial for resolving issues, enhancing the compatibility of various devices with both existing and new operating system updates. If you encounter problems with your PC’s components, updating the drivers should be one of the initial troubleshooting steps. Below is a comprehensive guide on how to update drivers in Windows 11.
Seven Methods to Update Drivers in Windows 11
There are several approaches to updating drivers in your Windows 11 environment. By default, Windows is equipped with a built-in tool that helps you find the most suitable drivers for all components and peripherals. You can leverage this utility to keep almost all of your system’s drivers updated. Choose a method from the following options that best fits your requirements.
Method 1: Utilizing Device Manager
Device Manager serves as a utility for managing driver installations for nearly all components in your system. If you have a specific driver file you want to install from your local device, follow the first section of this guide. If you prefer to search for a driver for a device, utilize the second portion.
Method 1.1: Installing Drivers from Your Local Device
Video Tutorial:
Step-by-Step Instructions with Images:
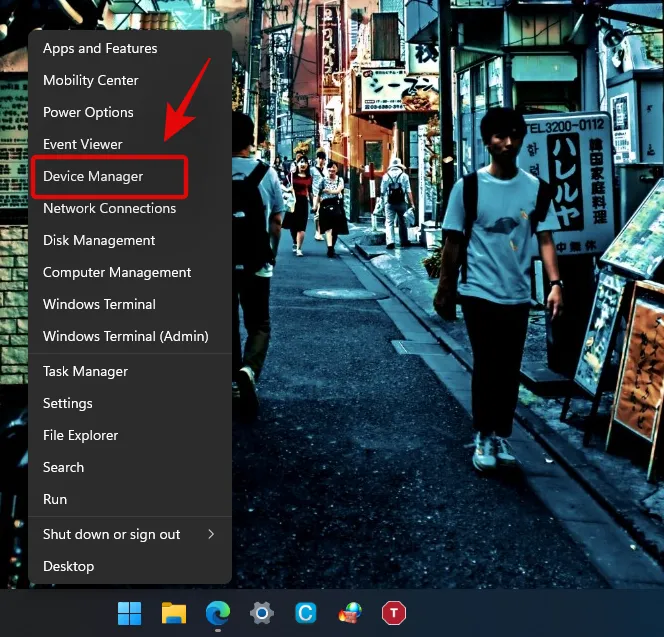
Step 1: Press ‘Windows + X’ and select ‘Device Manager’ from the menu.
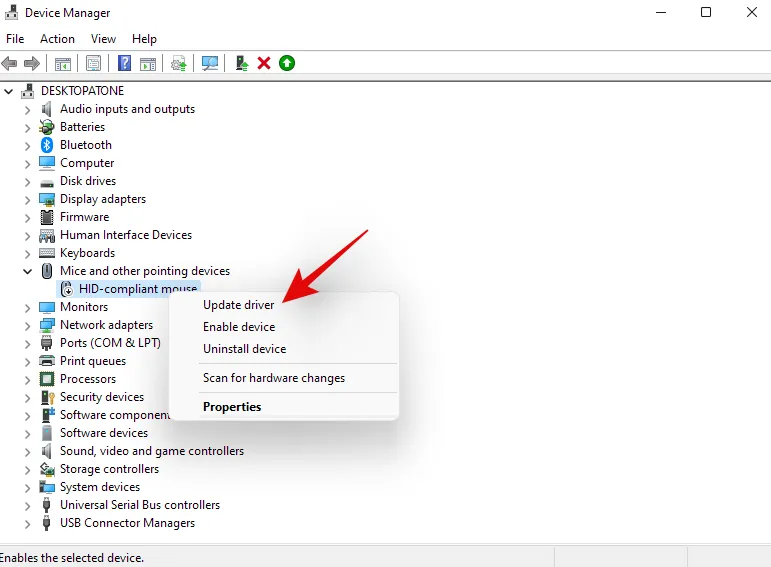
Step 2: Scroll through the list to find the device you want to update, right-click on it, and choose ‘Update driver’.
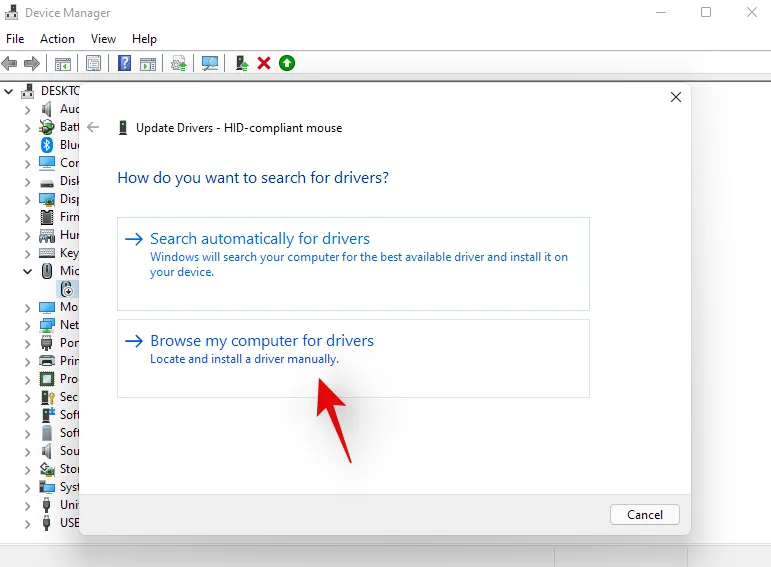
Step 3: Select ‘Browse my computer for drivers’.
Step 4: Click on ‘Browse’ to choose the appropriate driver file from your local storage.
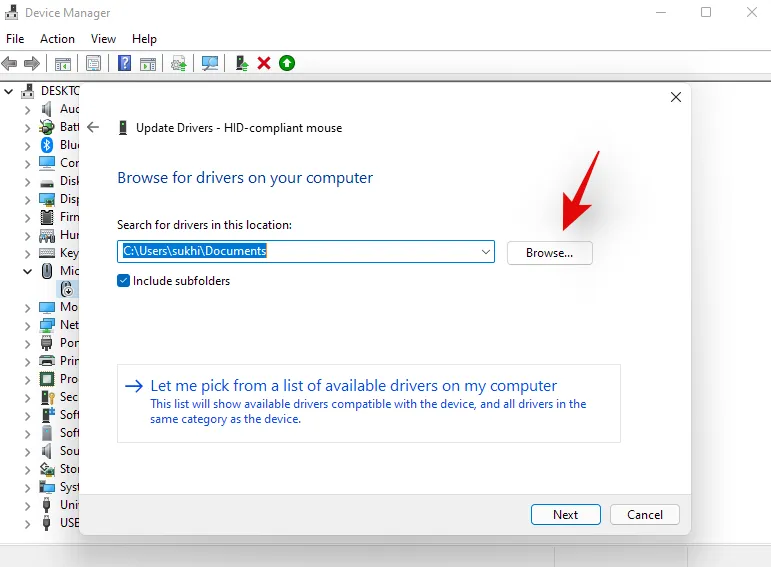
Step 5: Once you have selected the file, click ‘Next’.
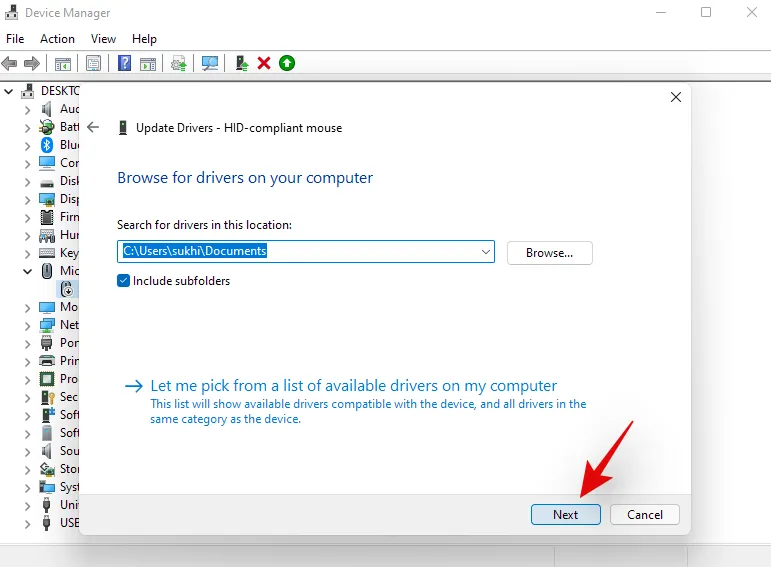
The driver should now be updated on your device!
Method 1.2: Finding Drivers Online
Video Tutorial:
Step-by-Step Instructions with Images:
Step 1: Press ‘Windows + X’ and select ‘Device Manager’.
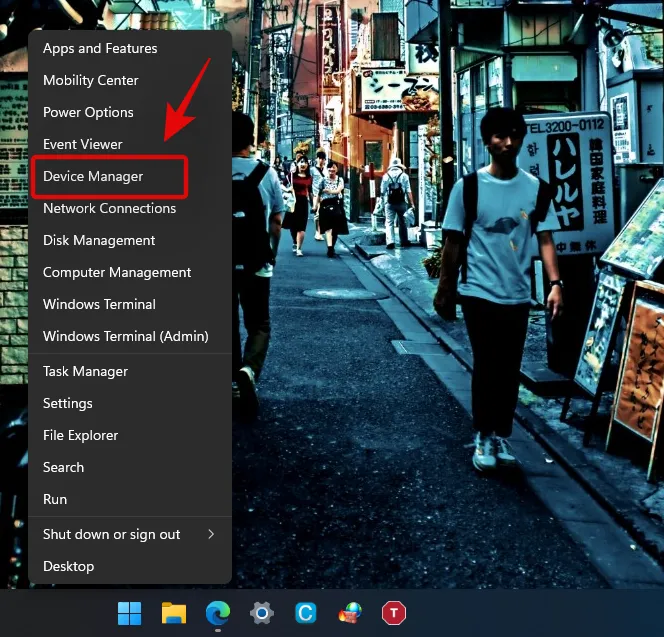
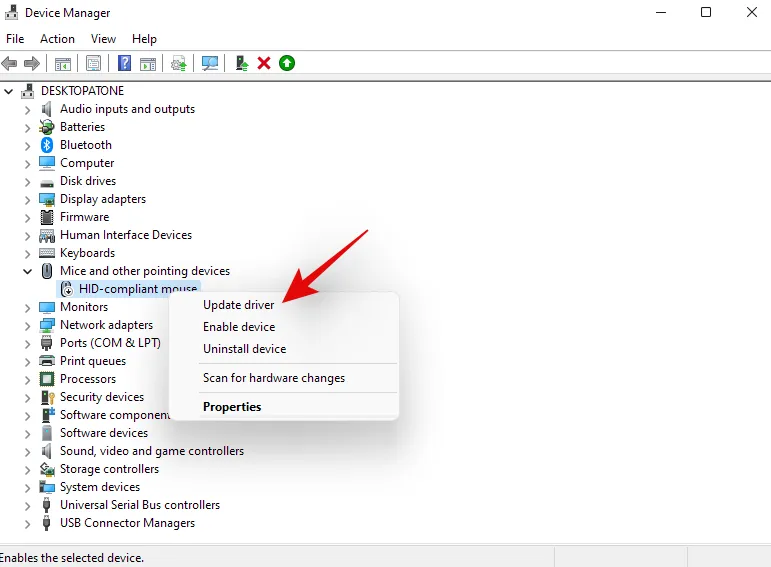
Step 2: Right-click on the device you want to update and select ‘Update driver’.
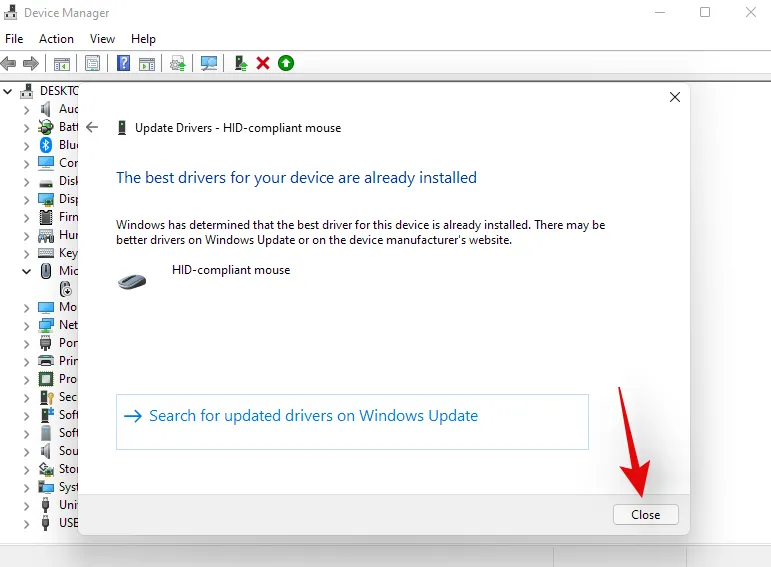
Step 3: Choose ‘Search automatically for drivers’.
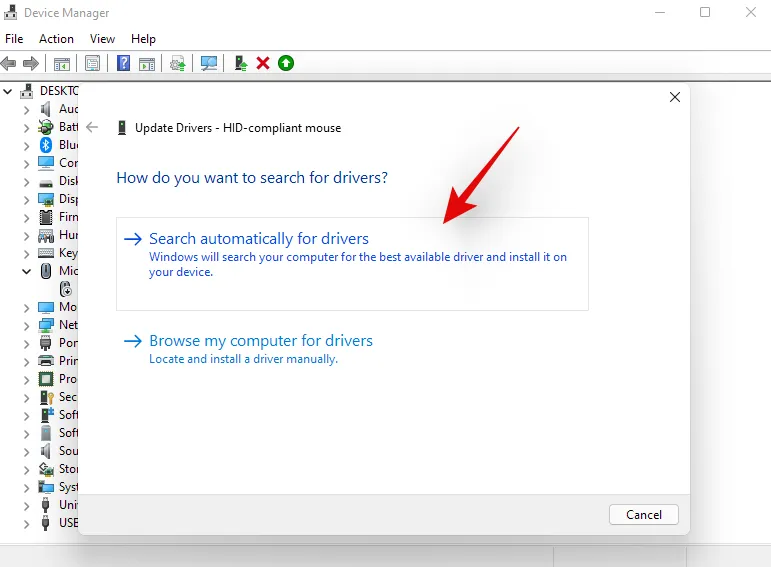
Step 4: Windows will search its databases for any available drivers for your device. If located, they will be installed, confirmed with an on-screen notification. If not, the drivers may only be available through your OEM.
You can follow the remaining methods to update components or peripherals that might require OEM drivers.
Method 2: Download and Install Updates from Your OEM
If you’re using a pre-assembled system or laptop, it’s likely that specific drivers for your hardware are made available by your OEM. While these may not be the latest drivers available from the manufacturer, they are typically optimized for your device’s performance and power management. If you cannot locate the specific drivers for your device, consider visiting your OEM’s support page to search for it. Here are links to various manufacturers’ support pages:
- Acer
- Asus
- Compaq
- Of the
- Eluktronics
- Gigabyte
- IBM
- HP
- iBUYPOWER
- Lenovo
- LG
- Maingear
- Micro Center
- Microsoft
- Microsoft Surface Support
- MSI
- Samsung
- Sony
By navigating to these websites, you should be able to find and install the appropriate drivers for your system. Most will come as an executable file for straightforward installation. However, if you encounter. inf files, refer to the earlier guides to manually install them on your system.
Method 3: Using OEM Utilities
You can search for it in the Start menu and utilize it to update your device drivers to the latest versions. If your OEM utility is not present, you can visit the support website to find both necessary drivers and one-click update utilities for your system.
Method 4: Utilizing Windows Update
Video Tutorial:
Step-by-Step Instructions with Images:
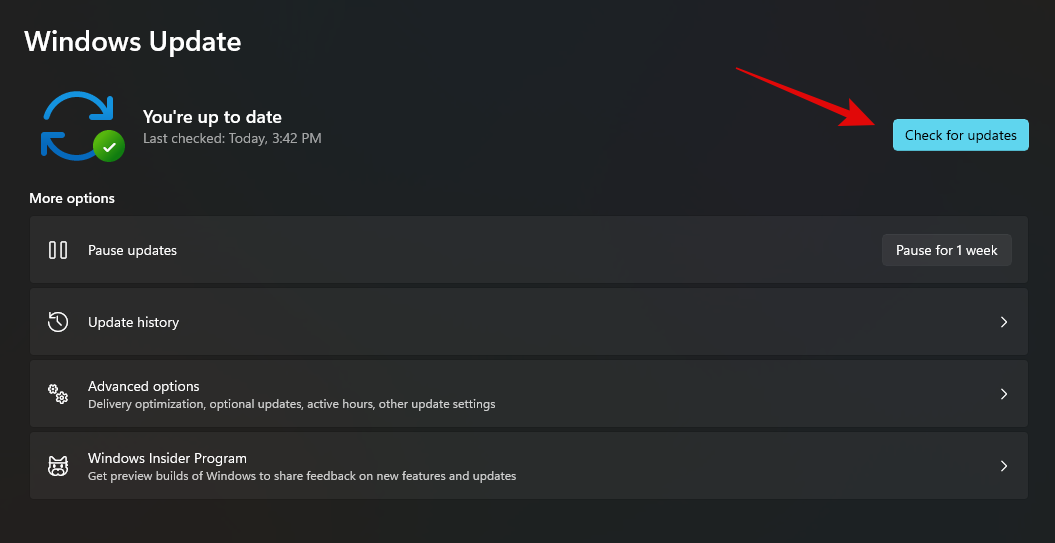
Step 1: Press ‘Windows + i’ to open the Settings window, then select ‘Windows Update’ on the left.

Step 2: Click on ‘Check for updates’ and proceed to install any that are available.
Method 5: Enable Automatic Driver Updates via Windows Update
Windows Update has a feature that allows it to deliver drivers tailored to your components and peripherals through your OEM. This means you can secure the latest drivers without the need to download additional tools. However, this setting is often disabled by default on many systems. If it is disabled, you will not receive OEM driver updates during your Windows Update process. Follow the instructions below to make sure it is enabled:
Video Tutorial:
Step-by-Step Instructions with Images:
Step 1: Press ‘Windows + S’ to open the Windows Search utility.
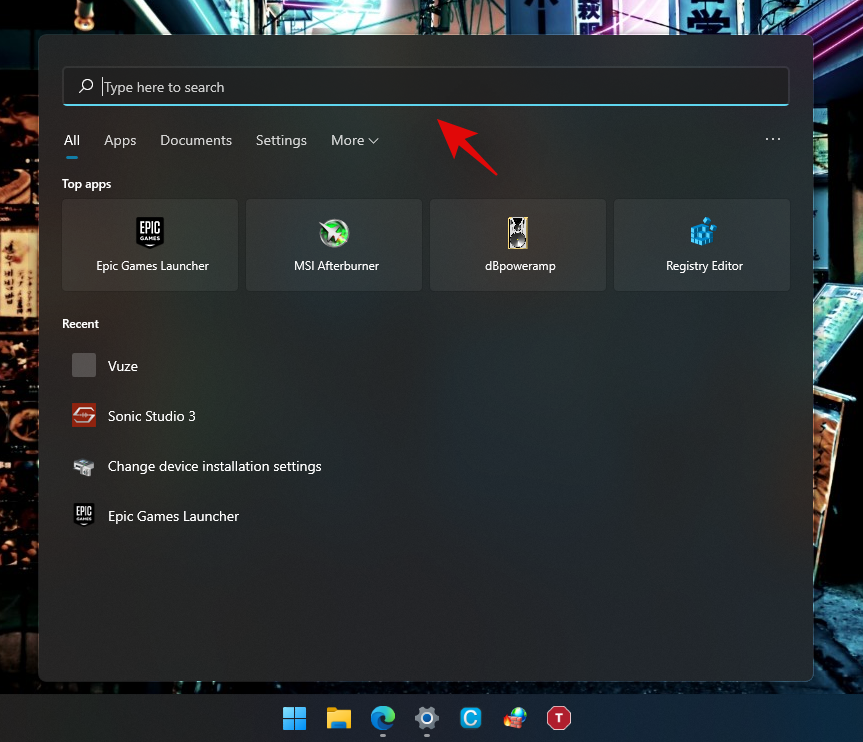
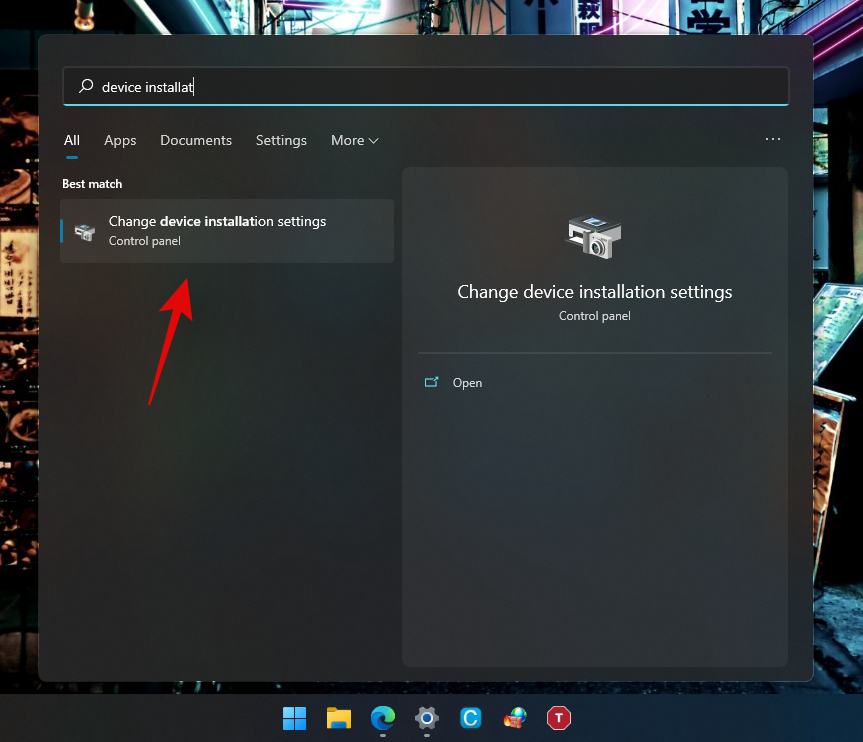
Step 2: Search for ‘Device installation settings’ and launch the application from the results.
Step 3: Select ‘Yes’ to confirm.
Step 4: Click on ‘Save Changes’ to finalize the settings.
Step 5: Then press ‘Windows + i’ to access the Settings app again, and select ‘Windows Update’ from the sidebar.

Step 6: Click on ‘Check for updates’ again.

Step 7: Your PC will check for any updates, including OEM drivers, to be automatically downloaded and installed if available.
Method 6: Check for Optional Updates
Additionally, Windows issues optional updates for components and peripherals that, while not essential, can be beneficial if you experience issues with existing drivers. Follow the instructions below to install them.
Video Tutorial:
Step-by-Step Instructions with Images:
Step 1: Press ‘Windows + i’ to open Settings and select ‘Windows Update’ from the left menu.

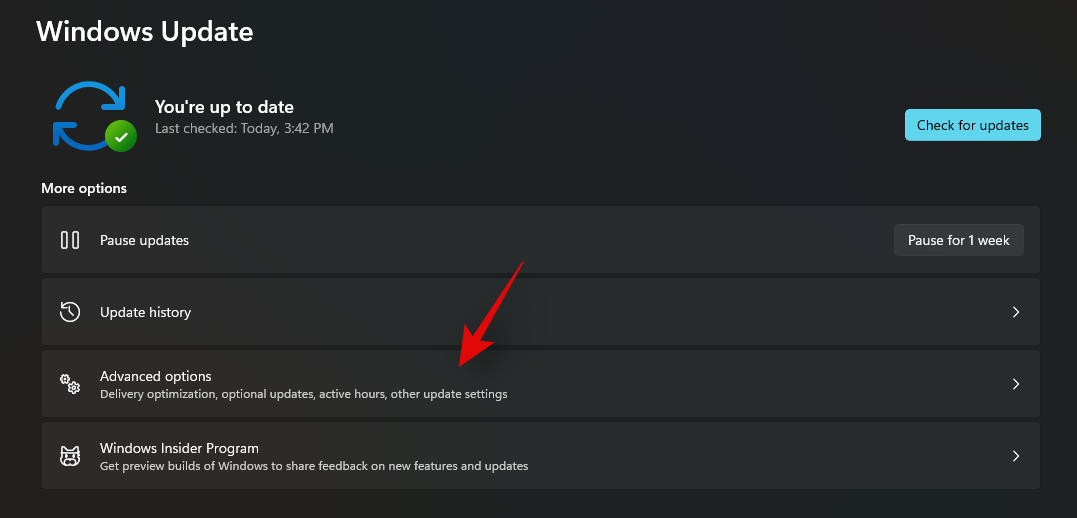
Step 2: Select ‘Advanced Options’ to proceed.
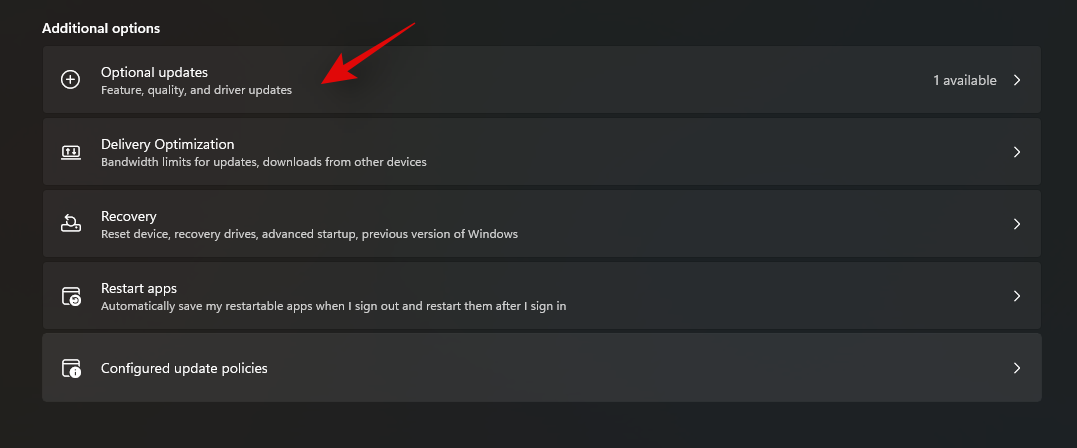
Step 3: Choose ‘Optional updates’ listed under ‘Additional options’.

Step 4: Tick the checkbox next to the updates you wish to install.

Step 5: Click on ‘Download & install’ to proceed.

Windows will download and install the selected driver updates on your system. Depending on the changes made by the update, you might need to restart your computer, which is a normal part of the update process.
Method 7: Manually Add Drivers for Missing Components in Device Manager
Devices that are not recognized often appear as ‘Unsupported devices’ in Device Manager. However, if your device is completely absent from Device Manager, you can follow the steps below to install the drivers manually.
Video Tutorial:
Step-by-Step Instructions with Images:
Step 1: Press ‘Windows + X’ and open ‘Device Manager’.

Step 2: Click on the ‘Add drivers’ icon located in the toolbar.

Step 3: Hit ‘Browse’ and pick the relevant driver file from your storage.
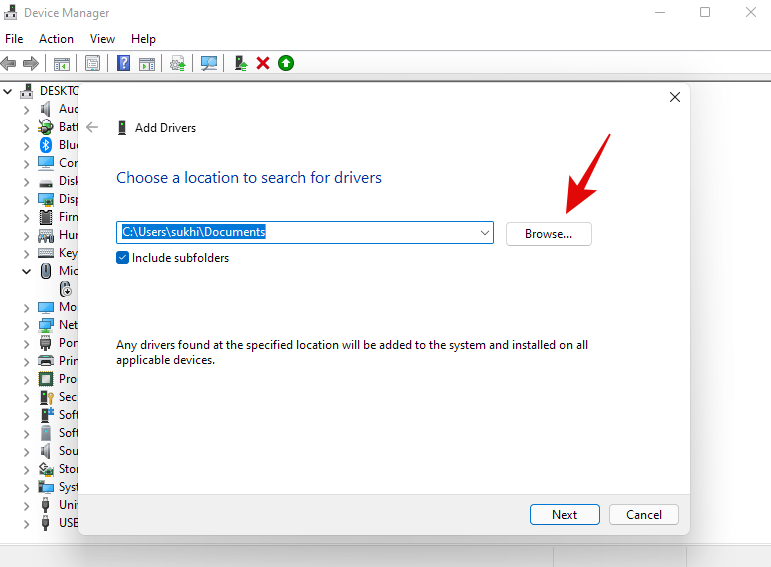
Step 4: Click ‘Next’ after making your selection.

Step 5: Windows will search the indicated location for drivers and install any compatible ones. This method allows you to install drivers even for components not visible in Device Manager.
How to Remove Problematic Driver Updates
It’s fairly easy to uninstall problematic driver updates that are creating more headaches than benefits. The following guide outlines how to effortlessly remove driver updates from your system.
Method 1: Uninstalling via Device Manager
If you installed the driver manually or through an OEM executable, this is the recommended approach. If Windows has saved the previous driver on your system, you may have the option to roll back to that driver. If this option isn’t available, you will need to uninstall the current driver and then proceed to install an earlier version.
Video Tutorial:
Step-by-Step Instructions with Images:
Step 1: Press ‘Windows + X’ and select ‘Device Manager’.

Step 2: Locate the concerned device, right-click on it, and select ‘Properties’.

Step 3: Switch to the ‘Driver’ tab atop the window.

Step 4: If the rollback option appears, click it and follow the instructions to revert your driver. If the option is greyed out, select ‘Uninstall device’ instead.
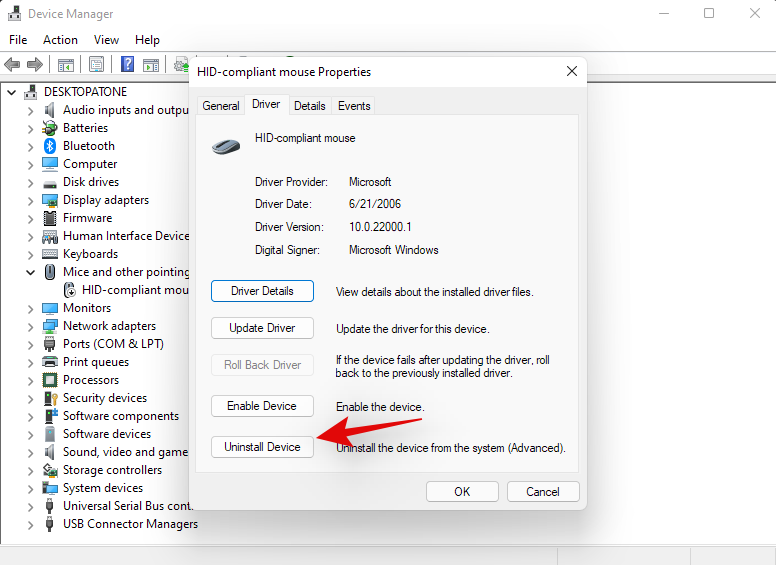
Step 5: Tick the box denoting ‘Attempt to remove the driver for this device’ and press ‘Uninstall’.
Step 6: Windows will remove the specified device and its associated driver from your system.
Method 2: Uninstalling via Windows Update
If the driver update was applied through Windows Update, you can uninstall it directly to eliminate the driver from your machine. Follow this guideline to proceed.
Video Tutorial:
Step-by-Step Instructions with Images:
Step 1: Press ‘Windows + i’ on your keyboard to launch the Settings app, click on ‘Windows Update’ in the left menu.

Step 2: Select ‘Update History’.
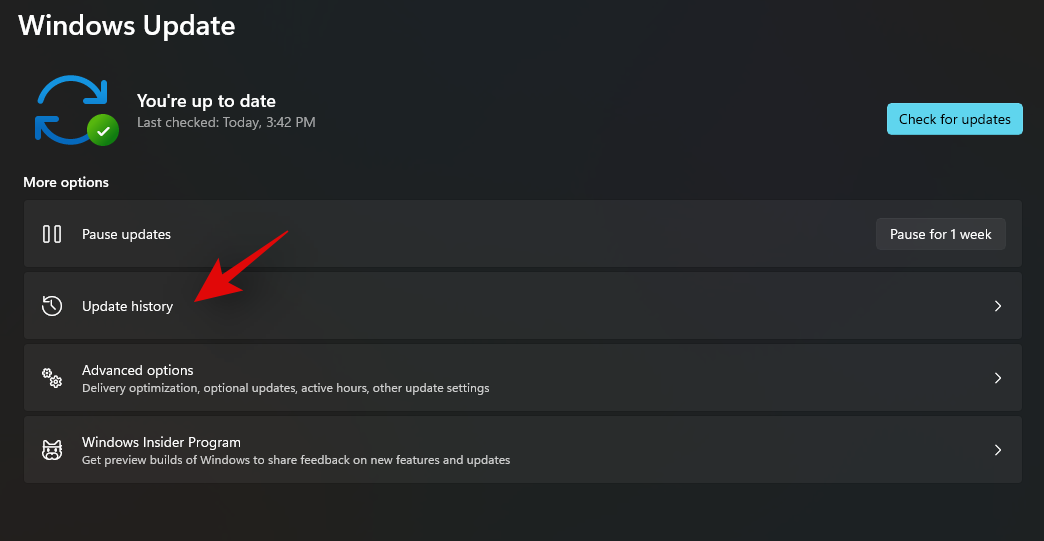
Step 3: Scroll downward to click on ‘Uninstall Updates’.

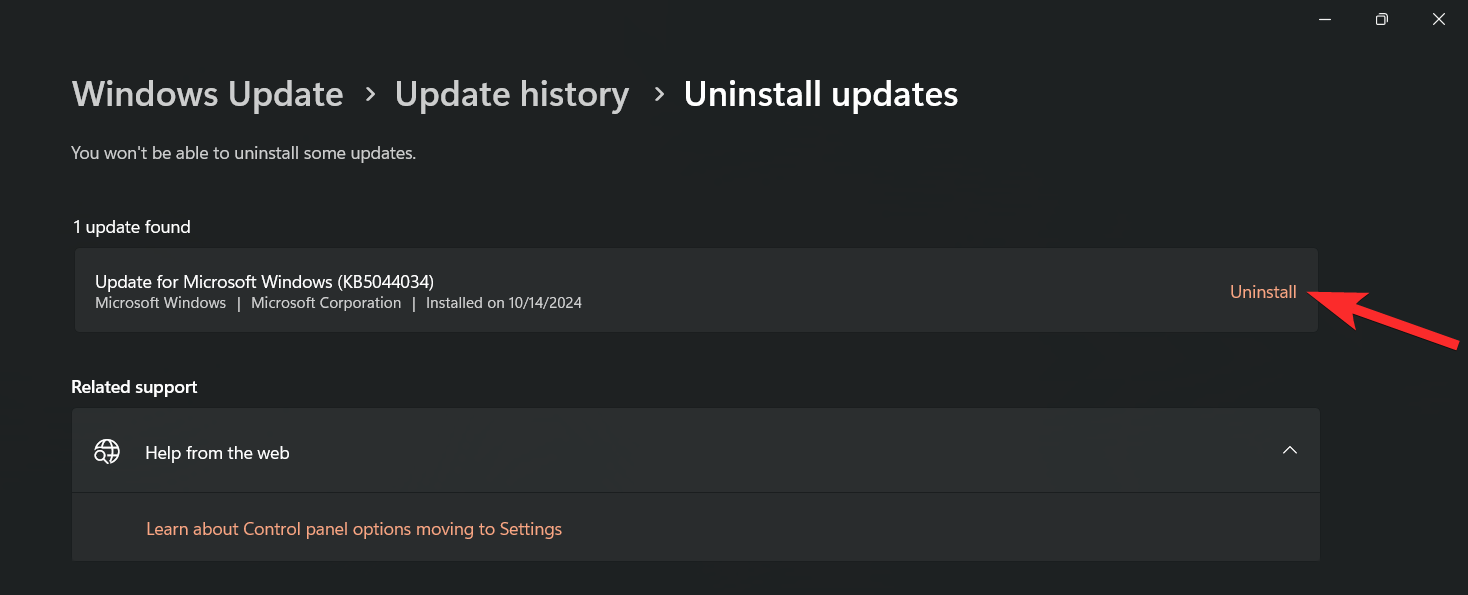
Step 4: Select the update you wish to uninstall and click on ‘Uninstall’.
Step 5: Confirm by clicking ‘Uninstall’ once again.
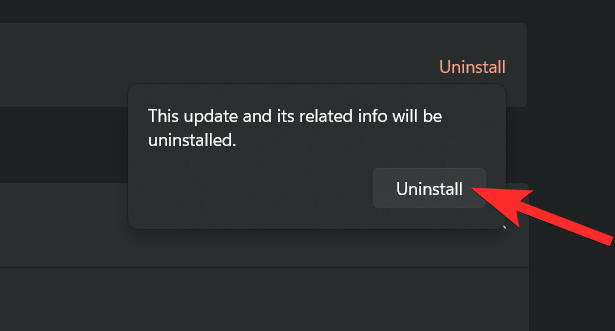
This update will now be uninstalled. You may need to restart your computer depending on the driver update removed.
How to Stop Receiving Driver Updates via Windows Updates
It is common for OEM driver updates to negatively affect performance as they try to encourage consumers to purchase new hardware. While receiving OEM updates through Windows can be beneficial, it might also remove vital updates behind the scenes that hurt your system’s performance. You can uninstall these updates through the guide above, but what if you wish to block them altogether? Use the following steps to prevent these updates.
Video Tutorial:
Step-by-Step Instructions with Images:
Step 1: Press ‘Windows + S’ to open the Search feature, search for ‘Device installation settings’ and open the app that appears.

Step 2: Select ‘No’ to cease receiving OEM driver updates.
Step 3: Confirm by clicking on ‘Save Changes’.
Frequently Asked Questions
Why is it Necessary to Update Drivers?
Updating drivers addresses several factors, including:
- Resolving compatibility issues with your hardware or peripherals.
- Accessing new features.
- Fixing existing bugs.
- Gaining the latest firmware versions.
- Enhancing communication between hardware and software.
- Ensuring external devices are recognized by your system.
- Addressing issues with malfunctioning hardware.
In short, if you are experiencing any of these prevalent problems, it might be time to update your drivers right away.
Is It Really Necessary to Update My Drivers?
Drivers help to correct bugs introduced by previous updates, add new features, and ensure compatibility with newly released hardware. Whether you are currently facing issues with your computer’s components or not, it’s advisable to keep your drivers up to date with the latest versions.
However, if your hardware is functioning correctly, consider approaching this recommendation with caution. Occasionally, driver updates may introduce new bugs or setbacks.
Therefore, if your hardware operates smoothly, it may be prudent to consult online tech forums regarding the latest update before applying it. In this manner, you can avoid issues with software functionality should new bugs arise post-update, allowing you to wait for a fix to be issued.
That wraps up your guide! You should now be familiar with various methods to install drivers on Windows 11. If you have any questions or require further assistance, feel free to leave a comment below.
Leave a Reply