Step-by-Step Guide to Rename, Upgrade, and Delete Hyper-V Virtual Machines

Key Notes
- Properly naming your VMs improves organization and management.
- Upgrading configuration versions enhances performance and compatibility.
- Deleting non-essential VMs helps save storage and resources.
Mastering Hyper-V: How to Rename, Upgrade, and Delete Virtual Machines Effectively
Managing virtual environments in Hyper-V can be complex, making naming, upgrading, and deleting virtual machines crucial for efficient operations. This guide provides step-by-step instructions to help IT professionals harness the full potential of Hyper-V.
Step 1: Renaming Your Hyper-V Virtual Machines
Efficient management of multiple virtual machines starts with a clear naming convention. While renaming within Hyper-V Manager changes only the display name, the VM’s folder and virtual hard disk name remain unchanged. Let’s explore how to rename your virtual machines.
Step 1.1: Renaming via Hyper-V Manager
To rename a VM using Hyper-V Manager:
- Launch Hyper-V Manager and select the desired virtual machine.
- Press F2 or click the VM’s name. Alternatively, choose Rename from the Actions Pane or right-click the VM and select Rename.
- Type the new name and press Enter.
Step 1.2: Renaming Using Microsoft PowerShell
For PowerShell renaming, follow these steps:
- Open PowerShell as an administrator by searching in the Start menu, right-clicking, and selecting Run as administrator.
- Run the following command to rename the VM:
Rename-VM "<Current VM name>" -NewName "<New VM name>"
Replace <Current VM name> and <New VM name> with the appropriate names.
Pro Tip: Always ensure the new name is descriptive and relevant for better VM management.
Step 2: Upgrading the Configuration Version of Your Hyper-V VMs
Upgrading the configuration version is vital for optimizing virtual machine performance. This step involves changing the underlying file structure to improve efficiency and compatibility. Here’s how to do it:
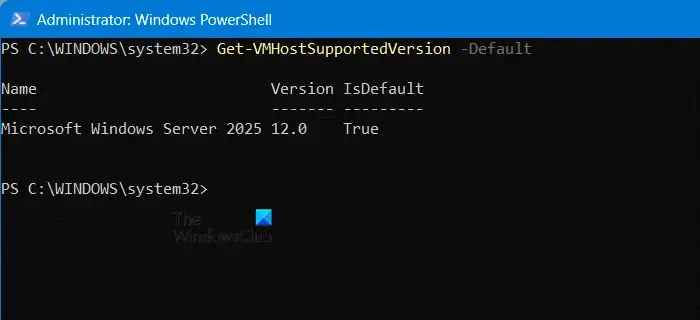
Step 2.1: Check Current Configuration Version
To check the current configuration version, open PowerShell with administrative rights and execute:
Get-VMHostSupportedVersion -Default
Step 2.2: Perform the Upgrade
Next, select the VM in Hyper-V, then click on Upgrade Configuration Version from the Action menu. Confirm the upgrade in the pop-up window.
Pro Tip: If you are unable to perform this step, the VM might be on the maximum supported configuration version.
Step 3: Deleting a Hyper-V Virtual Machine
Eliminating unnecessary virtual machines frees up vital storage space and system resources. There are two approaches: using Hyper-V Manager or PowerShell.
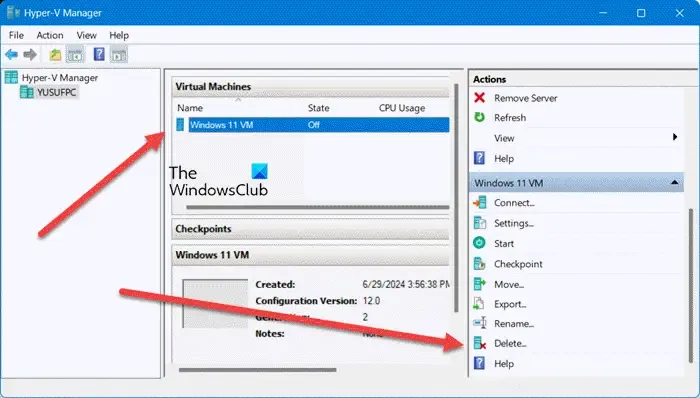
Step 3.1: Deleting via Hyper-V Virtual Manager
To delete a VM using Hyper-V Manager:
- Open Hyper-V Manager and select the VM you wish to delete.
- Navigate to the Actions section and click on Delete, or right-click the VM and choose Delete.
- Click Delete on the confirmation popup to proceed.
Step 3.2: Deleting with Microsoft PowerShell
For deletion via PowerShell:
- Search and launch PowerShell as an administrator.
- Execute
Get-VMto list virtual machine details. - Run the following command to remove the VM:
Remove-VM "<VM name>" -Force
Make sure to substitute the <VM name> with the actual name of the virtual machine.
Additional: How to Rename a VHD File in Hyper-V
Renaming a VHD or VHDX file involves these steps:
- Ensure the VM is turned off, and there are no existing checkpoints.
- Naviagate to the file location in File Explorer, right-click the VHD/VHDX file, and choose Rename. Provide a new name.
- Restart the VM, access Hyper-V Manager, right-click on the VM, go to Settings, and update the path to point to the renamed file.
Pro Tip: Always double-check that the virtual machine is powered off before renaming its disk files.
Summary
This guide provided comprehensive steps for managing Hyper-V virtual machines, focusing on renaming, upgrading configuration versions, and safely deleting VMs to optimize your virtual environment.
Conclusion
Effective management of Hyper-V VMs is crucial for maintaining optimal performance and organization. By following these outlined procedures, you can enhance your virtual environment’s efficiency and reliability.
FAQ (Frequently Asked Questions)
How can I rename a Hyper-V virtual machine?
You can rename a Hyper-V VM through the Hyper-V Manager by right-clicking the VM or by using PowerShell commands to rename it.
Does deleting a VM delete its virtual hard disk?
No, deleting a VM only removes its configuration file; the virtual hard disk remains until deleted manually.