How to Remove Windows Viruses with Linux
While Microsoft has improved the Windows Defender to a great extent, your system is still not impermeable to viruses. The worst case is when the virus takes over your system, and you can’t boot it up. When this happens, you may want to use a live Linux distro to remove the Windows viruses. This tutorial shows you how to get it done.
Why Use Linux?
If your Windows desktop refuses to boot properly in safe mode, and you’d like to explore the file system and operate the computer, you will need a live environment for that. Sure, you can flash Windows onto a USB drive and just use its recovery command line, but your options there are limited.
Flashing a USB drive with a Linux distro gives you several advantages, such as:
- A graphical environment to use on your system
- A light resource profile
- Access to a package manager that lets you install applications on the fly to a temporary space
- A sandboxed environment that doesn’t get contaminated by what’s affecting your Windows installation
For most use cases, especially when removing infections affecting the file system, using a live Linux distro is the path of least resistance.
Which Distro Should I Use?
In the majority of cases, Ubuntu presents a compelling option, with its large repository, graphical interface, and ease of use. For simplicity’s sake, many of the instructions in this tutorial will be relevant to Ubuntu.
Since we are using the Linux-native ClamAV to scan for viruses and other threats infecting your system, you can also use Arch and Fedora if you are more familiar with them.
Before going any further, flash the distro of your choice to your USB drive by using a tool like balenaEtcher.
Booting Into the Live OS
To properly boot from a USB drive, you will have to configure your motherboard’s BIOS to boot from the USB drive. Generally, you may access your BIOS by repeatedly pressing either F1, F2, F10, F12, or Del. Once you’re in, look for “Boot” or “Boot Order.” Make sure your USB drive is on the top. If there’s a “UEFI” boot option for the USB drive, move that up as well, above any other options.
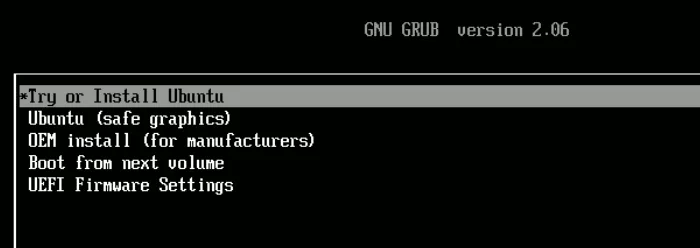
Let the drive boot. You’ll be greeted by a GRUB screen that allows you to choose from multiple options. Select “Try or Install Ubuntu” and press Enter.

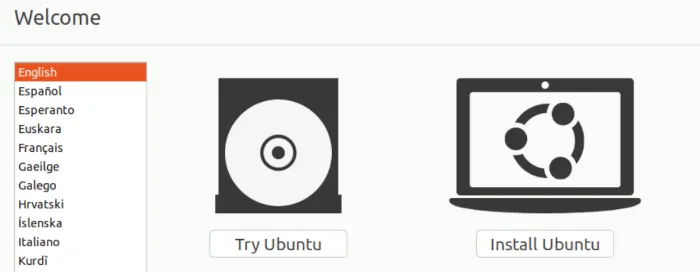
Once the USB drive is done loading the operating system into memory, it will give you a choice between trying Ubuntu or installing it.

Choose “Try Ubuntu,” which should land you on the Desktop.
Installing ClamAV
- Press Ctrl + Alt + T to open the terminal.
- Update the repositories with a fresh version:
sudo apt update
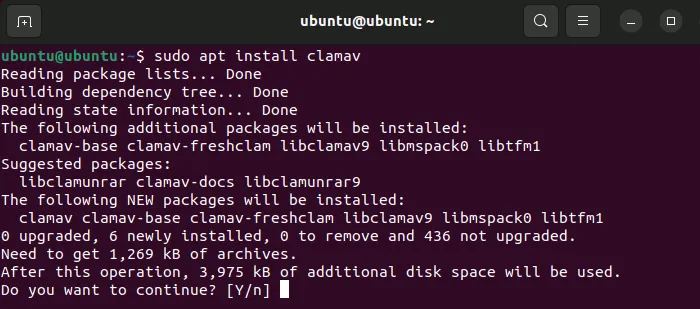
- Install ClamAV:
sudo apt install clamav

Now that you have ClamAV, it’s time to use it to scan your system.
- Open your file manager. In Ubuntu, it’s an icon of a folder on the dock to the left of the desktop.
- Click on “Other Locations” near the bottom of the left sidebar.
- Choose the Windows drive you’d like ClamAV to scan.

- Select the drive. If you have a ton of partitions, you’ll know you chose the right one if the following folders are visible: “Program Files,” “Users,” and “Windows.”
- Right-click on any empty space within the file manager and click “Open in Terminal.” This provides a terminal window with the drive’s root folder already open.
- Start ClamAV through the
clamscancommand:
sudo clamscan -r.
This will scan files in the current directory (your Windows root directory) recursively, looking for viruses along the way. The . represents “this directory,” and the -r flag tells it to scan through the entire tree of folders recursively.
With this command, you will do a dry run. It won’t remove any files. This lets you see which files ClamAV picks up as viruses so that you can judge for yourself whether you’d like them removed.
- At any point during the process, if you’d like to cancel the scan, just press Ctrl + C on your keyboard.
- If you want ClamAV to remove the files for you, pass the
--remove=yesoption like so:
sudo clamscan -r. --remove=yes
- If you don’t want it to scan certain file types, pass the
--exclude=flag as many times as you need.
sudo clamscan -r. --remove=yes --exclude=.png
The above example would exclude PNG image files, as they often do not have anything that poses a threat written into them.
- Add
--verboseto this command if you’d like to see everything ClamAV is doing when it runs a scan. The--infectedflag may actually be more useful here, only letting you know when an infected file has been found. - Be aware that ClamAV will use a significant amount of system memory (I recorded over 1.3 GB of RAM use) during the scan process. Also, since it uses only one processing thread for the scanning process, it could take a long time to fully scan a drive.
After putting in a proof-of-concept virus that would simulate a worst-case scenario where Windows doesn’t boot correctly, ClamAV was able to find the culprit and zap it within an hour. It was a long process, but it seems that this old antivirus software still does its job very well.
Logging
When doing the dry-run procedure (without the --remove flag), you may want to place the output of the scan in a file that you can search later:
sudo clamscan -r. | tee ~/output.txt
This command tells ClamAV to do a recursive scan of the current directory and output the result to an “output.txt” file in your USB drive’s home directory.
You can later go to “output.txt” and search for the term “FOUND” to see each virus it detected. This helps you quickly find the threats on your system without having to wade through miles of muddy terminal output after the fact!
Frequently Asked Questions
Does ClamAV use updated virus definitions?
Yes, when you install ClamAV, a service known as clamav-freshclam is installed and started on your live system. This service keeps the heuristics database updated for you.
Is there a GUI for using ClamAV?
You can install the clamtk package, which is a limited GUI front end for ClamAV.
In Ubuntu, you can use the link found within the developer’s GitLab repository for Ubuntu/Debian. Once you download the .deb file, run it, and it should install ClamTK for you!
Can ClamAV be installed on Windows directly?
Yes. If you’re able to boot your Windows system, ClamAV has a Windows version that you can download from the developer’s site.
- Tweet
Leave a Reply