How to Move Your Home Folder to Another Partition in Linux
If you have accepted the default option of using the entire disk while installing Ubuntu, or if your computer came with Ubuntu preinstalled, you are likely to have a Home folder in the same partition as all of your system files. Under any normal circumstances, this would be fine. However, if you want to reinstall the operating system, you won’t be able to preserve your settings or all of your files unless you make a full backup of the folder before doing so. To avoid any absent-minded hiccups that would result in the removal of your home directory, you should instead let it sit in its own partition. This guide shows how to move your Home folder to a separate partition (or location).
Creating a New Partition
For this guide, we are assuming that your computer only has one hard disk and contains only one partition. To create a new partition, you have to first create a bootable USB thumb drive or optical disc with Ubuntu on it. You can’t partition the hard disk while your bare-metal operating system is still running.
- Insert the thumb drive or disc into the computer, then boot with it.
- On the GRUB screen that shows up, choose the option that says “Try or Install Ubuntu.”
- On the graphical interface that lets you choose between trying and installing the OS, select the “Try” option.
- Once booted in, press the Super key (on most keyboards Win or a key with the Windows logo) and type “GParted.”
- When GParted shows up in your options, press Enter to start your partition manager.
- Select the hard disk your operating system is installed on from the manager. In most cases, it should be something like “/dev/sda”.
Warning: If you have more than one drive and are unsure which one you want to use, boot into Ubuntu normally again and check your file system table with cat /etc/fstab. The file will tell you where each mount point was during Ubuntu’s installation. Find where the root (“/”) directory is mounted (usually described in a comment that reads “/ was on /dev/xxxx during installation”) and take note of it.
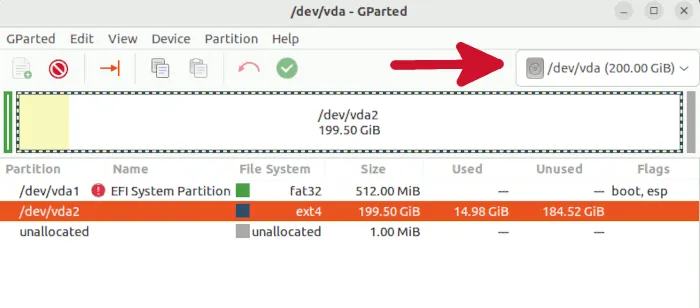
- You should see some entries in the list. Select the entry that corresponds to the main partition. It should be the one with the biggest file size and either in the ext3 or ext4 filesystem format. Right-click on it and select “Resize/Move.”
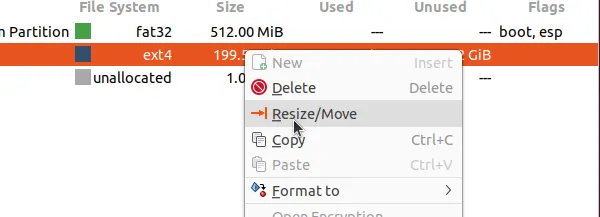
- Set the size for your main partition at a level you want in the “New Size” field. The number represents the partition’s size in MB, so if you want to set it to 50 GB, enter “50000.” When you click on another field, the “Free Space Following” number should automatically adjust to free the rest of the space on your drive for a new partition.
You should set aside at least 40 GB of storage space to future-proof the partition against things that newer versions of your Linux distribution may introduce. Set it to 100 GB if you’re particularly worried about installing many applications. Generally, it doesn’t need much more than that, except in very niche use cases.
- Once you’re done, click “Resize/Move.”
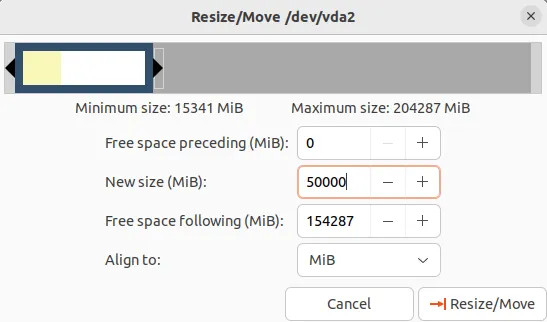
- Back to the GParted main screen, you should see a new “Unallocated” entry with the file size you set earlier. Right-click on it and select “New.” Select “ext4” as the filesystem and click “Add.”
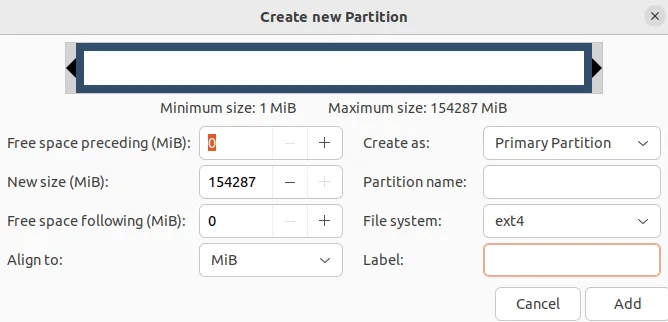
- Click the green checkmark to apply the changes. Depending on your hard disk size, the resizing process may take a long time.
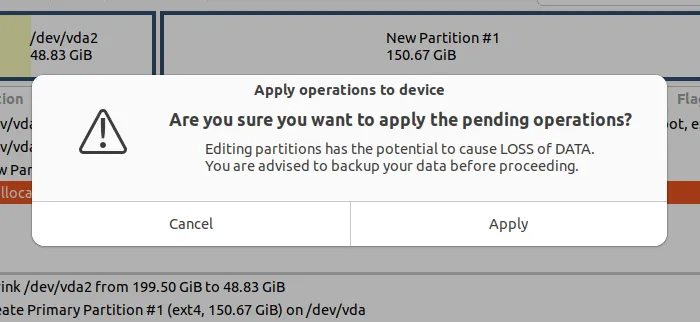
- Once the process has completed, you should see something like the screen below. Write down the new partition’s label.
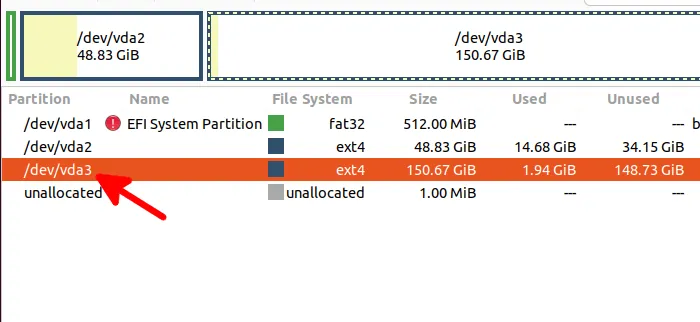
Shut down the live session, remove the live CD/USB, and boot up the computer.
Migrating the Home Folder
To migrate your current Home folder to an external partition, there are four things that you need to do:
- Mount the external partition onto a temporary Home location.
- Copy the files from your current Home folder to this temporary Home folder.
- Relocate the current Home folder.
- Mount the new Home folder.
1. Create a Temporary Home Folder
- Open your file system table file:
sudo nano /etc/fstab
- Add the following line to the end of the file:
/dev/sdxx /media/home ext4 nodev,nosuid 0 2
Remember to replace “sdxx” with the partition label you wrote down earlier. You can also find your partition information with the lsblk command.
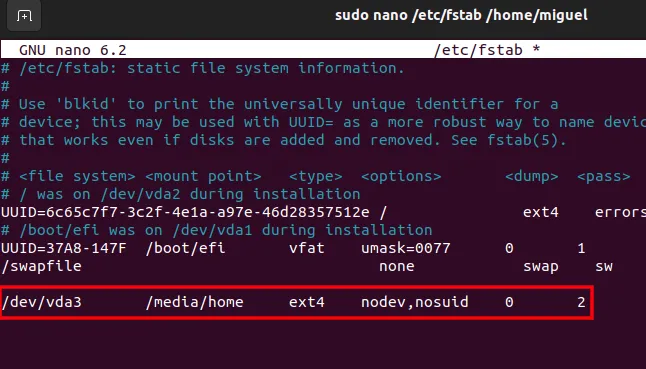
- Save (Ctrl + O) and exit (Ctrl + X) the file.
- Create a mount point:
sudo mkdir /media/home
- Reload the updated file system table.
sudo mount -a
You should see a “home” folder in the Media directory.
2. Copy the Files from Your Current Home Folder to the New Partition
Next, copy all of the files from the current Home folder to the new Home folder. You can simply do the usual “Select all,” “Copy” and “Paste” routine to transfer all of the files to the new Home folder. However, you might be missing the hidden files, and some of the file permissions might not be preserved. Use rsync to preserve the attributes of all of your data plus anything else hidden in your Home folder:
sudo rsync -aXS --progress /home/. /media/home/.
If everything worked well, you should see the same files and folders in your new Home folder.
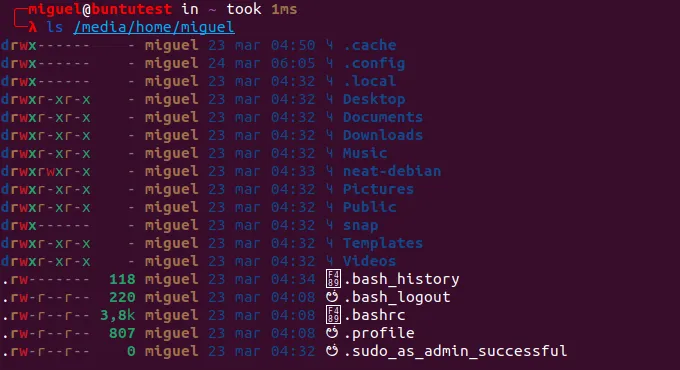
3. Relocate the Current Home Folder
Once the new home has been set up, we need to remove the existing Home folder to make way for the new Home folder in the new partition.
To do that, type the following commands in the terminal:
cd /sudo mv /home /home_backup

sudo mkdir /home
The above commands move the existing Home folder to Home_backup and create an empty Home folder for the new Home folder to mount to.
4. Mount the New Home Folder
To complete the migration, mount the new Home folder as “/home” by revisiting the fstab file.
sudo nano /etc/fstab
Change “/media/home” to “/home”. Save and exit the file.

Lastly, reload the fstab file:
sudo mount -a
That’s it. You have now migrated your Home folder to an external partition.
Optional: Removing the “Home_backup” Folder
Once you are done with the migration, you can either use the old Home folder as a backup or remove it to release the storage space. To remove it, use the command:
sudo rm -rf /home_backup
Frequently Asked Questions
I received an error when trying to resize the partition in GParted. What should I do?
If you investigate your error a little more deeply, you may find that GParted was unable to edit your partition schema, as at least one of them was already mounted. You will have to unmount all partitions you’re trying to work with before attempting to resize them. Right-click on each partition in the drive you selected in GParted and click “Unmount.” Alternatively, open a terminal and type sudo umount /dev/sda?* Remember to replace sda with the actual drive you’re working with.
What’s the absolute minimum size I can have for my system partition?
As the Linux ecosystem evolves, it continues to add new services and applications to each release that makes each subsequent release a bit larger than the last. Using Ubuntu as a reference, the minimum storage requirement was 25 GB. Adding 10 GB of headroom to any current Ubuntu version’s minimum system requirements for storage could secure your system for a decent period of time. If all else fails, use what you learned in this guide to resize your partitions to better fit your needs at any given time.
Image credit: William Warby
- Tweet
Leave a Reply