How to make a Picture transparent in PowerPoint
One of the cool actions you can perform using PowerPoint is to make a photo transparent. You can change the opacity of an entire picture or just specific areas; the choice is yours. In this post, we will show you how to make a Picture transparent in PowerPoint.
How to make a Picture transparent in PowerPoint
To make an image transparent in PowerPoint, you have to change the opacity of the image – and you can do it for the whole image or a part.
Change the opacity of an image in PowerPoint

When it comes down to changing the opacity, it is a relatively easy task, so let us explain what you need to do.
Open the PowerPoint application on Windows 11/10.
Create a new presentation or open one that was created prior.
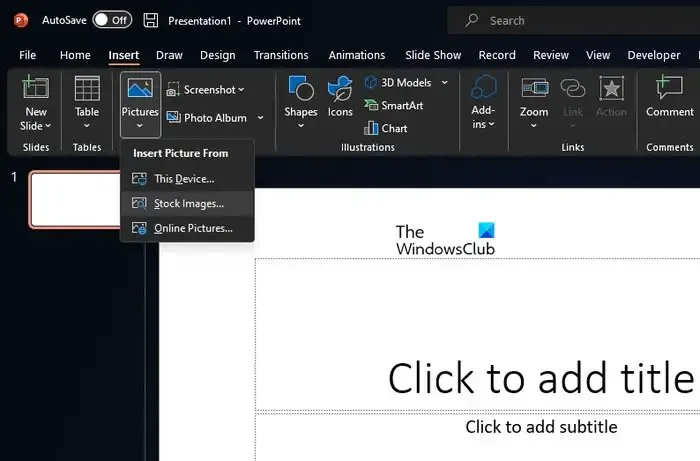
Go to the Insert tab, then select Pictures from the Ribbon.
Choose where you want to insert the pictures from via the dropdown menu.
Once the picture is added, click on it right away.

Right-click on the photo, then select the option that reads, Format Picture.
To the right of the presentation, you’ll see the Format Picture pane.
Click on the image icon via the pane, then click the arrow next to Picture Transparency.
Next, you must change the transparency scale to 50 percent or any level you deem fit.
Look back on your image, and you’ll see transparency changes.
Change the opacity of a specific part of an image in PowerPoint

Maybe you do not want to make the entire image transparent. Maybe you only want to add opacity to a specific section. If that is the case, then you’re in the right place, so let us explain what needs to get done.
Follow the instructions above to add a picture to your PowerPoint presentation.
- Select the image, then go to Picture Format.
- Via the Adjust group, select Color.
- Click on Set Transparent Color. You can find it close to the bottom of the menu.
- Next, click areas on the image, then watch how that area becomes transparent without much effort.
We should point out that if you print a presentation, the transparent section of your picture will become white on the hardcopy.
Can I make PowerPoint background transparent?
Insert the picture you want into your PowerPoint presentation. After inserting the photo, please click on it to reveal the Image Format tab. From here you will find the option to make the picture transparent. Click on Transparency, then click on the preview image with the needed transparency.
Why is PNG not transparent in PowerPoint?
That’s because most printers do not accept transparent color formats. When printed, the transparent section will come out looking white, so always keep that in mind before using PNG image format over others.
Leave a Reply