How to Install Optional Features in Windows 11
There’s a new tool on Windows 11 using which users may download and install optional features on their PCs. This new feature includes different scripts, tools, drivers, and other essential ones. If you visit this section, you will some pre-installed features which comprise WordPad, Media Player, PowerShell ISE, and others.
Say, for example, you want to install graphics tools or add a new script/font on your computer. Well, you can easily add such basic features to your computer using this new tool titled – “Optional features”.
Please enable JavaScript
Install Optional Features on Windows 11
To install a new optional feature on Windows 11, all you need is to follow and apply the below steps –
- Press Win + X and select “Settings“.
- On the left navigation, click Apps and head over to the right pane.
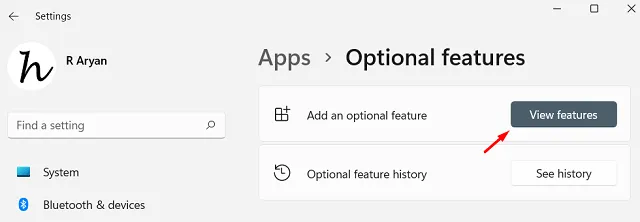
- Come down to the fourth option and click Optional Features.

- You may click on the “View features” option to see a list of items that you can install on your device. This section mainly includes different scripts, fonts, a few tools, and drivers.
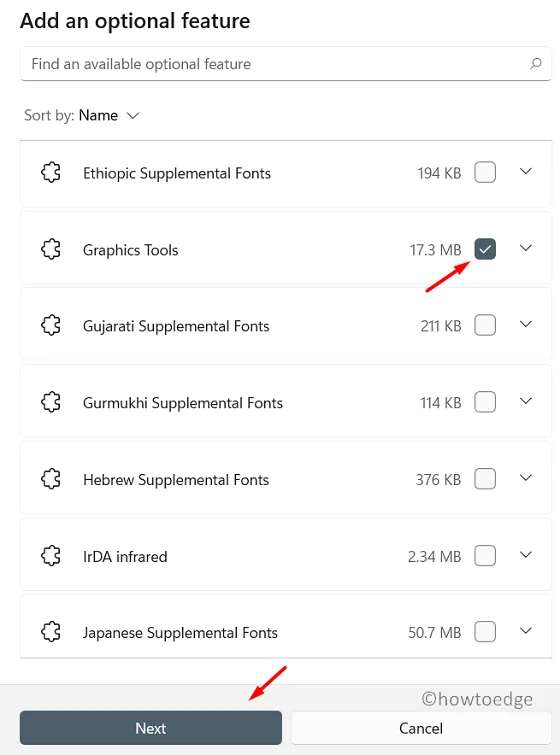
- Locate the feature which you want to install by scrolling down the cursor. Or, you may search for the feature name inside the text field and press Enter.
- After you find a particular feature, tick the box available next to it and hit Next.

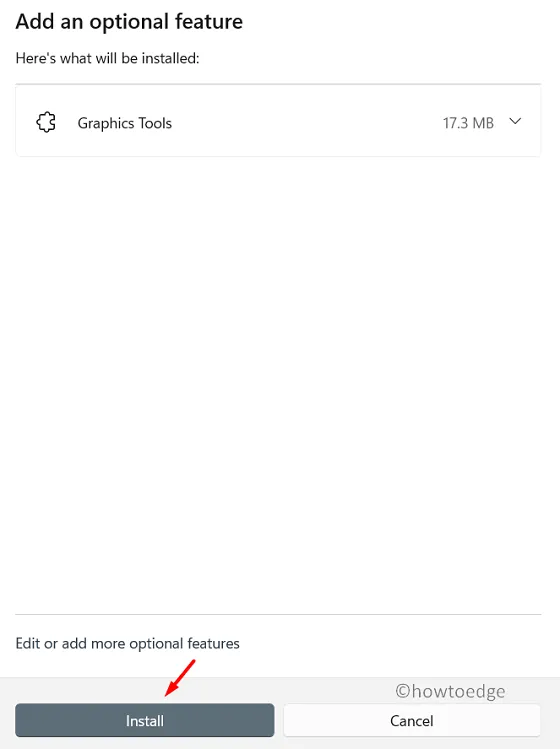
- Click Install next to start downloading and installing the selected feature.

- Make sure to reboot your PC after you install a new feature on your PC.
Uninstalling Optional Features on Windows 11
If for any reason you don’t like a specific feature and want to remove that from your computer, you may follow these easy steps –
- First of all, launch Settings by pressing Win + I.
- Go to Apps > Optional Features next.
- Under Installed features, search for the feature that you no longer need running on your PC.
- When found, click on it once and hit Uninstall.
- The selected feature will uninstall immediately afterward and this action will feature inside the “Recent actions”.
Where can I view my recently installed or uninstalled features?
When you install a new feature or remove a pre-existing feature from your device, they appear under the “Recent actions” section. One may reach out to this section by navigating to the below path –
Settings (Win + I) > Apps > Optional features > Recent Actions
I hope you find this article useful and easy to follow. Let’s know in the comment section if you face any difficulty following this guide.
- How to Solve 100% or High CPU Usage in Windows 11
- Fix – Your PC has been reset, but we couldn’t remove all your personal files
- How to Check Your Computer Health in Windows 11/10
Leave a Reply