How to Fix Update Error 0x8007371c in Windows 10
What do you get when an error 0x8007371c occurs?
Please enable JavaScript
The update error 0x8007371c often accompanies an error message that says either of the following –
-
ERROR_SMI_PRIMITIVE_INSTALLER_FAILED -
The SMI primitive installer failed during setup or servicing
This is quite clear in the error message itself is that either the servicing stack update is failing to install, or some required drivers were not running on your computer. Let’s learn next how to solve this update issue in Windows –
Windows 10 Update Error 0x8007371c Solutions
To solve the 0x8007371c error on Windows 10 PC, try the below workarounds. There is no need to follow the solutions in sequential order, however doing so may opt for that possibility.
1] Restart Windows and Check for Updates
Before proceeding to the actual solutions, we recommend properly restarting your PC once. This is essential as many a time we simply don’t know how long we haven’t rebooted our device. When the Windows 10 reloads, go to Settings > Update & Security > Windows Update, and hit Check for Updates.
In case you still receive this bug, try the below suggestions –
2] Run Windows Update Troubleshooter
- Use Win + I to launch the Settings app and choose to “Update & Security“.
- Click the Troubleshoot option available on the left pane.
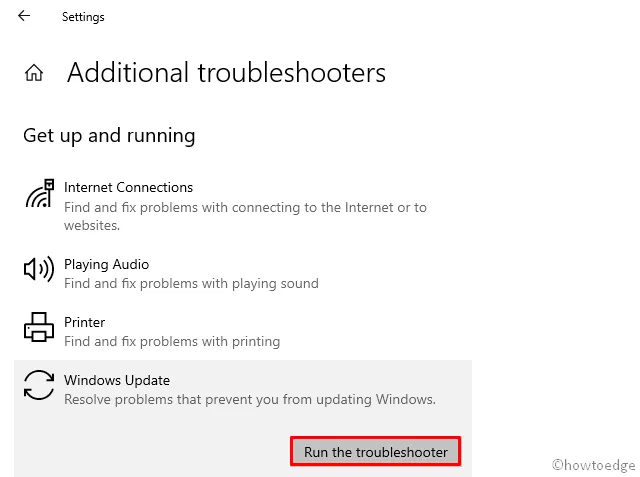
- On the right pane, hit the “Additional troubleshooter” link.
- Next, click Windows Update and press the “Run the troubleshooter” button.

- This tool then immediately starts looking for possible corrupt files and repairs them as well.
- Once this completes the repair process, Restart your Windows again.
3] Rename SoftwareDistribution and Catroot2 Folders
If the Troubleshooter doesn’t resolve the error 0x8007371c, Windows Components must have become corrupt somehow. To fix this, you need to clean the temporary files that are stored inside the Software Distribution and Catroot2 folders. After clearing its contents, attempt to check for Updates again. You may find the above two folders at these locations – C:\Windows and C:\Windows\System32.
In case the Update error 0x8007371c is still unresolved, try renaming these two folders. You won’t be able to rename these folders just like normal folders as they are an integral part of Windows Operating System. Hence, follow these easy steps to rename them –
- First of all, open Command Prompt with admin rights.
- Run these codes on the console one by one, doing so will stop some of the essential services.
- Don’t forget to press the Enter key after each command –
net stop wuauserv
net stop cryptSvc
net stop bits
net stop msiserver
- Copy/paste these two codes separately followed by the Enter key –
ren C:WindowsSoftwareDistribution SoftwareDistribution.old
ren C:WindowsSystem32catroot2 Catroot2.old
- Restart the services that you stopped earlier by running the below codes –
net start wuauserv
net start cryptSvc
net start bits
net start msiserver
The Update error 0x8007371c must have been resolved by now. If not, try the next set of workarounds –
4] Manually download and install Standalone Package
If none of the fixes above resolve the error, manually installing the recent patch should fix the 0x8007371c error. However, you must know the latest security patches for your current Windows 10 version. You may look for failed updates under “View Updates History” on the Windows Update page. For simplicity, we have compiled a list of recent Windows 10 Cumulative Updates.
Once you have the relevant KB number to search for, use the below guideline to download and install it on your device –
- First of all, open the Microsoft Update Catalog.
- Paste the KB number noted down above and hit Enter. A list of matching results pop-up.
- Hit the Download button next to the system architecture to which your PC currently belongs.
- Click the top link and the .msu file will start downloading immediately afterward.
Once the setup file gets downloaded, browse to the Download folder and double-click on the setup file. Your system will soon begin upgrading to the chosen OS Build.
5] Boot into Safe Mode and perform Windows Update
The above method works for almost all cases. However, if you are still receiving the 0x8007371c error, there’s a third-party influence preventing the Windows Update to occur normally. To solve this, you may boot into Safe Mode with Networking. Doing so will devoid any third-party applications from interfering with system files. Here’s how to perform Clean Boot on Windows PC –
- Navigate to the below path –
Settings (Win+I) > Update & Security > Recovery
- On the adjacent right, locate and click “Restart Now” under Advanced Startup.
- When Windows 10 reboots, browse to the following location –
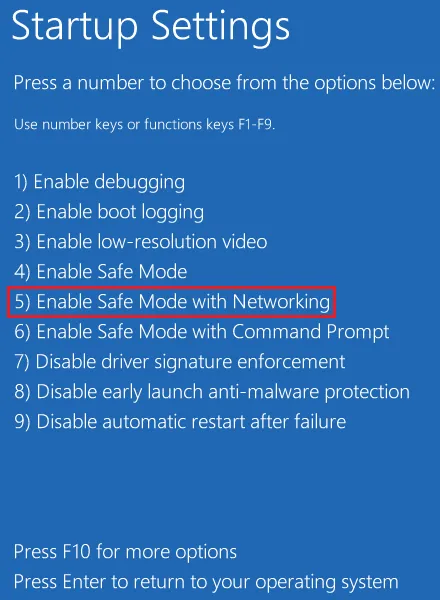
Choose an option > Troubleshoot > Advanced Options > Startup Settings > Safe Mode with Networking

|
Alternate Way to Enter Safe Mode
Open the System Configuration window, switch to the Boot tab, and select “Safe Boot” under Boot options. Do check the “Minimal” checkbox before clicking the OK button. |
Use System Backup or Clean Install
If you had created system backups on the computer, it’s the right time to revert back OS to a state where everything was running normally. Learn how to use system restore points in case you have created one in the past. If not, read on how to perform a clean installation of Windows.
Leave a Reply