How to Fix the “Your Connection Was Interrupted” Error on Windows
Are you tired of getting the “Your Connection Was Interrupted” error message while browsing the Web on your Windows computer? It’s a frustrating experience that can disrupt your workflow. This guide shows you some simple yet effective solutions to fix this issue and get your Internet back up and running smoothly.
6 Options to Fix the “Your Connection Was Interrupted” Error
To fix the “Your Connection Was Interrupted” error on Windows, first go through the following simple fixes, and if you’re still experiencing an issue, follow the solutions listed below.
- Refresh the web page: this is the simplest solution to try: press the “Refresh” button and see whether the page reloads. In many instances, this is all you need to do. You can also try closing and reopening the browser.
- Check network status: hover your mouse over the connected network on the system tray. This will tell you if your connection is still active and your device is connected to the Internet. If you want further details on a specific network, right-click on the network and select “Network and Internet settings.”
- Restart your router or modem: turn off the router/modem and wait a few minutes, then turn it back on and see whether you can reestablish the connection. Sometimes a simple restart can successfully reset your connection and make the error message disappear.
- Make sure you’ve updated or reinstalled network drivers: network drivers need to be updated regularly to avoid causing any issues. If updating the network drivers does not work, you can uninstall and reinstall the network drivers and see whether that solves your problem.
1. Reset Network Settings
More often than not, corrupt or faulty network settings can cause network interruptions, which in turn may produce the error you’re seeing. You can solve this problem by simply resetting your network settings.
- Click the Start button on your Windows.
- Select the Settings app.

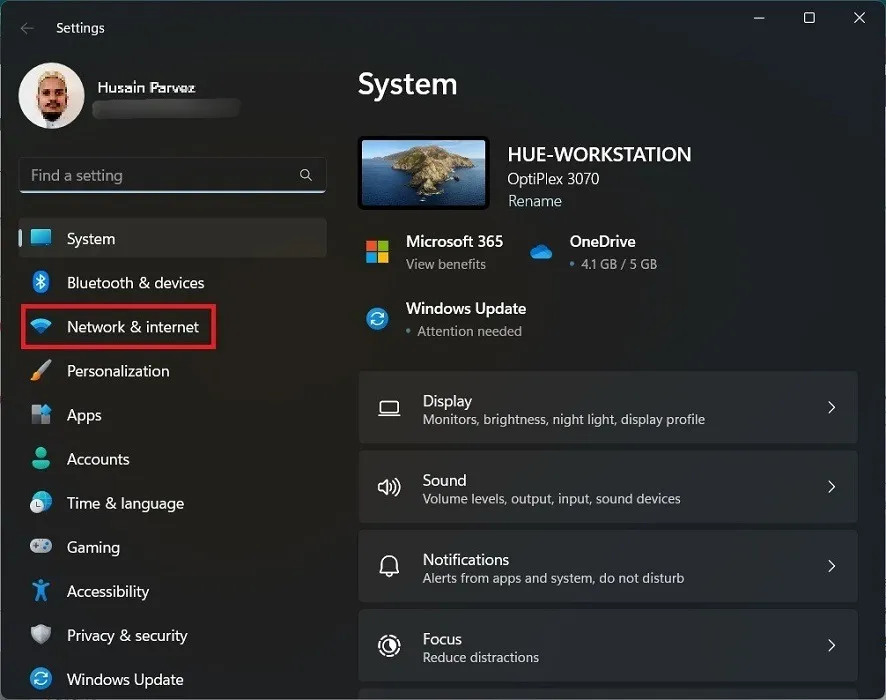
- Click “Network & Internet.”

- Scroll down and click the “Advanced network settings” tab.
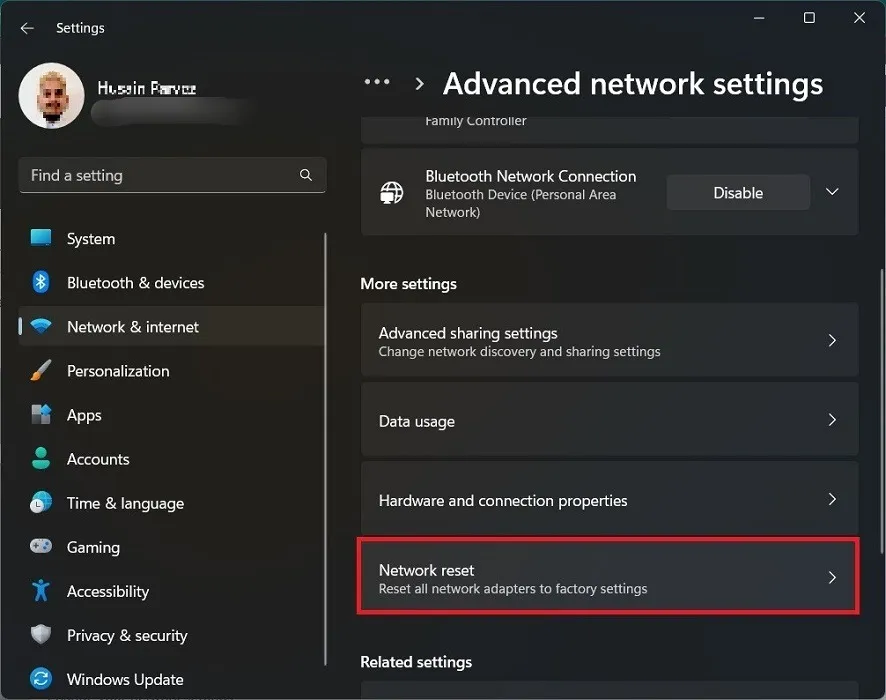
- Select “Network reset.”
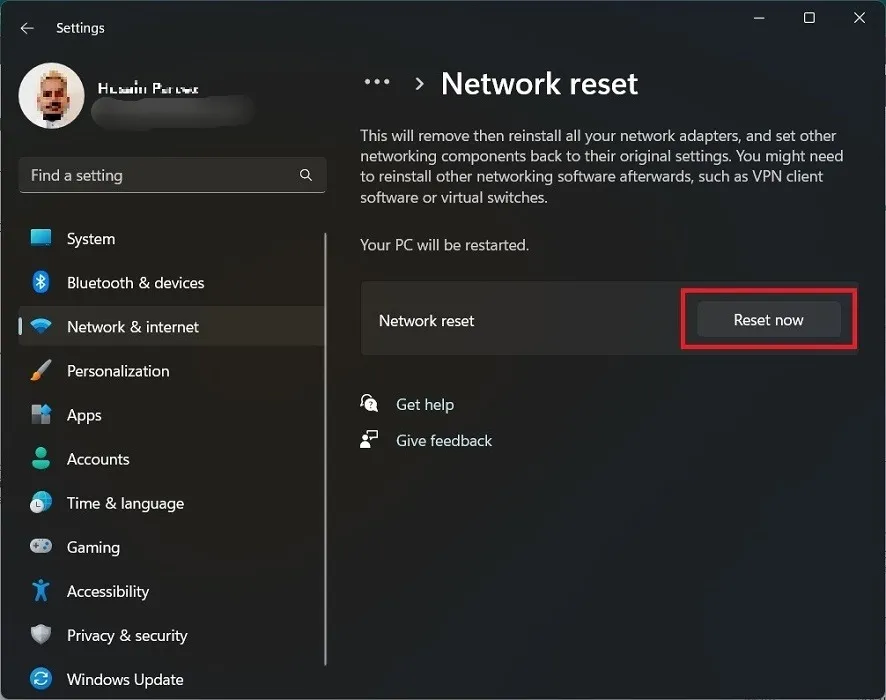
- Click the “Reset now” option to reset your network settings.
2. Disable Firewall and Antivirus
Your firewall or antivirus (if you have one installed) could also be behind the error message. It’s a good idea to try turning either of them off to see whether the connection gets restored.
- Go to “Settings -> Network & Internet.”
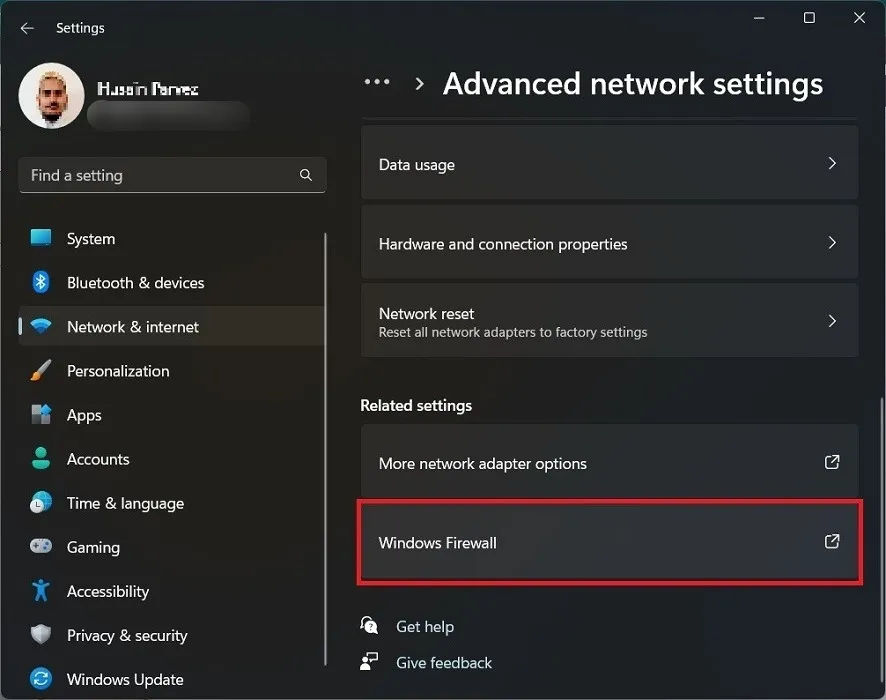
- Scroll down and click the “Advanced network settings” tab to find the “Windows Firewall” button.
- Click “Firewall & Network protection” on the left. Toggle off the firewall instance for all three instances: “Domain network,” “Public network,” and “Private network.”

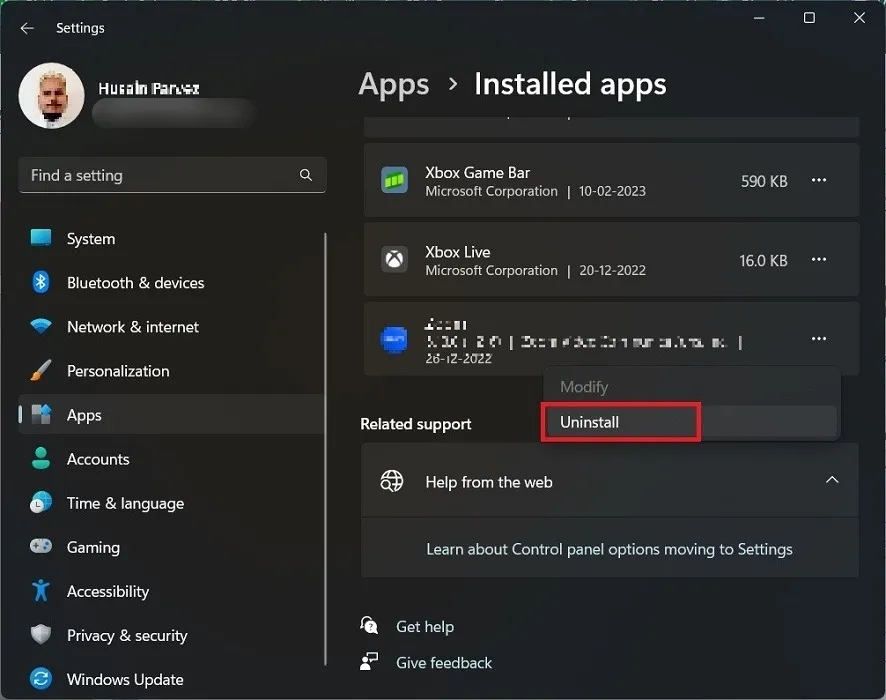
- To uninstall your antivirus, go to “Settings -> Apps -> Installed apps.”

- Scroll down to find your antivirus program and right-click on it.
- Press “Uninstall” and follow the screen prompts.
3. Clear Browsing Data and Cache
Another way to effectively solve the connection error is to clear the browsing data in your Windows browser. We are using Google Chrome for this tutorial, but the steps are similar in other browsers.
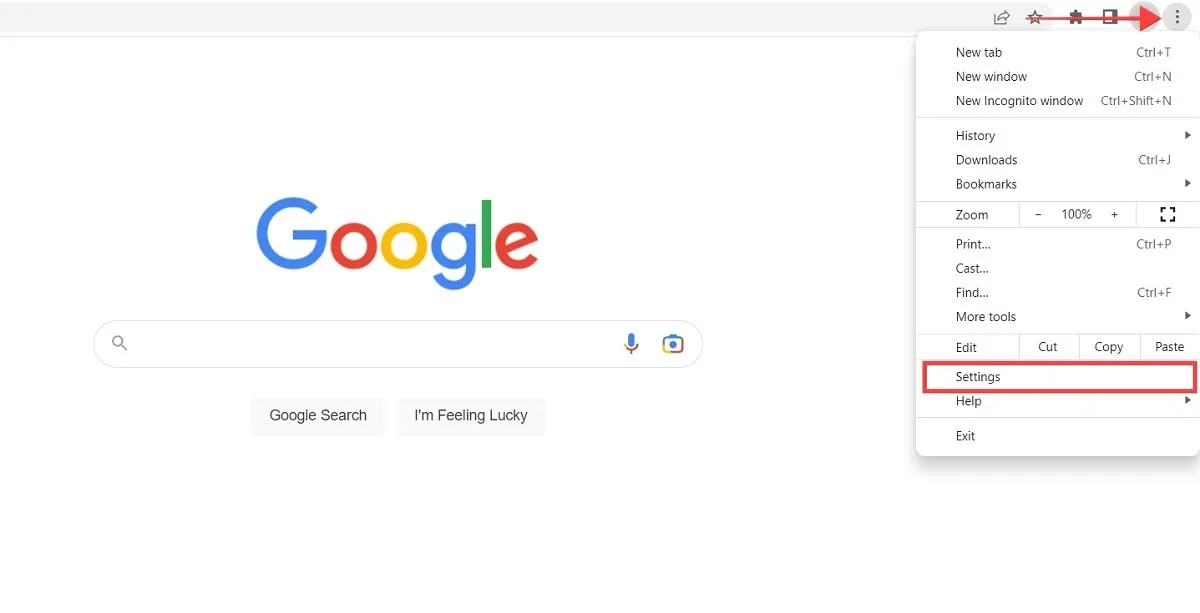
- From the Chrome window, click on the three-dot icon on the right.
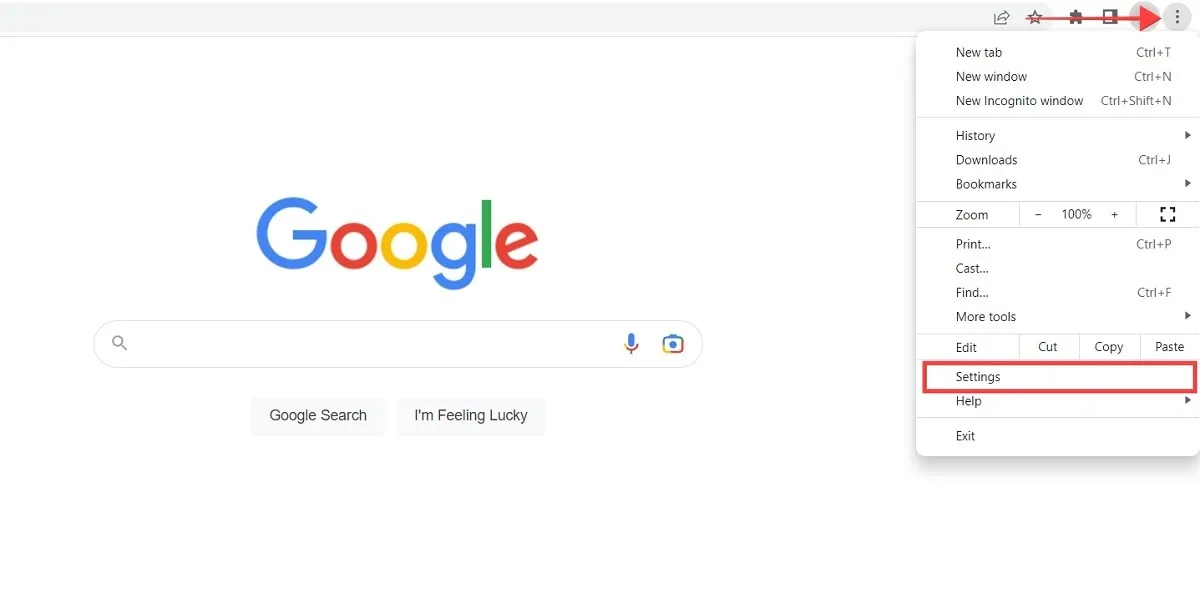
- Select “Settings” from the menu.
- Click “Privacy and Security” on the left panel.

- Open the “Clear browsing data” section.
- Check the “Browsing history,” “Cookies and other site data” and “Cached images and files” options.

- Click the “Clear data” button to erase all of the browsing data and cache from your browser.
4. Change DNS Settings
Your ISP (Internet Service Provider) could be responsible for experiencing an interruption on your network. Changing DNS settings and connecting to a public DNS service can solve this issue.
- Go to “Settings -> Network & Internet.”
- Scroll down and click the “Advanced network settings” tab, then click the “More network adapter options” button.

- In Windows 10, click on “Change Adapter Settings.” It will list all of the connected networks and devices.
- Right-click the current network and choose the “Properties” option.
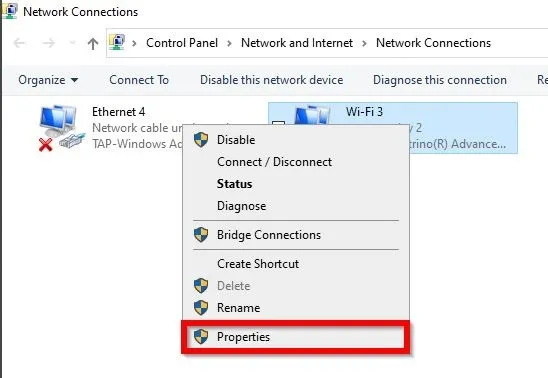
- Select the “Internet Protocol Version 4 (TCP/IPv4)” option and click on “Properties.”

- In the new window, select “Use the following DNS Server addresses” and add your new DNS server address. Configure your network settings to use the IP addresses 8.8.8.8 and 8.8.4.4 as your DNS servers. These are Google Public DNS addresses that are available for Internet users worldwide. Google Public DNS is fast, secure, and the largest public DNS service in the world.
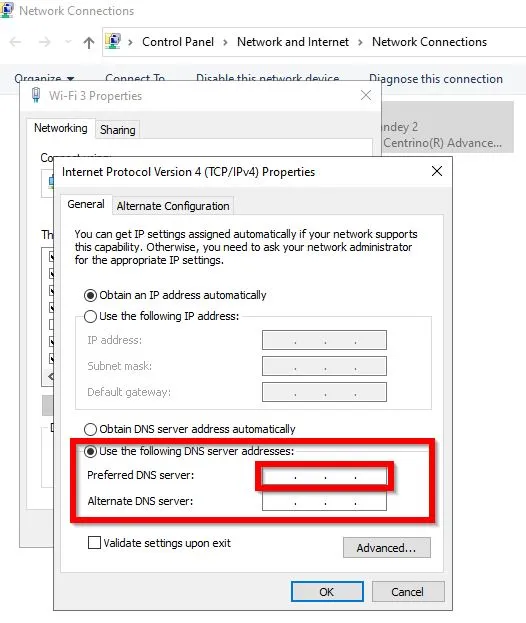
- Click “OK” to change your DNS address.
5. Check Proxy Settings
Having proxy settings enabled may interfere with your browser’s ability to connect to a network. You can disable the proxy settings and set them in default mode, which may solve the network issue.
- Open Chrome, click on the three-dot icon and select “Settings.”
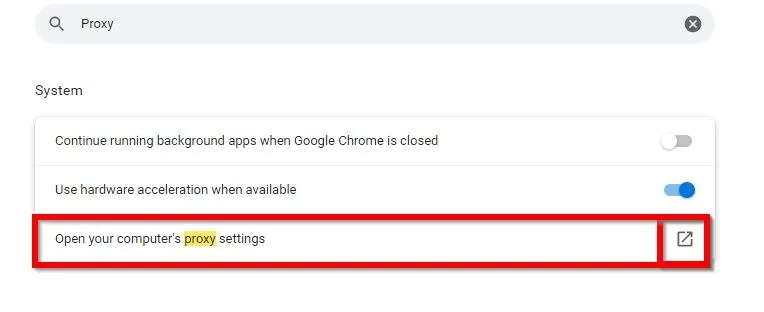
- Search for “Proxy” via the search box above and click “Open your computer’s proxy settings.”
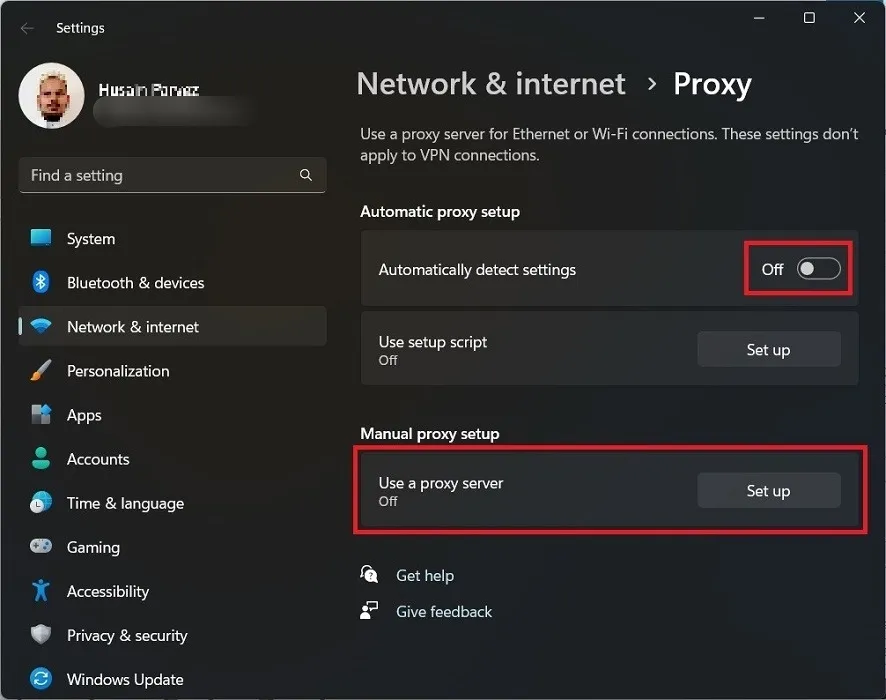
- Turn off the “Automatically detect settings” and “Use a proxy server” options.
6. Restore Windows to an Earlier Point
If you just updated Windows to the latest version, and this error message appears, you may have to revert your system to the previous version.
To roll back to the old build less than 10 days after you installed the update, follow the steps outlined in our article.
Frequently Asked Questions
How do I fix a slow Wi-Fi connection?
The reasons for a slow Wi-Fi connection are diverse and range from the number of devices connected to the router, to the router’s age, to issues with your ISP. These tips may help you solve your slow Wi-Fi woes. It also may be helpful to troubleshoot a router.
What does “A network change was detected”mean?
This message usually appears underneath the “Your connection was interrupted” error in your browser. It means that your computer switched the network when viewing a webpage or downloading a file. Basically, you were not given permission to view a particular site.
Image credit: Freepik. All screenshots by Husain Parvez.
- Tweet
Leave a Reply