How to Enter BIOS in Windows: 7 Methods That Work
Some changes to your Windows PC can only be accomplished from the BIOS or UEFI. The method of getting there ranges from pressing the right key at the right time to using several desktop tools. Instead of just wondering how to enter the BIOS in Windows, pick your favorite method below.
1. Press a Key During Startup
The most popular method, and the main method for older versions of Windows, is pressing a certain key or key combination during the boot process. The only problem with this method is that the key varies based on different manufacturers.

For older Windows PCs, the boot process is slower. Look for the key(s) on the screen, either right before the Windows logo appears or on the splash screen itself. Most Windows 10 and 11 PCs boot much faster, which means you probably won’t see the key. These are the most common key combinations to use:
- F1
- F2
- F10
- Delete (or Del)
- Esc
The most likely keys for popular PC manufacturers include:
- Acer: F2 or Del
- Asus: F2 or Del
- Dell: F2 or F12
- Gateway: F1 or F2
- HP: Esc or F10 (some older models use F2 or F12)
- Lenovo: F1 or F2
- MSI: Del
- Samsung: F2
- Sony: F1 or F2
- Surface: hold and release the Power button while holding Volume Up
- Toshiba: F2, F12, or Esc
You’ll need to restart your computer and press the correct key as soon as the boot process starts. Keep pressing it until the BIOS screen appears.
2. Windows Recovery
On some newer Windows PCs, you can’t enter the BIOS or UEFI settings just by pressing a key. Instead, you have to enter recovery mode first. The steps vary slightly between Windows 10 and 11, but the end result is the same.
- Go to Start and select (or search for) “Settings.”
- Go to “System” in Windows 11 or “Update & Security” in Windows 10.
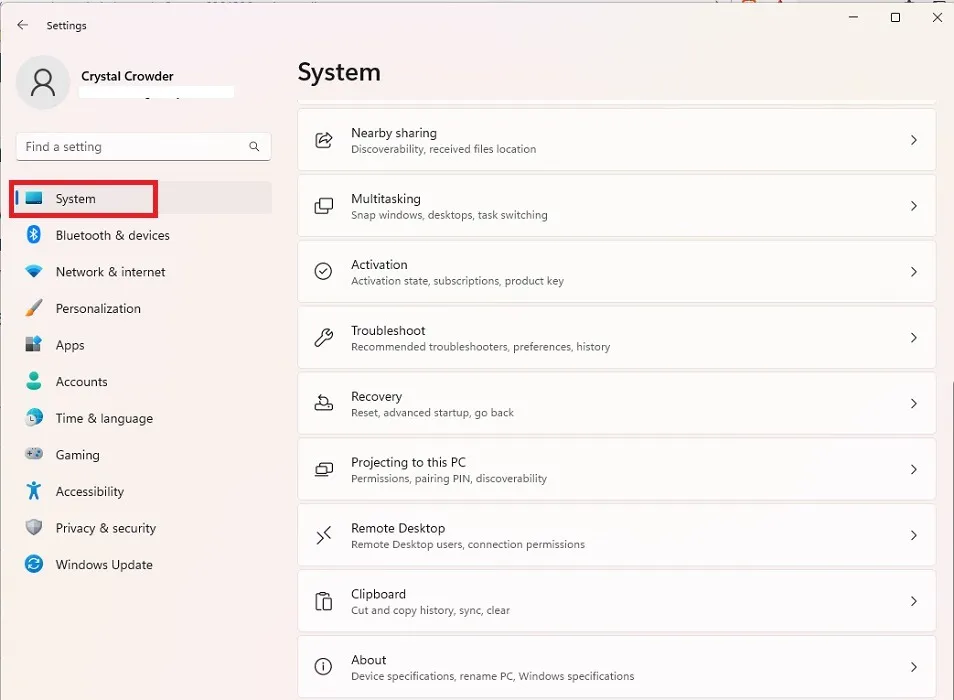
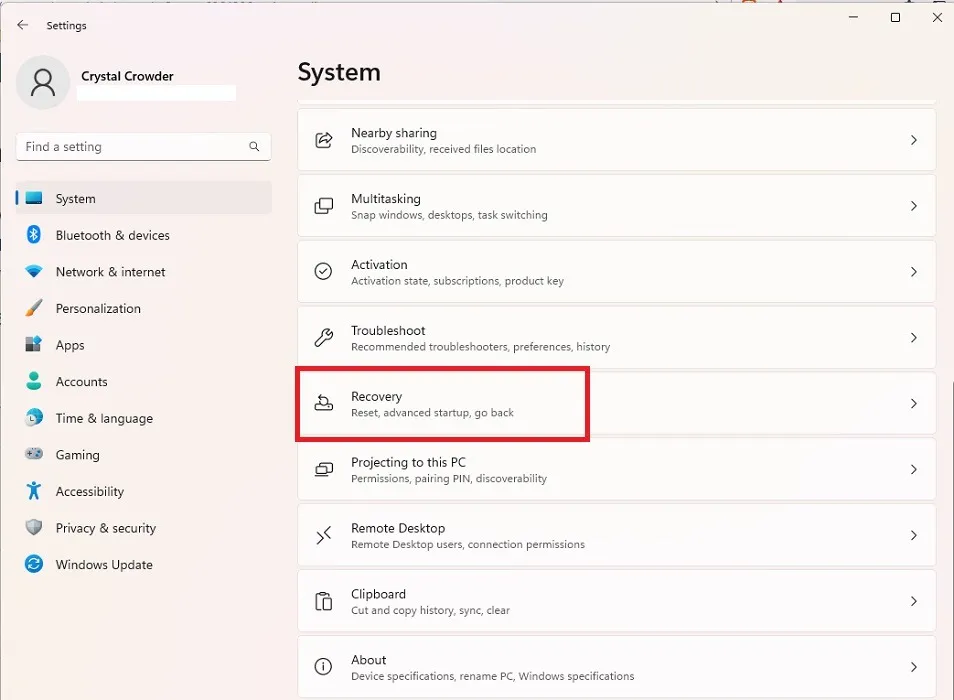
- Select “Recovery” in the right pane on Windows 11. On Windows 10, it’s in the left pane.
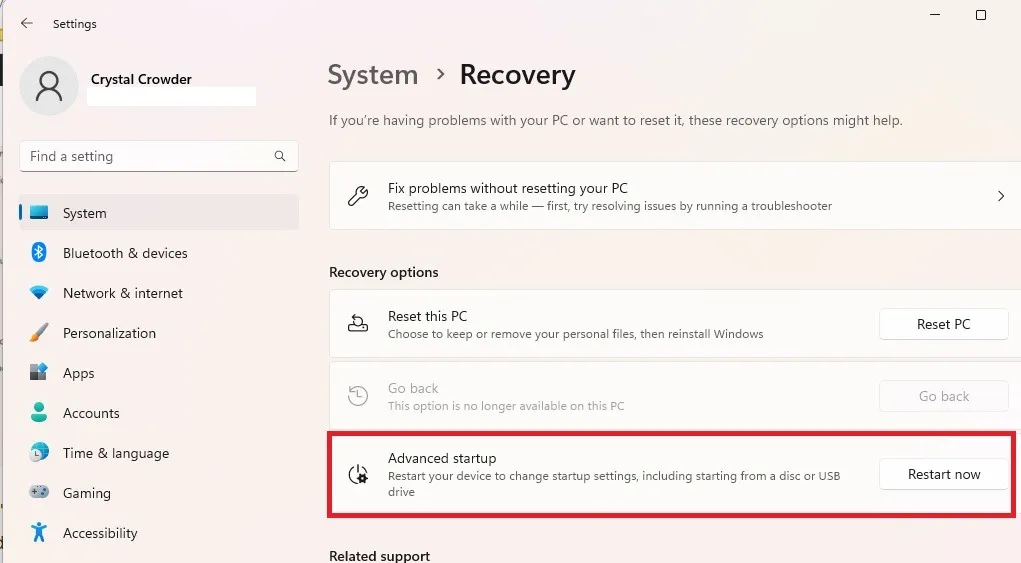
- Press “Restart Now” next to “Advanced startup.” Your PC will restart immediately. Ensure that you’ve saved all open work before doing this.
- On the next screen, select “Troubleshoot.”
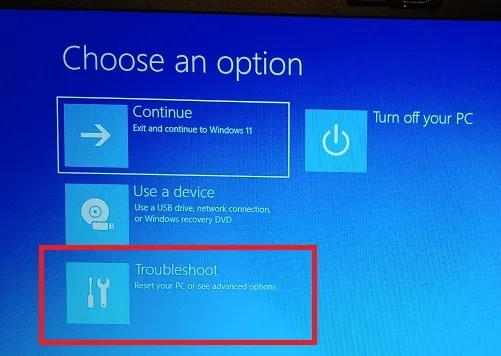
- Choose “Advanced options.”
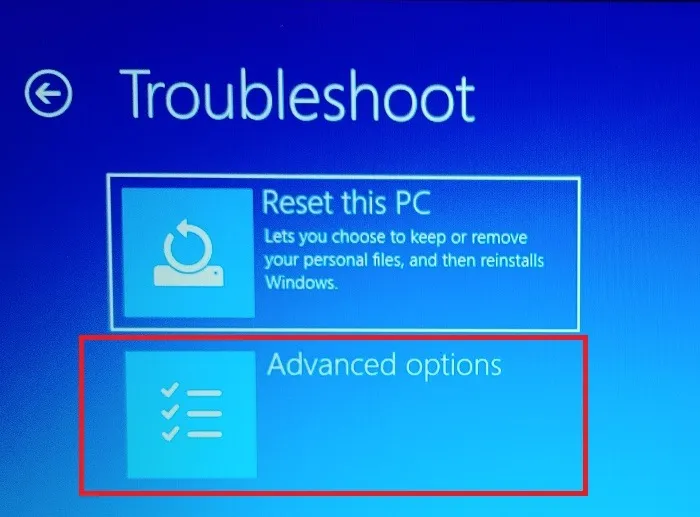
- Select “UEFI Firmware Settings.” If you don’t have UEFI, learn how to convert legacy BIOS to UEFI. You can also get up to speed with the differences between the two.
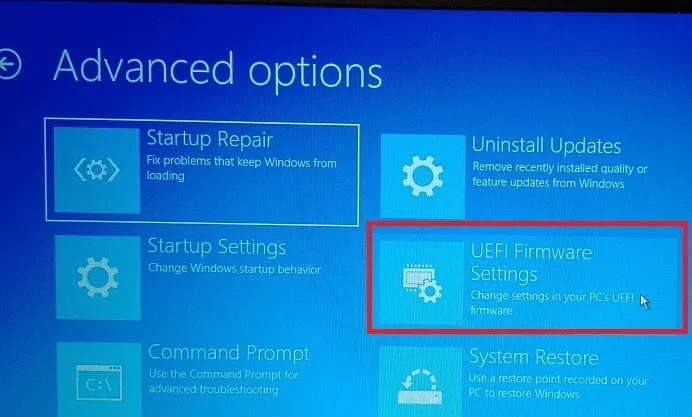
- Press “Restart.”
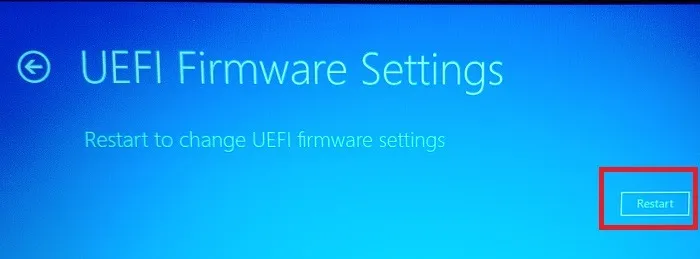
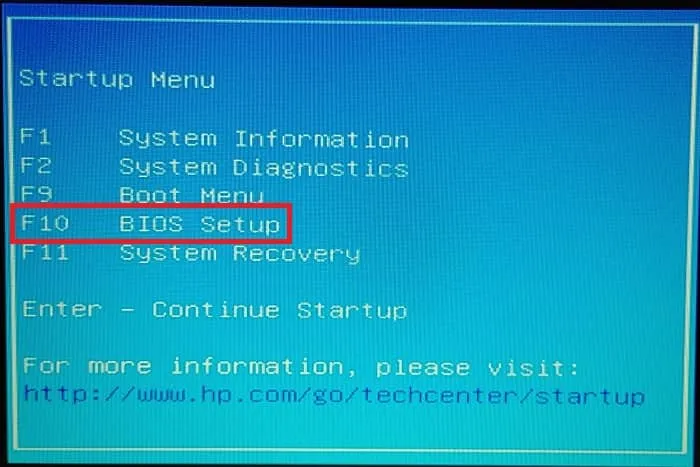
- Select “BIOS Setup.” Make a note of the key next to this option so that you can use it in the future.
3. Enter BIOS via Command Prompt
If you don’t want to go through several windows in Settings, it’s possible to use a single command to restart your PC and access the Advanced Startup options just as we did in the previous section.
In Windows 10, you can use Command Prompt. In Windows 11, you also have the option to use the Terminal app. However, the command is the same in both cases.
- Press Win + R, type
cmdin the Run window, and press “OK” to open Command Prompt. If you prefer using a Terminal window, press Win + X and select “Terminal (Admin).”
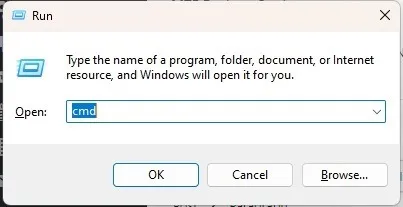
- Enter the
shutdown /r /o /f /t 00command at the prompt. This will restart your PC immediately.
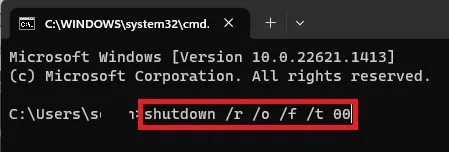
- When your PC restarts, it’ll be the same process as the previous section. Go to “Troubleshoot -> Advanced Options -> UEFI Firmware Settings -> Restart -> BIOS Setup.”
4. Enter via Run
A simpler version of the previous method is to enter the shutdown command directly in the Run dialog.
- Press Win + R to open a new window.
- Enter
shutdown /r /o /f /t 00in the box.
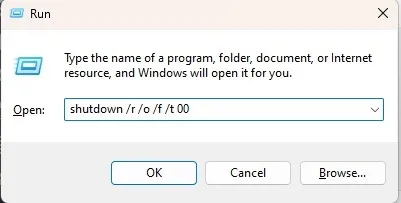
- Press “OK” to restart, enter the Advanced Options screen, then select “Troubleshoot -> Advanced Options -> UEFI Firmware Settings -> Restart -> BIOS Setup.”
5. Use a Shift Restart
If you’re looking for the fastest method of entering BIOS in Windows 11, the Shift + Restart option is the best choice. This combination restarts your PC and takes you to the Advanced Options window shown in the previous methods.
- If you’re on the login screen, select the “Power” button with your mouse to bring up the shutdown, sleep, and restart options. If you’re on the desktop, open the Start menu and click the “Power” button.
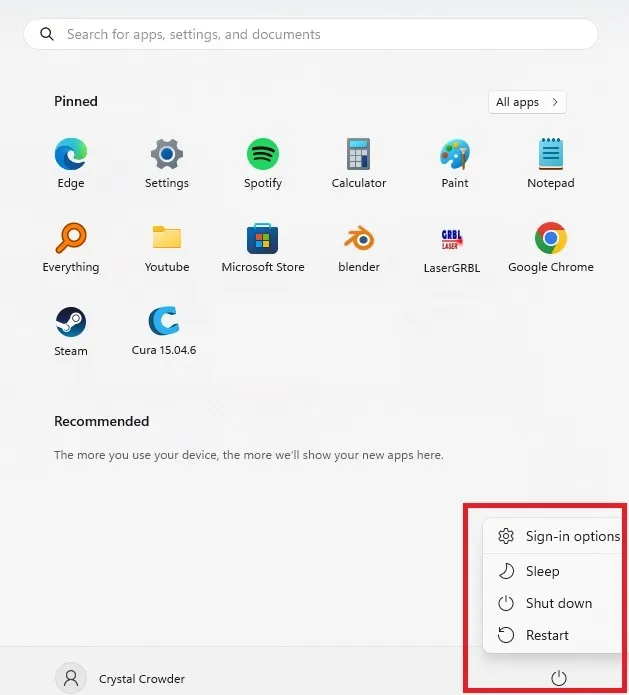
- Hold your Shift key and click “Restart” with your mouse at the same time.
- This should restart your PC immediately and take you to the Advanced Startup options window. From there, go to “Troubleshoot -> Advanced Options -> UEFI Firmware Settings -> Restart -> BIOS Setup.”
6. A Specific Button
Some PCs include a special BIOS button or button combo that lets you access the BIOS quickly. For instance, if you have a Surface device, you can use the Volume Up button and the Power button at the same time to restart into the BIOS.
7. Create a Shortcut
The fastest way to enter your BIOS on Windows is via a shortcut icon. If you need to enter the BIOS often, it’s well worth it to create a shortcut for your desktop. Just don’t press it accidentally, or you’ll suddenly restart your PC.
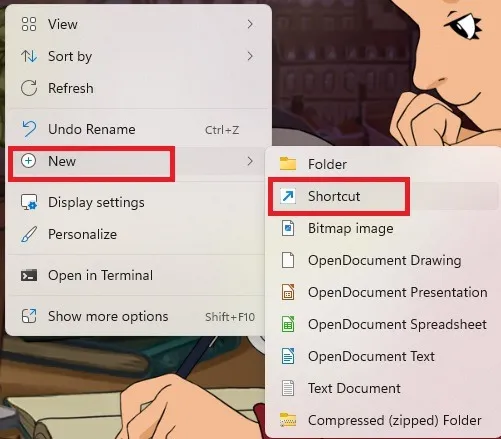
- Right-click where you want to create your new BIOS shortcut.
- Select “New -> Shortcut.”
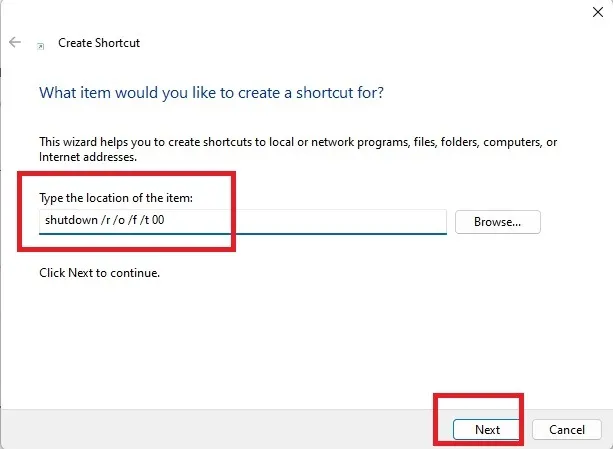
- Enter this path in the location box:
shutdown /r /o /f /t 00.
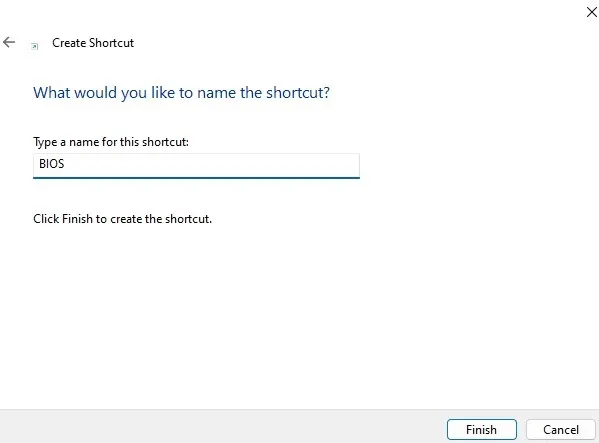
- Give a name to your shortcut and press “Finish.”
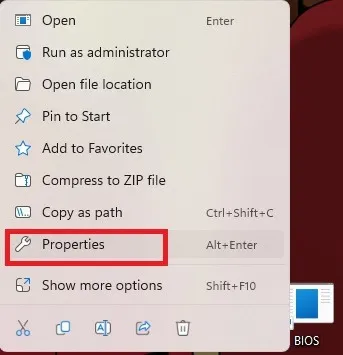
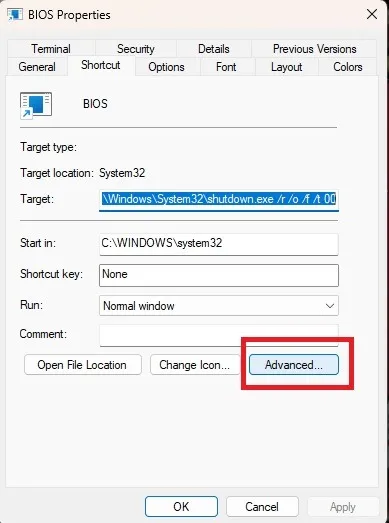
- You’ll see your new icon. Right-click the icon and choose “Properties.”
- Select “Advanced” on the “Shortcut” tab.
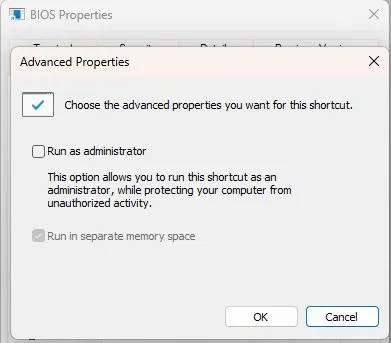
- Check “Run as administrator.” Press “OK” and “Apply” to save the changes.
- If you want to change the icon image, right-click it and select “Properties.” Select “Change icon” on the “Shortcut” tab. Choose an icon and select “Apply.”
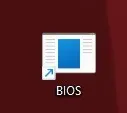
- When you click the icon, your PC restarts immediately, and you enter the Advanced Options window as in previous methods. Then go to “Troubleshoot -> Advanced Options -> UEFI Firmware Settings -> Restart -> BIOS Setup.”
Troubleshooting
In recent versions of Windows, Fast Boot helps your PC start up faster. Instead of truly shutting down, it goes into a mix of hibernation and partial shut down. If you try to enter the BIOS by powering on your PC from a shutdown state, you can’t, as the PC never started from scratch.
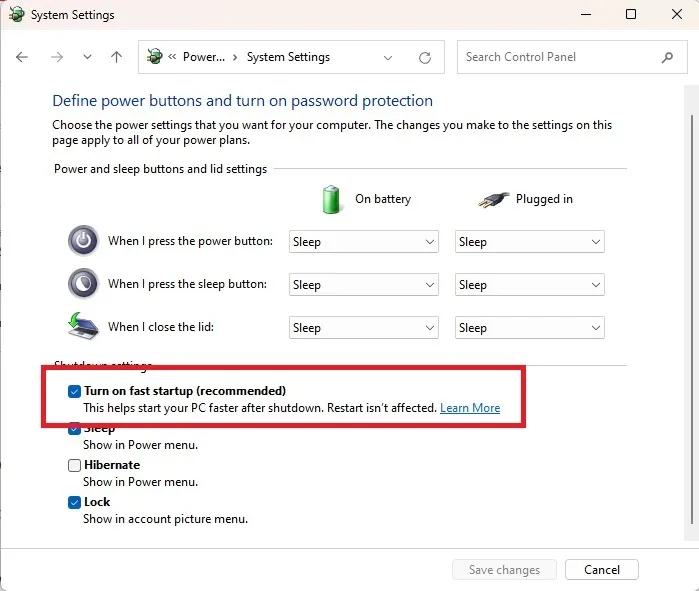
Fast Boot has also been known to cause issues trying to restart your PC to access the BIOS. If you’re having trouble entering the BIOS, try disabling Fast Boot.
- Open the Start menu and search for “Control Panel.” Select the result.
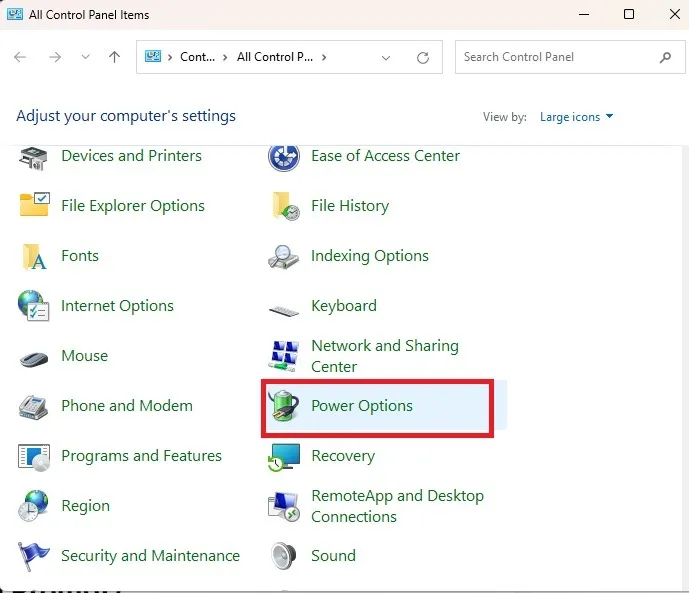
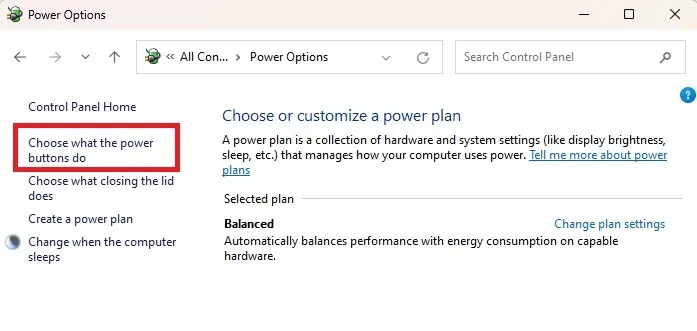
- Select “Power Options.”
- Click on “Choose what the power buttons do” on the left side.
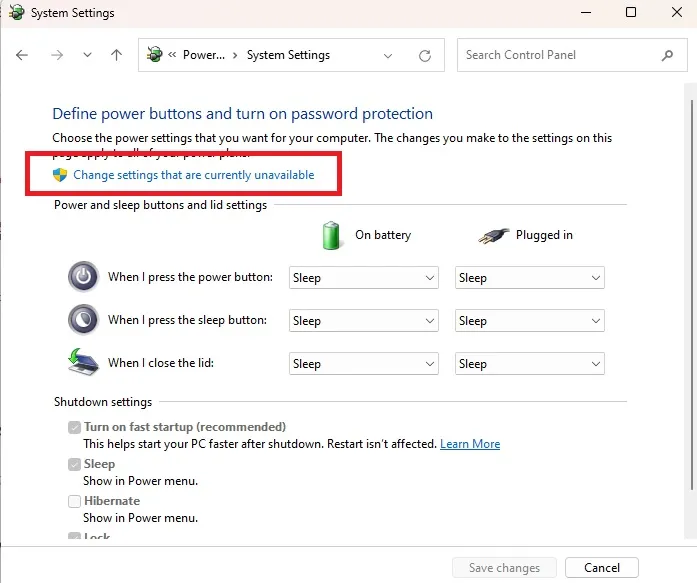
- Press “Change settings that are currently unavailable.”
- Uncheck “Turn on fast startup” and press “Save changes.” If this doesn’t solve your problem, you can turn it back on later.
Frequently Asked Questions
Why do I get an error when trying the Run or Command Prompt methods?
If you don’t have administrator rights, you may not be able to restart your computer this way. In fact, it’s possible that none of the methods above will allow you to enter the BIOS. This is to protect sensitive system settings from non-admin users. You can switch a standard user account to administrator and vice versa from any administrator account.
Why doesn’t a single key let me enter the BIOS?
Newer Windows PCs often boot too fast for you to press the key. This is especially true on PCs with SSDs. You can try holding the correct key from the moment you restart or press the computer’s power button.
Can I set my PC to show Advanced Startup options every time?
No. You must enter the correct key or use one of the restart methods above to enter the Advanced Startup options window.
Image credit: Flickr. All screenshots by Crystal Crowder.
- Tweet
Leave a Reply