How to Enable and Find Windows Boot Log

When you restart your computer, all system drivers and USB drives reboot as well. Only when the essential drivers are turned ON, one can use his/her computer to its fullest performance. The information like which drivers actually start and which ones don’t during Windows startup is stored inside a text file named “Boot Log“. If you are struggling with some error code or issue on your Windows PC, you may take the help of this file and check where the problem actually lies.
By default, the Boot Log is disabled in Windows. So, you need to first enable this process on your computer. After you enable Boot Log in Windows 11/10, you may open the same to see which drivers are actually failing to start on your PC.
MBR vs. GPT: Which one is better for your SSD?
What is Windows Boot Log and how do you find it?
By enabling this boot log, you can have a grasp on what actually is not starting during Windows startup. This includes all network drivers, hardware devices, and a few other pieces of information which are preventing Windows from loading properly. This aids to find and work on the problematic device drivers and thus get rid of the persisting issue by applying the appropriate fixes.
By default, this boot log process is disabled in Windows. To enable storing your computer’s boot sequence, you may either use the System Configuration tool or the Command Prompt. After you have turned on this boot log process, follow these steps to locate and open this file on Windows 11/10 –
- Make sure to sign in as an administrator on your PC and launch File Explorer (Win + E).
- Type the following in its address bar and press Enter –
C:\Windows\ntbtlog.txt
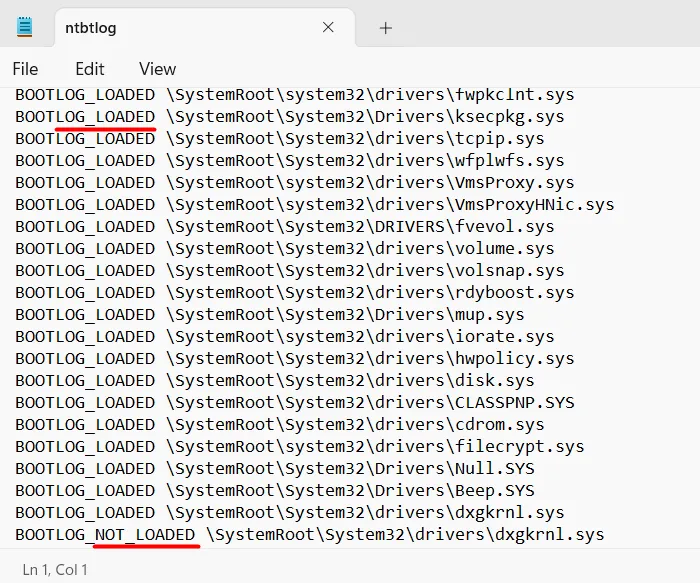
- The selected text file will open inside the notepad. If you have set any other application to open the text file, this boot log file will open into that.
In the text file, you will find all the drivers listed separately with labels like LOADED or NOT_LOADED. You can also see the path of each of these device drivers.
How to convert your hard disk from MBR to GPT
Enabling Windows Boot Log on your PC
You may enable the Boot Log in Windows 11/10 using either of the following two options –
1] Using the System Configuration Tool
The most effective way to turn on the boot log process in Windows is by using the system configuration tool. Follow the below instructions to enable the same –
- Press Windows + S to launch the Run dialog.
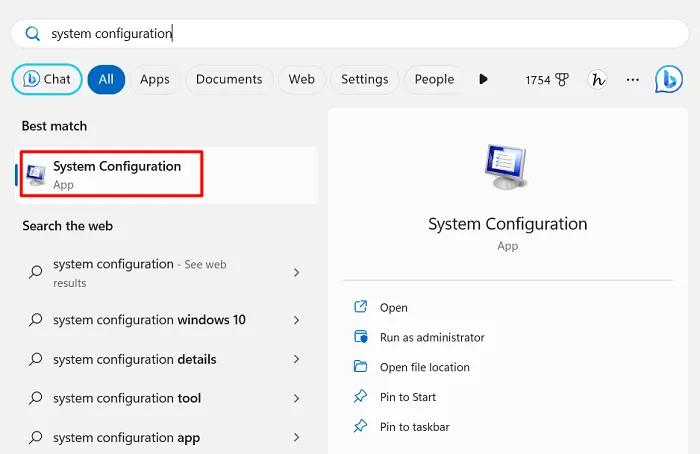
- Type “System Configuration” in the text field, and click on the top result.
- When the System Configuration tool opens up, head over to the Boot tab.
- Under Boot options, check the box available left of “Boot log” and hit Apply followed by the OK button.
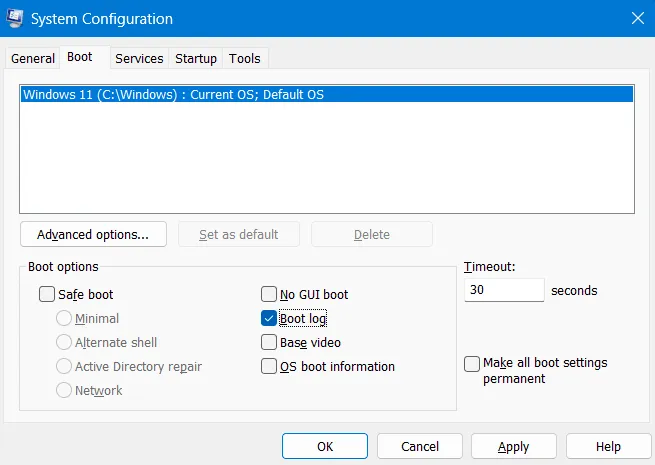
Close this tool and other running windows and restart your Windows PC. Sign back into your device again and you may now find the Boot log process enabled on your computer.
2] Using the Command Prompt
Alternatively, one may also use Command Prompt to enable the Boot log process in Windows 11/10. Here’s what you need to perform on your PC –
- Press Windows + X and select Terminal (Admin).
- The UAC window will prompt next, click Yes to authorize accessing the terminal.
- Press Ctrl + Shift + 2 to open Command Prompt inside the terminal.
- Type the following code on the console, and press Enter –
bcdedit
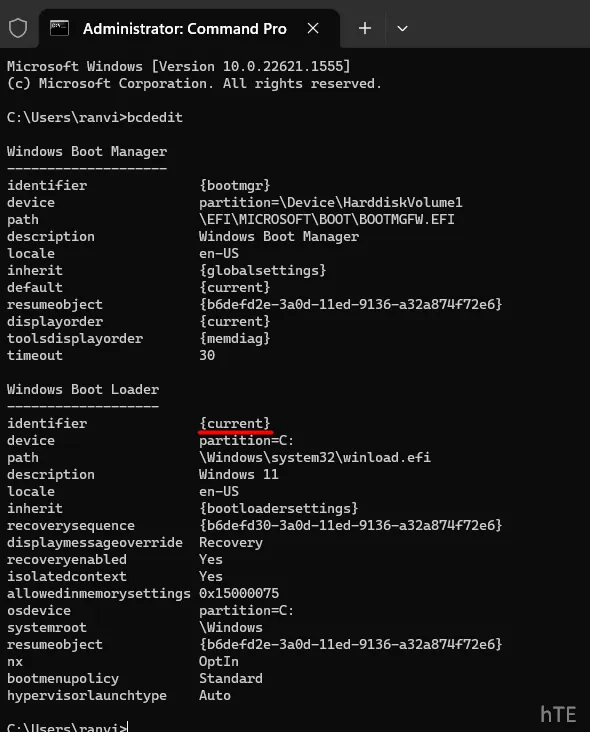
- Under Windows Boot loader, check what’s there next to the identifier.
- Copy this identifier and run the following code on the terminal next.
bcdedit /set {identifier} bootlog Yes
- Make sure to replace the identifier in the above code with your actual identifier. In our case, this is set to “current”, so we run the following code on our PC.
bcdedit /set {current} bootlog Yes
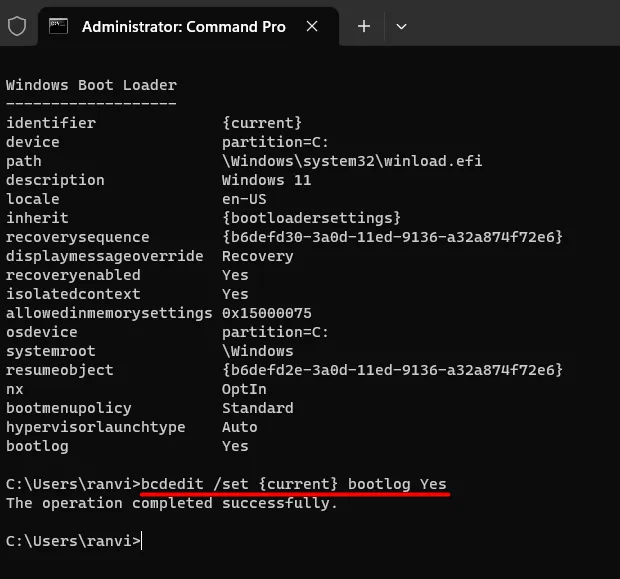
That’s it, you have successfully enabled storing the Boot log process on your computer. Restart your PC so that the recent changes come into effect from the next login.
How do I check if Boot Log is enabled or disabled using CMD?
To check if the boot log is enabled or disabled on a computer, launch Command Prompt as administrator and run the below code on it –
bcdedit
Under Windows Boot Loader, scroll down to the last line and check if there’s an entry named “ bootlog“. If indeed there is such an entry, you will find “Yes” written next to it. This means that the Boot Log process is enabled on your computer.
However, if the boot log is disabled, you will not see such an entry as” bootlog” at the end of Windows Boot Loader. To confirm the same, see the snapshot provided above.
How do I disable Windows Boot Log?
Every time you restart your computer, this boot log file updates automatically, and while doing so, it maintains a record of your computer’s boot sequence from all times. With new information added to this boot log file, the size of this Boot Log file also increases.
To easily locate the problematic drivers, and make troubleshooting a bit easier in Windows, we suggest keeping this file disabled. Enable this file only when the need arises. Else, keep the boot log disabled by using either of the following two options –
1] Using the System Configuration Tool
The System Configuration tool provides you with the easiest way to disable the Boot Log in Windows. Here’s how to use this tool to disable the same –
- Press Windows + R to launch the Run dialog.
- Type “
msconfig” without quotes on it and hit OK. - When the System Configuration tool opens up, go to the Boot tab, and uncheck the box left of the Boot Log. You may find this under the Boot options.
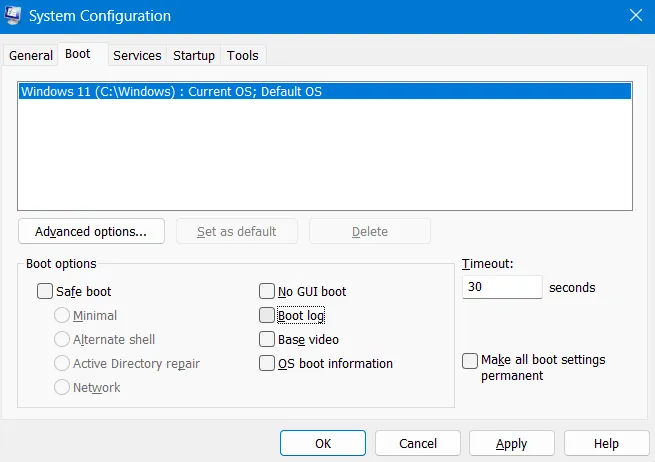
- Click Apply and then OK to confirm the recent changes.
Restart your PC and from the next login, you will not find any Boot log data on your computer.
2] Using Command Prompt
Just like enabling the Windows Boot Log using CMD, one can also use Command Prompt to disable the Boot Log as well. For this, you must follow these easy steps –
- Press Windows + R to launch the Run dialog.
- Type CMD and press Ctrl + Shift + Enter keys altogether to launch Command Prompt as administrator.
- On the elevated console, type the following code and press Enter –
bcdedit/ set {identifier} bootlog No
Make sure to replace the identifier in the above command with the one existing on your computer. If the same is set to current, run this code –
bcdedit /set {current} bootlog No
- That’s it, you have successfully forced your system not to store any boot log on your Windows PC.
Restart your PC next and the recent changes will come into effect from the subsequent login.
Whether should I keep enabling this Boot Log file in Windows?
Enable the Boot Log process only when you are facing troubles or issues accessing different drivers or services on your Windows PC. For the remaining time, when your operating system is functioning pretty well, keep this process disabled.
- How to Fix Dual Boot Option Not Showing In Windows
- How to Delete the EFI System Partition in Windows 11/10
Leave a Reply