How to dual boot POP OS and Windows?
Do you want to dual boot Pop!_OS and Windows on your system? Here is a complete guide showing you the steps you need to follow to install Pop!_OS on your PC alongside Windows OS.
Pop!_OS is a free and open-source Linux distribution developed by System76. It is based on Ubuntu and is specially designed for STEM and creative professionals who focus on deep learning, engineering, bioinformatics, etc. It has a lot of useful features that you may want to use. Some of its functionalities include Workflow Customization, Fast Navigation, Seemless Workspace Organization, Auto-Tiling, and more. Now, if you wish to install Pop!_OS on Windows PC, this post will help you.
Before you get started, we recommend you see the risks and benefits of Dual Booting Operating Systems.
How to boot Pop OS from USB?
To boot Pop!_OS from a USB flash drive, you first need to create a bootable USB drive. Download the Pop!_OS from its official website and burn the ISO file to the USB drive using ISO burner software like Rufus. When done, attach the USB drive to a computer where you want to install Pop!_OS and run the setup file to complete the installation process.
How much RAM is needed for Pop OS?
The minimum RAM required to install Pop!_OS on a system is 4 GB. However, to utilize it best, a RAM of 8 GB is recommended. In addition to that, 20 GB of storage is needed for running the OS smoothly.
Now, if you want to dual boot Pop!_OS alongside Windows OS on your PC, you can follow the steps mentioned below.
How to dual boot POP OS and Windows?
To dual boot Pop!_OS and Windows, you can use the below step-by-step procedure:
- Check Pop!_OS system requirements.
- Download Pop!_OS from the official website.
- Create a Pop!_OS installation media.
- Shrink the Windows partition and create a Pop!_OS partition.
- Create a Pop!_OS VM.
- Install Pop!_OS.
- Set up GRUB.
1] Check Pop!_OS system requirements
Before installing Pop!_OS on Windows 11/10, check the system requirements and prerequisites of Pop!_OS and make sure your Windows PC can run it. Here are the minimum system requirements of Pop!_OS:
- CPU: 64-bit x86, ARM (RAS PI 4) architectures
- RAM: 4 GB
- Drive Storage: 20 GB
In addition to that, you must disable secure boot in your BIOS before you proceed to install Pop!_OS on Windows.
If the above requirements are fulfilled, you can proceed with the below steps to dual boot POP OS and Windows.
2] Download Pop!_OS from the official website
The next step is downloading Pop!_OS from its official website. You can download the OS ISO file from the pop.system76.com website. Visit the aforementioned page and click on the Download button. Now, you need to select a suitable download. For example, if you have NVIDIA GPU, click on the NVIDIA version to download a copy of Pop!_OS on your system. In the case of Raspberry Pi 4, select the respective version to download Pop!_OS.
After downloading the POP OS, verify the checksum of the downloaded file to verify the integrity of the file and to ensure that download is not corrupted. The SHA256 Sum of the download is mentioned when you download the ISO file. You can compare the checksum you get in Command Prompt using CertUtil with the checksum provided on POP OS’s official website and make sure both are the same.
3] Create a Pop!_OS installation media
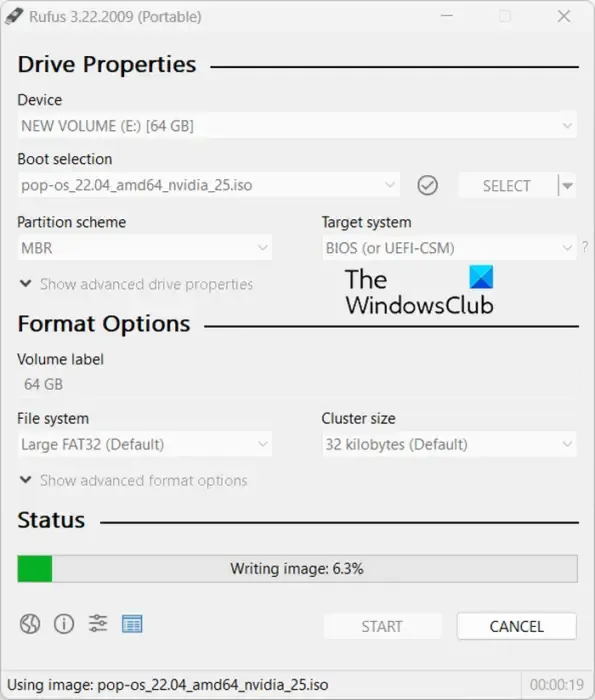
Now, you can create an installation media for Pop!_OS. For that, connect a USB drive greater than 8 GB and install an ISO burning program like Rufus. You can then use it to burn the downloaded ISO file of Pop!_OS to your USB flash drive. Here’s how:
Once you have downloaded and installed Rufus, launch the program and select the target USB drive. Next, press the SELECT button to browse and choose the ISO file of Pop!_OS and press the START button to burn the ISO file to the selected USB drive. After that, you can insert the created bootable USB drive into the Windows PC where you want to install the OS. Simply run the setup file and follow the prompted guide to complete the installation.
4] Shrink the Windows partition and create a Pop!_OS partition
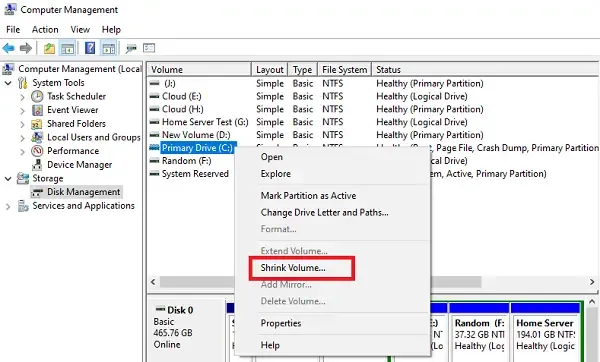
You need to create an individual VM partition and for that, you need to shrink the Windows partition. Here are the steps you need to follow to shrink the Windows partition:
First, open the Disk Management app, right-click on a partition that holds Windows OS, and choose the Shrink Volume option. After that, enter the amount of space you need for Pop!_OS installation and then hit the Shrink button to generate a new unallocated space where we will be installing Pop!_OS.
5] Create a Pop!_OS VM
Next, we will be creating a Pop!_OS VM on the partition that we created for Pop!_OS. You can download and install VMware Workstation Player on your PC and use it to create a Pop!_OS VM.
Firstly, you need to download and install VMware on your system and then launch it. Now, press the File > New Virtual Machine option, choose Custom (advanced), and tap on Next. After that, choose the Installer disc disk image file (iso) option and then browse and import the Pop!_OS ISO file. Next, choose Linux and Ubuntu 64-bit and press Next. Then, name the VM as Pop OS and set the location to the partition you created in step (4). Now, follow the onscreen steps accordingly and tap on the Finish button to complete the process.
6] Install Pop!_OS
You can now install Pop!_OS by switching on the above-created Pop OS VM. Pop OS install wizard will appear where you can follow the prompted instructions to complete the process.
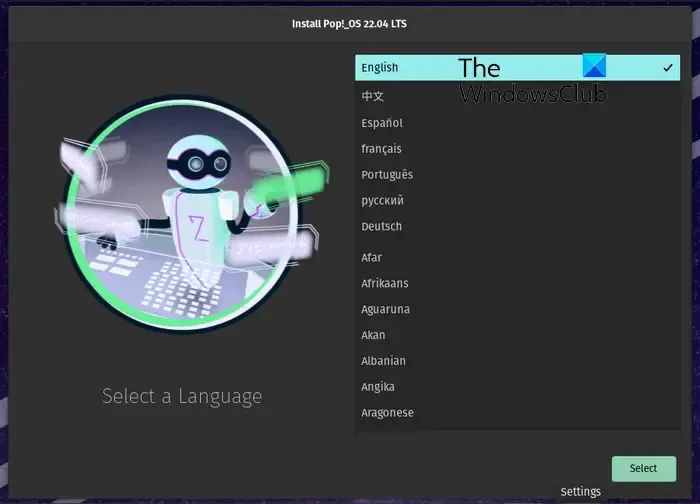
First, you need to choose a language and then press the Select button.
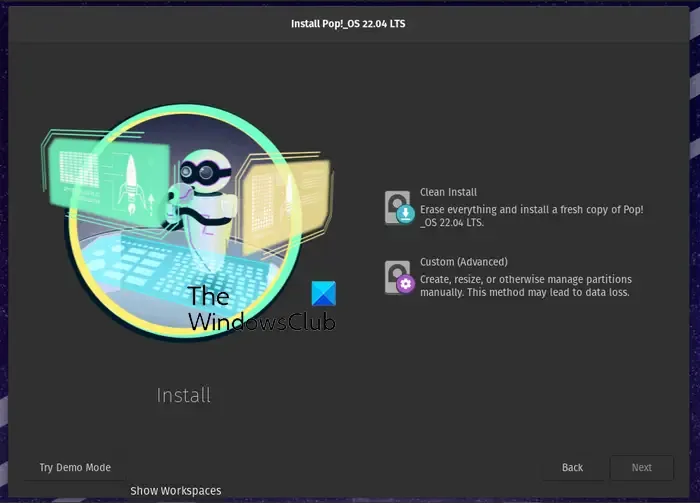
In the next step, select the Clean Install option which will delete everything, and install a fresh copy of Pop!_OS on the target drive. In case you want to manually install the OS, you can choose the Custom (Advanced) option.
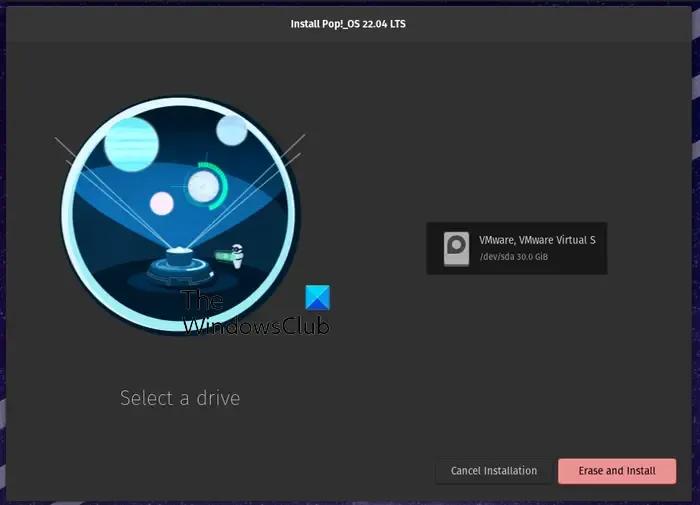
Now, choose the VMware drive and tap on the Erase and install button. And then, set up your full name and username and press the Next button.
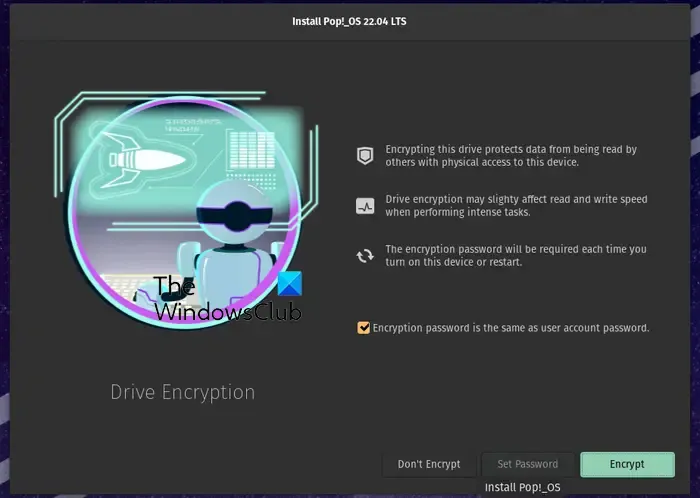
Next, if you want to encrypt the system drive, choose the Encrypt option and set a password. If you don’t want to use encryption, press the Don’t Encrypt button.
It will start installing the Pop!_OS on your drive. The process will take some time, so be patient.
Once the installation finishes, restart your computer and then sign into your user account to use Pop!_OS.
7] Set up GRUB
When the Pop!_OS is installed on your system alongside Windows, you may notice that your system directly boots to Pop!_OS. So, in that case, you need to configure GRUB (Grand Unified Bootloader). It is a bootloader available from the GNU project. You must set it up to enable it to recognize the Windows partition.
To update GRUB, you can use the below simple commands:
sudo apt update

sudo apt upgrade
Next, you need to install the OS-Prober tool to enable GRUB to recognize the Windows partition. Use the below command to do so:
sudo apt install os-prober sudo os-prober
Finally, you can run the following command to update and enable GRUB on Pop!_OS:
sudo update-grub
So, this is how you can dual boot Pop!_OS and Windows.
Leave a Reply