How to Download and Use MSI Afterburner?
This post will show you how to download and use MSI Afterburner. It is a top-rated graphics card software by Micro-Star International that helps users boost Graphics Card performance. This utility is compatible with a wide range of Graphics Cards from different manufacturers and can be used on devices other than the ones manufactured by MSI. Keep reading this post to learn more about MSI Afterburner and how to download and use it.
What features does MSI Afterburner offer?
The advanced features offered by MSI Afterburner are:
- Overclocking: Afterburner can increase your graphics card’s clock speed and performance, improving gaming performance. It offers different options to adjust GPU and memory clock speeds.
- Hardware monitoring: Users can monitor different parameters like GPU temperature, clock speeds, core voltage, etc., using MSI Afterburner.
- Voltage Control: MSI Afterburner allows adjusting the voltage of your GPU, which helps achieve higher clock speeds and performance. Nevertheless, doing so can also increase the temperature of your GPU or damage it if not managed properly.
- Fan Speed Control: It allows you to regulate the fan speed of your GPU, which helps keep its temperature under control. Also, it allows setting a custom fan curve that automatically increases or decreases the fan speed based.
- Benchmarking: The utility allows measuring real-time graphics performance during a gaming session, also known as benchmarking. In easy words, a Benchmark test helps compare the GPU chipset’s speed, performance, and efficiency.
How to Download and Use MSI Afterburner?
To download and use MSI Afterburner on your Windows 11/10 device, you’ll need to follow these steps:
Step 1: Download and Install MSI Afterburner
Firstly, you need to download the MSI Afterburner utility on your device from msi.com. Once you have downloaded the application, install it and then open it.
Step 2: Get Familiar with the apps User Interface and Features
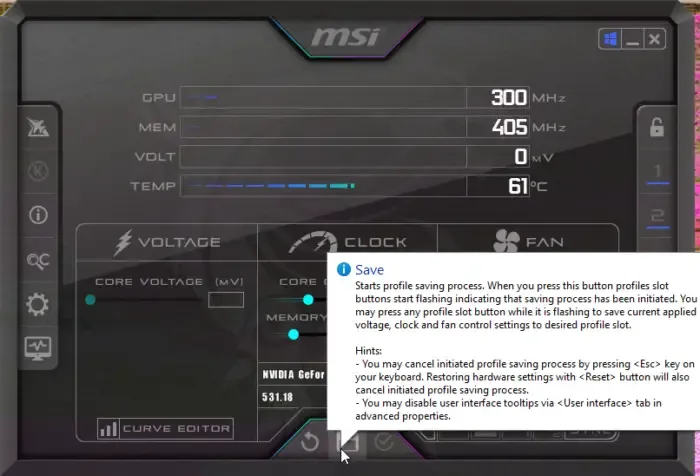
Once you’ve launched the application, familiarise yourself with its UI and features. We’ve explained all the options available as you open the app.

- GPU: This shows the current clock speed of your device’s GPU.
- MEM: This shows the current memory clock speed.
- VOLT: Tells how much voltage the GPU is consuming.
- TEMP: Shows the GPU’s temperature.
- CORE VOLTAGE (mV): Allows to adjust the voltage being used by the GPU.
- CORE CLOCK (MHz): Allows adjusting the clock speed of your GPU.
- MEMORY CLOCK (MHz): Allows adjusting the memory clock speed.
- POWER LIMIT (%): Allows adjusting the maximum amount of power to be delivered to the graphics card.
- TEMP LIMIT (°C): Allows adjusting the maximum temperature the graphics card can reach before the system throttles performance to prevent damage.
- FAN SPEED (%): Allows adjusting the fan speed of your device.
Step 3: Make a Custom Profile with the Optimal Settings for your GPU

Once you’ve set all the above-mentioned options as per your requirements. Click on the Save icon at the bottom to create a custom profile. You can make up to five custom profiles on the app.
We hope this post was helpful.
Can I use MSI Afterburner with any PC?
MSI Afterburner is a free tool that’s available for free and supports graphics cards from all brands. The application offers users complete control and allows real-time monitoring of their device’s hardware. It also allows controlling the voltage, fan speed and benchmarking their device.
Does MSI Afterburner increase FPS?
No, Afterburner cannot increase your device’s FPS directly. However, it can do so by overclocking your device’s GPU. Overclocking a GPU increases its clock speed and performance, which can increase the FPS in some situations.
Leave a Reply