How to Disable Windows 11 Automatic Updates
Windows updates are very crucial to keep your operating system updated, safe, and secure. However, what if your device stops working efficiently after installing a patch update? Well, in such cases, remove the recently installed security/non-security patches, and impose a restriction from receiving further updates. In this guide, we have discussed five different ways that will disable Windows 11 Automatic Updates temporarily or permanently.
After disabling updates, your PC will no longer receive any security patch updates, fixes, or improvements. In short, your device remains vulnerable to online threats. Keep visiting the Windows Update History page and see if Microsoft addresses the issues for which you have disabled updates in the first place. Keep in mind that issues can be resolved only through Windows updates, so you have to enable it at some time or another.
What happens after you disable Windows 11 automatic updates?
Since Windows 11 is still in the development phase, users receive new features, bug-fixes every now and then. After you restrict your device from getting updates, these are the things that you will no longer receive –
Disable Automatic Updates on Windows 11 – 5 Ways
Reviewing and reading what’s gonna happen after you install a patch update is always a good thing to go for. If you come across issues on a patch update that you think may corrupt your operating system, follow any one of the below methods to turn off your PC from getting updates.
1] Set your PC as metered connection
If you are in search of ways that can halt Windows 11 automatic updates temporarily, you should follow this method and set your PC as the metered connection. Enabling this setting will tell the system not to download any further updates as you are on a limited data plan. Here’s how you may turn On this setting on Windows 11 –
- Right-click over the Network icon on the taskbar and hit the option – Network and Internet settings.
- The system will take you to the following location – Settings > Network & Internet.
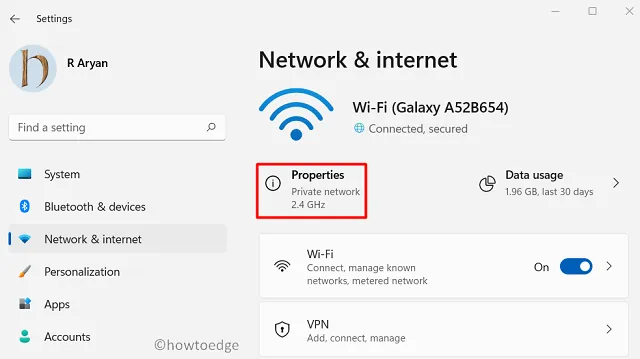
- Click Properties and then slide the “Metered Connection” toggle switch to the right.
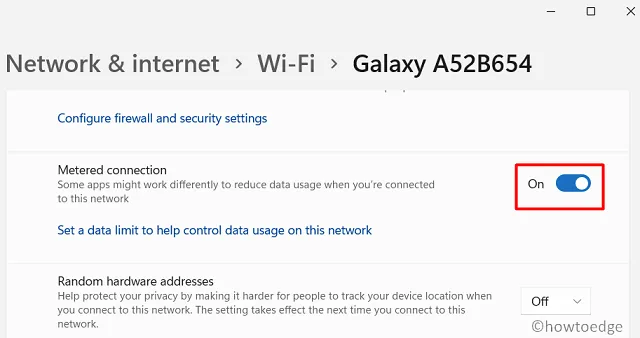
That’s it, the operating system will not download any further Windows 11 updates automatically on your computer. Even in cases wherein it had to download an update, this will inform you about the same beforehand.
2] Pause updates
If you don’t want even security or other important updates to install on your Windows 11 PC, you may pause updates for 1 week by following these easy steps –
- Press WinKey + I to launch Settings.
- Click Windows update on the left pane.
- Head over to the right page and click “Pause for 1 week” beside Pause updates. You may find this setting under the “More options” section.
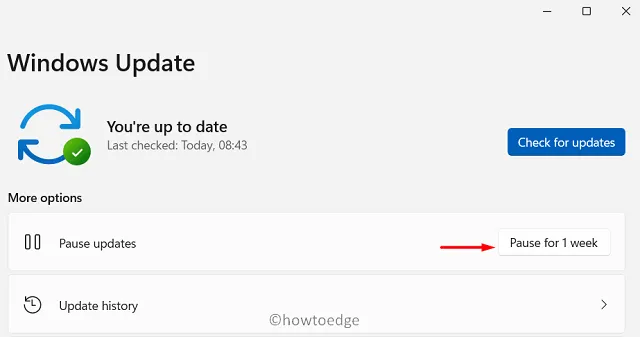
- Your PC will stop getting any updates for the chosen time frame.
3] Disable the Windows Update Service
In case you want to disable Windows 11 automatic updates for more than 1 week, or for permanently, go and stop the services that are essential for update processes. There are basically three services that should be running on your device to receive timely updates. They are – Windows update, BITS, and Cryptography. Here’s how to disable any one of these services on Windows 11 –
- Press Ctrl + Shift + Esc to open the Task Manager.
- When it opens up, go to File and hit Run new task.
- Inside the Run dialog, type “
services.msc“, and hit OK. - When the Services window launches, scroll down and locate the Windows update service.
- Right-click over this service when found, and hit Properties.
- Use the drop-down menu next to the Startup type and select Disabled.
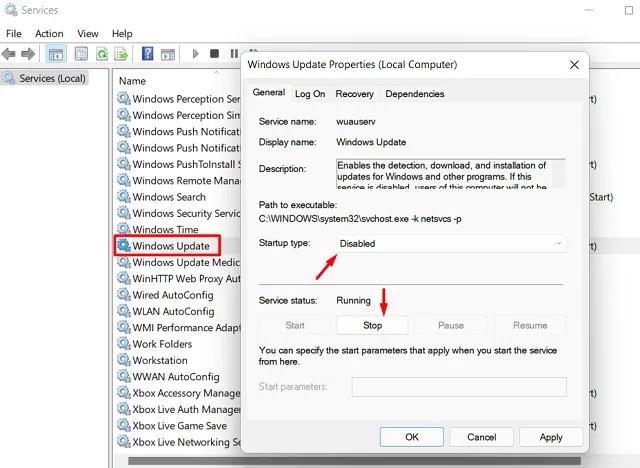
- Hit Stop and then Apply > OK.
That’s it, you’ll no longer receive any further updates on your Windows 11 PC.
Should I disable Windows Update permanently?
Though Microsoft doesn’t recommend disabling cumulative updates for more than a week, you may do so by disabling the Windows update service. Perform this task only if the recent security/non-security patch updates are causing more harm than good on your device.
4] Modify the registry
Every action that you perform on your computer modifies the corresponding registry accordingly. If anyone wants to disable automatic updates on Windows 11 by modifying the registry directly, s/he may do so by following these steps –
- First of all, press Win + R to start the Run dialog.
- Type “
regedit” near the blinking cursor, and hit OK. - On the registry window, navigate to the following –
Computer\HKEY_LOCAL_MACHINE\SOFTWARE\Policies\Microsoft\Windows
- Right-click on the Windows folder, and proceed as follows – New > Key.
- Rename the newly created key as “AU”.
- Go inside the AU key, right-click anywhere in the blank space, and hit New > DWORD (32-bit) Value.
- Rename this entry as “AUOptions”. Double-click over it and put any of the below numbers as per your need.
| Number | Corresponding Results |
| 2 | Notify for download and auto-install |
| 3 | Auto download and notification to install |
| 4 | Auto download and schedule the install |
| 5 | Allow local admin to choose settings |
| 7 | Allow download, Notify to install, Notify to restart |
- Read the results that you are going to get after entering any number inside the “AUOptions” data field.
- Click OK to confirm the changes and restart your PC.
5] Group Policy
If you are on Windows 10 Pro or Enterprise Edition, you may use Group Policy instead to disable automatic Windows 11 updates. To do so, use these steps –
- Press Win + X, and hit Run.
- Type “
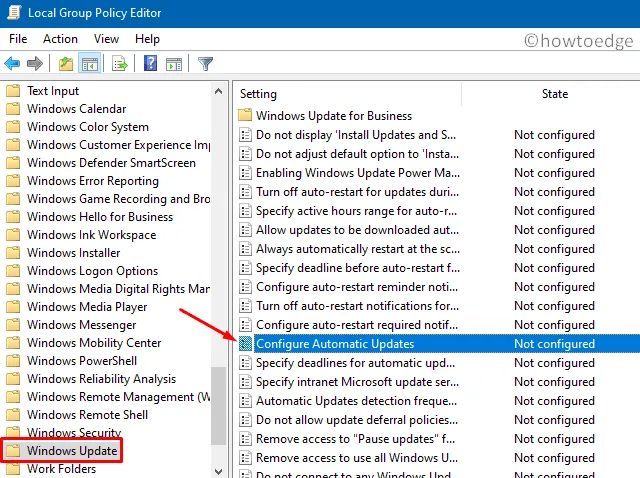
gpedit.msc” and hit OK. - When Local group policy opens up, navigate to the following –
Computer Configuration > Administrative Templates > Windows Components > Windows Update > Manage end user experience
- Head over to the right pane, and double-click upon Configure Automatic Updates.
- Tick the disabled radio button, and hit OK.
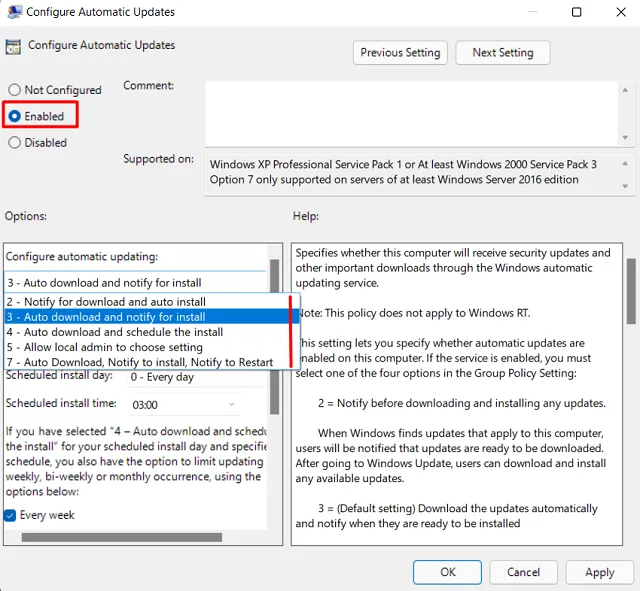
However, if you want to change the current configuration, re-visit the above path and enable the radio button that you have disabled just before i.e. Configure Automatic Updates.
- Use the “Configure automatic updating” drop-down menu and select any one of the below numbers. You may know their corresponding functions in the right section.
- 2 – Notify for download and auto-install
- 3 – Auto download and notify to install
- 4 – Auto download and schedule the install
- 5 – Allow local admin to choose settings
- 7 – Allow download, Notify to install, Notify to restart
- I hope you have already chosen and put down the number that you want to go with.
- Click Apply then OK to confirm the changes made so far.
- Reboot your PC so that the recent changes come into effect from the next login.
How to stop getting updates for Microsoft products
- Right-click on the Windows icon and hit Settings.
- Select Windows Update > Advanced Options.
- Turn off the toggle switch – “Receive updates for other Microsoft products“.
- That’s it, you will not receive any further updates till this setting is disabled.
Should I disable Windows Update?
One should stop getting updates only when there is some issue with the recent cumulative updates. Going this way, you tell your PC not to download/install any further patches on your computer. However, if everything is running as usual, and there aren’t any issues on the next cumulative update, you shouldn’t disable Windows Update.
With cumulative updates disabled on Windows 11, your PC will remain on previous OS Builds unsafe and not secured.
- How to Disable Windows 10 Updates from Occurring automatically
Leave a Reply