How to Delete the EFI System Partition in Windows 11/10
Whenever you install Windows 11, or for that matter, any operating system on your computer, some of your disk drive’s space is stored by the EFI System Partition. This partition consists of all the important files that are required to boot up your operating system. Its size varies from 100 MBs to 1.0 GB.
One never needs to let go of this system partition unless s/he is using a dual-boot configuration on his/her computer. If you are using two or more operating system(s) on your PC and want to remove any one OS, you definitely require deleting this system partition as well. This post will discuss the right way to find and delete the EFI system partition in Windows.
Please enable JavaScript
When does one require deleting the system partition?
Users must delete the system partition when they are performing a clean installation of Windows or any other operating system on their computers. You may also want to get rid of this system partition when you are selling your laptop or desktop to other users.
While deleting primary and unallocated volumes is quite an easy task, the same can’t be said for the EFI system partition. This post covers what you must do in order to get rid of the system partition on Windows 11/10 PC.
Create a System Restore Point using Command Prompt or PowerShell
How to find the EFI System Partition in Windows?
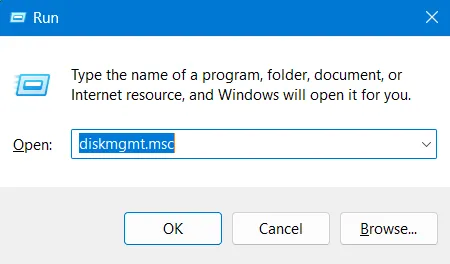
There are two easy ways by which you can open the Disk Management window on your Windows 11/10 PC. The first one is by using Windows Search while the other one is by using the Run dialog.
- Press Windows + S, and search for disk management in the text field.
- Click on the top result i.e. Create and format hard disk partitions.
- When this opens up, you may see all the disks available inside your PC with different partitions.

Delete the EFI System Partition in Windows
To delete the EFI system partition in Windows, use these steps –
- Press Windows + R to launch the Run dialog.
- Type CMD on it and press Ctrl + Shift + Enter keys altogether.
- The UAC window will prompt next, hit Yes to authorize accessing Command Prompt as administrator.
- Type the following near the blinking cursor, and press Enter.
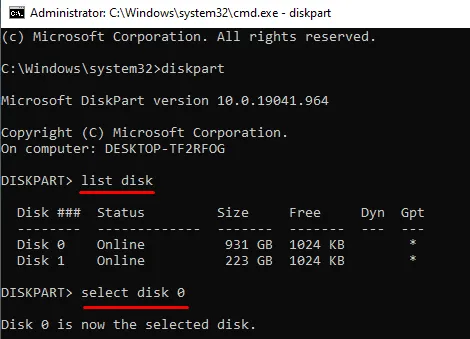
diskpart
- The Command Prompt syntax will now change to Diskpart.
- Execute the following code and press Enter to view a list of all the connected drives to your computer.
list disk

- Select the disk number on which you want to delete the EFI System Partition. For this, you need to copy/paste the below command and press Enter.
select disk 0
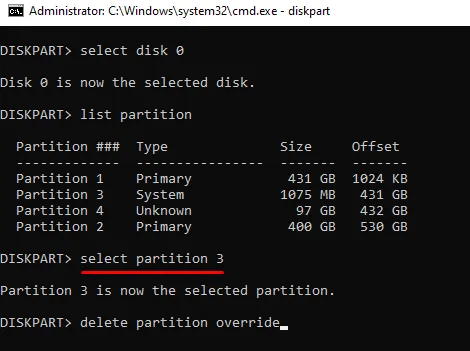
- Now that you have selected the designated disk, run the following code to list out all the partitions available on it.
list partition
- Look out for the partition that is of System type and select that particular partition by running this code.
select partition 3
- Now that you have selected the EFI system partition, execute this command to delete it from the disk.
delete partition override

That’s it, you have successfully deleted the EFI system partition from your disk drive. One may even confirm it by opening the Disk Management app on his/her Windows PC. Though the EFI partition must have gone by now, restart your PC in case it still appears.
How do I delete any other partition in Windows?
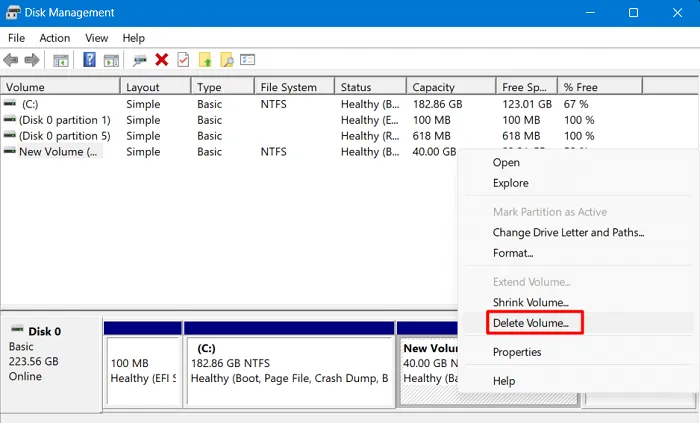
Deleting any other partition in Windows is quite an easy task. For this, you require to launch the Disk Management app, right-click on any partition (primary or unallocated) and choose the “Delete Volume” option.

That’s it, your chosen partition will now delete from your system automatically. In case you would like to create a new partition of this, right-click over it and choose the option – New Simple Volume.
Leave a Reply