How to connect Wireless Keyboard without USB Receiver on Windows PC
A USB receiver or connector (also known as a USB dongle) helps establish a wireless connection between your PC/laptop and the wireless keyboard to use within the supported range or distance. However, if the original USB receiver is lost or damaged, or not working, then it may create some trouble for you. That doesn’t mean your wireless keyboard is completely useless without it. Thankfully, there are a couple of ways to connect a Wireless Keyboard without a USB Receiver on a Windows PC and this post includes those options.
Can you connect a wireless keyboard without the USB?
Yes, you can connect a wireless keyboard without the original USB receiver. Some wireless keyboards support wired connectivity as well. So, if your keyboard has USB Type-C or micro USB port on it, then you can use that port to connect the wireless keyboard to your PC/laptop. If this option is not available, then you can connect a wireless keyboard using Bluetooth feature or a universal receiver.
How do I connect my Bluetooth keyboard without a USB receiver?
If your keyboard has a Bluetooth connectivity feature, then you don’t need a USB receiver to connect it to your PC. All you need to do is set your keyboard to pairing mode and turn on the Bluetooth on your computer. Once the system detects your keyboard, you can select the keyboard and establish the connection.
How to connect Wireless Keyboard without USB Receiver
To connect a Wireless Keyboard without USB Receiver on a Windows 11/10 system, you can use the options given below. Before that, first, check if your wireless keyboard supports a USB connection. Look for a USB port on your keyboard. If there is a USB port, you can connect your wireless keyboard using a USB data cable. If not, use the following options:
- Connect Wireless Keyboard using Bluetooth
- Connect Wireless Keyboard using Logitech Unifying Receiver.
Let’s check both these options with step-by-step instructions.
1] Connect Wireless Keyboard using Bluetooth
This option works only if your wireless keyboard model supports Bluetooth connectivity. Not all wireless devices such as keyboards, mice, etc., come with such a feature or support. You can check the product description on the keyboard box or on the product webpage about Bluetooth connectivity. If it does support this feature, then you can use the following steps to connect a wireless keyboard without a USB receiver via Bluetooth in Windows 11/10 PC:
- Turn on your wireless keyboard
- Set the keyboard to pairing mode. Some keyboards come with a Pair button and others with a Connect button that you need to press and hold for a few seconds (3-5 seconds) for enabling the pairing mode
- When the pairing mode is enabled, an LED light will start flashing on the keyboard indicating that your wireless keyboard is ready to connect with your PC or laptop
- Now use the Win+I hotkey to open the Settings app of Windows 11/10
- Turn on the Bluetooth on your computer. In Windows 11, go to Bluetooth & devices category, and turn on the Bluetooth button. If you are using Windows 10, then go to the Devices category, access Bluetooth & other devices page, and press the Bluetooth button
- Click on the Add device button if you are using Windows 11. In Windows 10, you need to click on the Add Bluetooth or other device option. An Add a device window will open
- Click on the Bluetooth option in that window
- Now Windows will start discovering the available devices to connect. From the list, select your wireless keyboard, and it will start connecting with your PC
- Once the wireless keyboard is connected, press the Done button.
Now you can start using your wireless keyboard on your Windows 11/10 system.
2] Connect Wireless Keyboard using Logitech Unifying Receiver

You might not know but you can also use Logitech Unifying Receiver to connect a wireless keyboard or mouse without needing the original USB dongle or receiver. In fact, a single Logitech Unifying Receiver lets you connect up to 6 devices at a time. Logitech USB Unifying Receiver is the same as a USB receiver or dongle with the difference being that it supports multiple Logitech devices and models. You can identify this receiver with an asterisk sign (*) under an orange color icon on it. So, if you already have one and you have a supported Logitech wireless keyboard, then use the following steps:
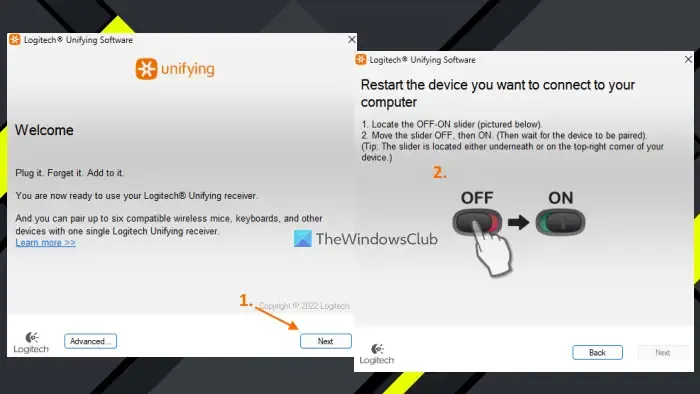
- Download Logitech Unifying software from support.logi.com and install it
- Plug in the Logitech Unifying Receiver to your laptop or PC
- Open the software interface
- Press the Next button
- Turn off and turn on your wireless keyboard
- Wait for a few seconds to pair the device.
The software will detect and pair the device automatically after which you can start using your wireless keyboard. In the same way, you can connect more compatible devices using the Logitech Unifying Receiver.
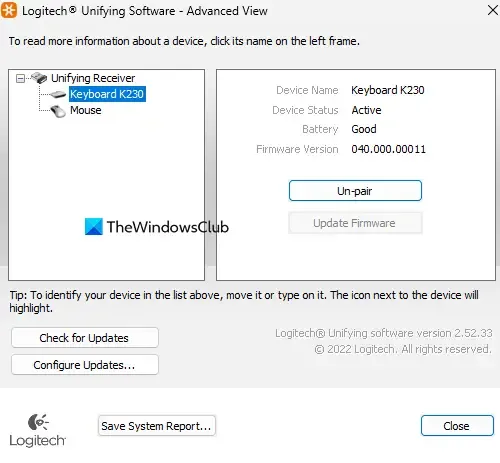
In case you want to un-pair the device later, you can open the software interface and click on the Advanced button. There, it will show the list of paired devices. You can select your device and use the Un-pair button.

Leave a Reply