How to change OneDrive Personal Vault Lock Time in Windows 11/10

By default, OneDrive locks the Personal Vault after 20 minutes of inactivity. However, if you want to change OneDrive Personal Vault Lock Time in Windows 11/10 computers, here is how you can do that. Modifying the timeout settings with the help of in-built Settings and Registry Editor is possible.
The OneDrive Personal Vault helps you protect your confidential files with additional security. Whether you use OneDrive on Windows PC, browser, or mobile, you can use Personal Vault to password-protect your important or private documents.
As said earlier, OneDrive locks down the Personal Vault automatically after 20 minutes of inactivity. However, if you want to change this timeout setting to 1 hour or 4 hours, you have two options in hand. First, you can utilize Microsoft OneDrive’s Settings panel. Second, you can use the Registry Editor. Here we have discussed both methods, and you can follow them as per your requirements.
Change OneDrive Personal Vault Lock Time using Settings
To change OneDrive Personal Vault lock time in Windows 11/10 using Settings, follow these steps:
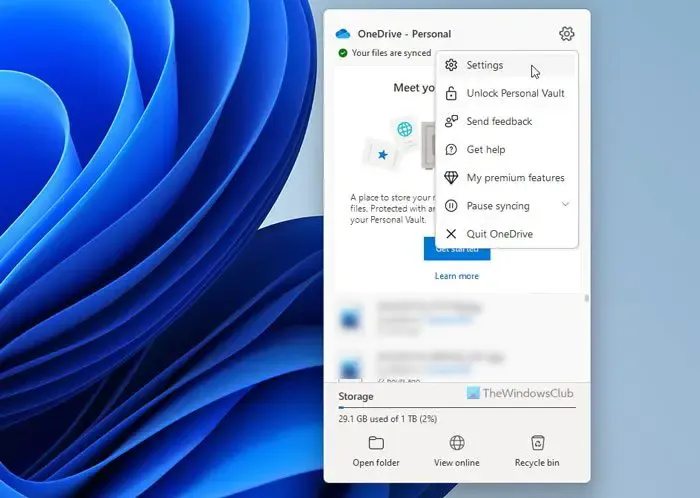
- Click on the OneDrive icon in the system tray.
- Click the settings gear icon and select the Settings option.
- Ensure that you are in the Account tab.
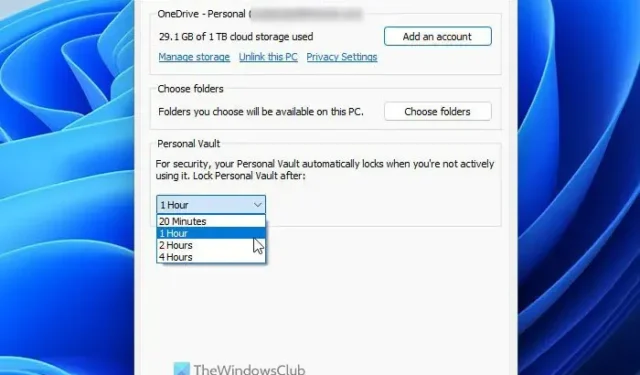
- Find the Personal Vault menu.
- Expand the drop-down list and choose the lock time.
- Click the OK button.
To learn more about these steps, continue reading.
First, you need to open the system tray and click on the OneDrive icon. Next, click the settings gear icon and select the Settings option from the menu.

It opens the Settings wizard. You need to ensure that you are in the Account tab. If so, find the Personal Vault menu, expand it, and choose a new lock time as per your requirements.
Once done, click on the OK button to save the change.
Modify OneDrive Personal Vault Lock Time using Registry
To modify OneDrive Personal Vault lock time in Windows 11/10 using Registry, follow these steps:
- Press Win+R > type regedit> click the OK button.
- Click on the Yes button.
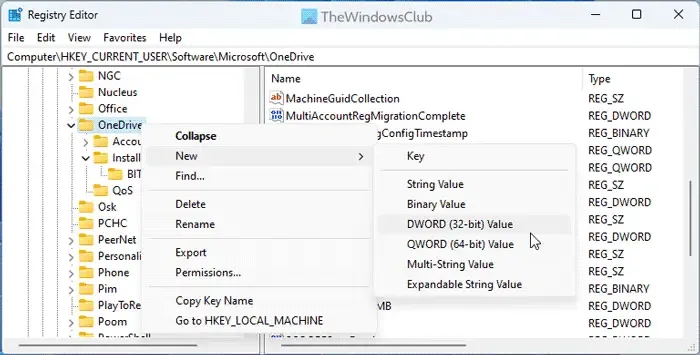
- Navigate to OneDrivein HKCU.
- Right-click on OneDrive > New > DWORD (32-bit) Value.
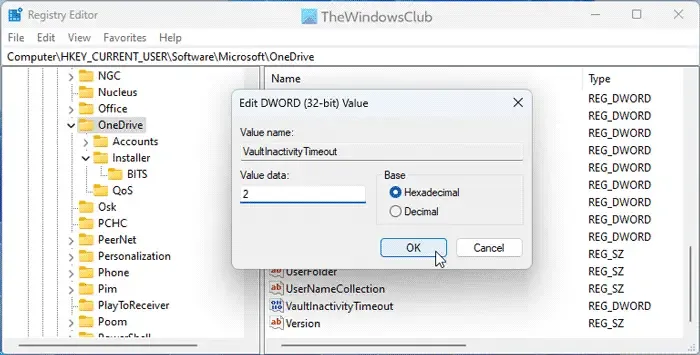
- Set the name as VaultInactivityTimeout.
- Set the Value data accordingly.
- Close all windows and restart your computer.
Let’s find out more about these steps.
To get started, you need to open the Windows Registry Editor. For that, press Win+R to display the Run prompt, type regedit, and click on the OK button. If the UAC prompt appears, click on the Yes button.
Next, you need to navigate to this path:
HKEY_CURRENT_USER\SOFTWARE\Microsoft\OneDrive
Right-click on OneDrive > New > DWORD (32-bit) Value and name it as VaultInactivityTimeout.

By default, it comes with a Value data of 0, and it denotes the 20 minutes of lock time. However, you can set the value data like this:
- 1 hour: 1
- 2 hours: 2
- 4 hours: 4

Finally, close all the windows and restart your computer.
How do I change the OneDrive sync settings in Windows 11?
To change the OneDrive sync settings in Windows 11, you need to open the Settings panel first. From here, it is possible to choose the folders you want to synchronize, pause the synchronization, etc. Whether you use OneDrive on Windows 11 or Windows 10, these things remain the same.
How do I unlock my OneDrive vault?
To unlock the OneDrive Personal Vault, you need to enter the credentials. That being said, you need to sign into your OneDrive account with the email address and password. Even if you have two-step verification enabled, you need to go through the same verification method to get it done.
That’s all!
Leave a Reply