How to change Active Hours on Xbox?
Active Hours is a new feature in Xbox Series X/S introduced with the latest updates. This feature switches off your console automatically instead of going into sleep mode outside of your active hours. The feature analyzes your behavior on the basis of which it determines when to turn on or off the console automatically. You can also manually adjust active hours on your console. Let’s see how.
How to change Active Hours on Xbox?
You can now adjust the active hours on your Xbox console. However, this feature is only available in the new Xbox update. So, if your console is not up-to-date, you first need to install system updates and then you can use the active hours’ feature on Xbox. Here are the steps to change Active Hours on Xboxt:
- Tap on the Xbox button on the controller.
- Click on Profile & system > Settings.
- Go to System > Updates.
- Install available system updates.
- Reboot your console.
- Navigate to Profile & system > Settings.
- Choose General > Power options.
- Click on Adjust active hours.
- Select Manually.
- Enter the start time and end time.
First, press the Xbox button on your controller to bring up the main guide menu. After that, navigate to the Profile & system > Settings option.
Now, you first need to make sure your Console is up-to-date as the active hours option is only available in the latest update. So, update your console by going to the System > Updates section. Here, you will see pending system updates that you can download and install, and then reboot your console to complete the process. You can skip this step if your console is already updated to its latest version.
Once your Xbox console is rebooted, tap on the Xbox button again and select the Profile & system > Settings option.
Next, go to the General section and choose Power options.
After that, click on the Adjust active hours option and then choose the Manually option to adjust active hours as per your requirements.
Finally, select the start time and then the end time of your active hours and save changes.
How to set Time Limits on Xbox One?
To set time limits on your Xbox One console, you need to use your Microsoft account in a web browser. Here are the exact steps to do that:
- Open the Microsoft Family Safety page in a web browser.
- Sign into your Microsoft account.
- Choose the family account for which you want to see the screen time limit.
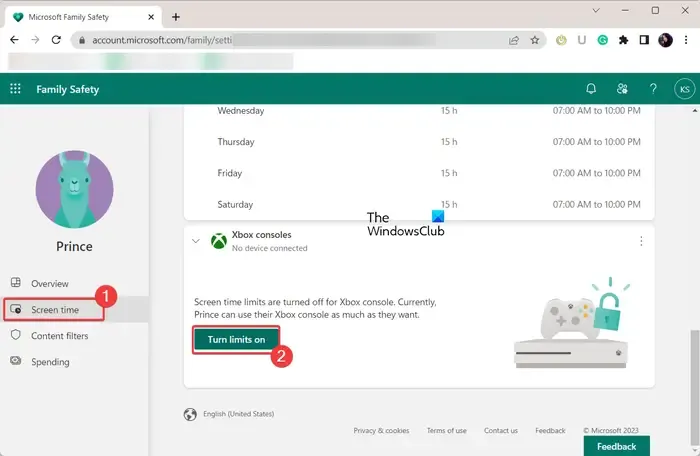
- Go to the Screen time tab.
- Click on Turn limits on.
- Set time limits for all days.
First, open a web browser and visit the Microsoft Family Safety page here. After that, click on the Sign in to Microsoft Family Safety button and log into your Microsoft account to control and set up parental controls for your family accounts.
Once you are logged in, you will be able to view all added accounts under the Your Family section. From here, select the account for which you want to set a time limit.

Now, move to the Screen time tab from the left-side panel and make sure to enable the Turn limits on option under the Xbox consoles section.

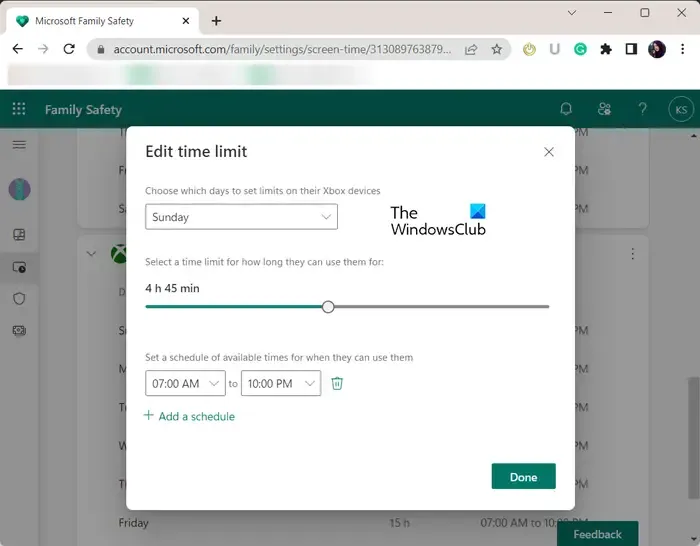
Next, you can now set up screen time limits for each day for the selected Xbox user account. Simply click on a day and adjust the time limit accordingly.
You can also add a time schedule to specify the time when the selected user can use the console (e.g., 7 AM to 9 AM). For that, click on the Add a schedule option. Besides that, you can use the same screen time limits for all other devices by enabling the Use one schedule on all devices toggle.
How do I stop my Xbox from turning off after an hour?
To prevent your Xbox console from switching off automatically, you need to change your console settings. First, switch on your console and tap on the Xbox button on your controller. Now, go to the Profile & system > Settings > General > Power options section and click on the Turn off after option. After that, choose the Don’t turn off automatically option.
How do I change the standby time on my Xbox?
You can change your Sleep mode to Standby on your Xbox console by configuring its settings. Press the Xbox button on your controller and click on the Profile & system > Settings > General > Sleep mode & startup option. Now, set the Sleep mode to Standby.
I hope this helps!
Leave a Reply