Fix: Windows Update Error Code 0x80244010
Did you receive an error code 0x80244010 while attempting to download, install, or update a Windows device? This bug normally appears when you tap “Check for updates” inside the Windows update section. Moreover, this also prompts an error message that reads – “ Code 80244010 Windows Update encountered an unknown error“.
Please enable JavaScript
What is Error 0x80244010? When does it occur?
Now that you know what may invoke an error 0x80244010 in Windows, let’s learn how to resolve this issue in the below section.
How to Fix Windows Update Error Code 80244010
Troubleshooting Windows Update, Running SFC scan, and Resetting Windows components are a few methods that can fix this error 0x80244010 on Windows 10. If not, go to the Update Catalog, download the pending update’s “.msi file” and apply it to your PC.
To solve the Update Error Code 0x80244010 in Windows 10, use the following workarounds –
Solutions List
1] Troubleshoot Windows Update
- Open Windows Settings (using WinKey + I).
- Select Update & Security then Troubleshoot on the left column.
- Head over to the right pane and expand “Windows Update“.
- When the box expands, hit “Run the troubleshooter”.
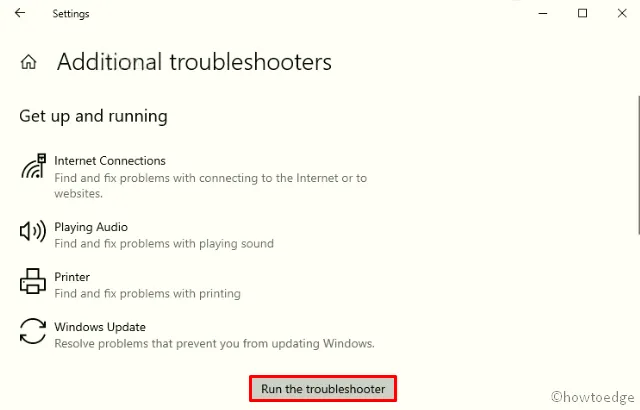
- Follow the on-screen instructions to troubleshoot Windows errors.
2] Run the System File Checker Utility Program
If the troubleshooter doesn’t solve the error 0x80244010, there may lie corrupt files inside Windows. To mitigate obsolete files or re-create missing files, you should run an SFC scan. Here’s how to proceed –
- Right-click anywhere on the Taskbar and click Task Manager.
- Go to the File Menu and hit Run new task.
- Type cmd near the blinking cursor and press Enter, just make sure to check the box beneath.
- On the elevated console, type
sfc /scannowand press the Enter key again.
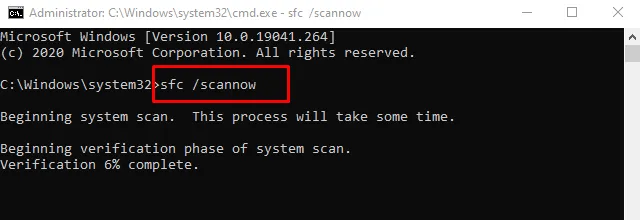
- This approximately takes 10-15 minutes to complete, so wait patiently.
- Once over, Restart the PC so as to make the above changes effective.
Sign back in and check whether you can now update your operating system or not. If still not, try the below fixes –
3] Scan for Malware using Microsoft Defender
Sometimes, the Error code 0x80244010 may occur simply due to some malware infection or virus attack. If that’s the case, open Windows Security and perform a full scan on the PC.
Third-party antivirus programs are of no use unless you have paid for using their services. If you have installed any such free application, either disable it or remove it completely.
4] Reset Windows Update Components
In case, the error code 0x80244010 still persists, this might be due to the corrupt Windows components. Resetting Windows Update components will surely repair the underlying causes and restore Windows OS back to normal. All you need is to follow the below guideline –
- Launch Command prompt as Admin – Type “CMD” in the search bar then right-click on the top result and choose Run as administrator.
- A UAC prompt will appear afterward, tap Yes to authorize the access.
- Next, execute the following codes one after another. Just make sure to press Enter at the end of each code.
 net stop wuauserv

 net stop cryptSvc

net stop bits

net stop msiserver
- Doing so will stop certain basic services. Next, rename SoftwareDistribution and Catroot2 folders using the below two codes –
Ren C:\Windows\SoftwareDistribution SoftwareDistribution.old

Ren C:\Windows\System32\catroot2 Catroot2.old
- Now, restart the services that you have previously paused –
net start wuauserv

net start cryptSvc

net start bits

net start msiserver
- Restart Windows to make the changes effective from the next login.
- Sign back in and navigate to the following path –
Settings > Update & Security > Windows Update
- Hit the Check for Updates button and if there is any pending update, download and install the same.
5] Manually Install Windows 10 Updates
Many a time, such errors appear after installing a wrongly configured patch update. So, look back and remember if you had recently installed any updates or not. If yes, then roll back the lately installed cumulative update on your PC.
However, if not, you should manually download and install the recent security patch on your computer. To do this, you need to first find out the pending updates “KB” number. Here’s how to find this –
- Jointly press Win+I to open the Settings UI.
- Click Update & Security then Windows Update.
- Head over to the right pane and hit “View Update history”.
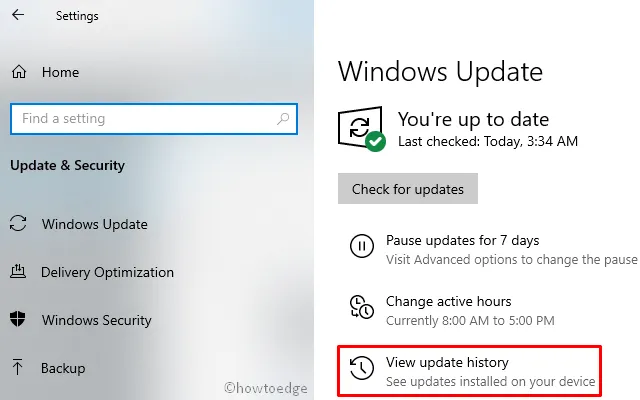
- On the next screen, you may find the list of failed updates.
- Note down the CU number and follow the next part –
Manually Install the Pending Updates
- Visit the Microsoft Update Catalog website and type the “KB” number noted above.
- This will present a list of well-matching results, choose one as per the system architecture.
- Click Download next to the update link and thereafter the top link on the upcoming window.
- When the download completes, click twice on the setup file to upgrade the operating system.
6] Modify Automatic Update detection frequency policy
If none of the above solutions fix the error code 0x80244010, you must try to enable the Detection Frequency policy. Here’s how to do this –
- Type “Group policy” on the search bar and click the best-matching result.
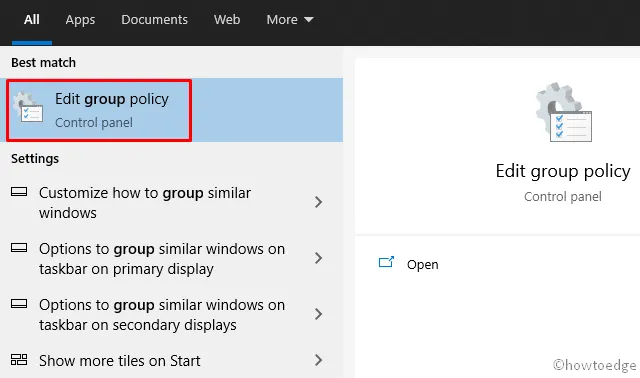
- On the Policy window, browse to the path –
Computer Configuration > Administrative Templates > Windows Components > Windows Updates.
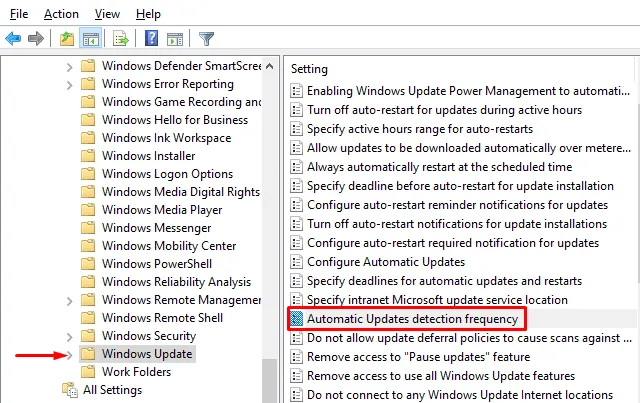
- Once you reach there, move right-side and look for the “Automatic Update detection frequency” policy.
- Double-click on this policy and this will open another window.
- Mark the circle left of the “Enabled” option and hit Apply then OK.
That’s it, I hope this article helps to fix the Error Code 0x80244010. If you have any queries or suggestions, write them down in the comment section.
Leave a Reply