Fix Twitch Audio delay, lag, or out of sync issues
Are you facing audio delays, lag, or desync issues on Twitch on your Windows PC? Some Twitch users have reported experiencing audio lag or out-of-sync issues while playing streams and videos on Twitch. These audio issues on Twitch could be a result of a number of factors; let us find out the reasons.
Why does my Twitch audio slowly go out of sync?
There can be various reasons why Twitch audio might go out of sync on Windows. Out-of-date or faulty graphics or audio drivers can be one of the primary reasons causing Twitch desync issues. Apart from that, it can also be caused due to web browser issues like old and corrupted browser cache and cookies and problematic extensions. Enabled hardware acceleration can be another reason for the same. Other reasons include third-party audio drivers and the enabled fast startup feature.
Fix Twitch Audio delay, lag, or out of sync issues
If you are facing audio delay, lag, or out of sync issues on Twitch, you can try refreshing the page and make sure your internet connection is working fine. In case the problem continues, you can use the below solutions to fix audio lag issues on Twitch:
- Turn off the HTML5 player on Twitch.
- Update your graphics and audio drivers.
- Clear cache and cookies from your web browser.
- Disable hardware acceleration in your web browser.
- Disable or remove web extensions.
- Uninstall third-party audio drivers.
- Turn off fast startup.
- Turn off the Use Device Timestamps option (while using OBS).
- Open Twitch in a different browser.
1] Turn off the HTML5 player on Twitch
You can try disabling the HTML5 player on Twitch. As per some user reports, audio desync/lag issues in Twitch could be caused due to enabled HTML5 player. Hence, turn it off and then check if the problem is resolved. Here are the steps to do that:
- First, open Twitch in your web browser and open the stream with which you are facing the issue.
- Now, click on the gear-shaped icon present at the bottom of the player.
- Next, go to the Advanced option and then disable HTML5 Player.
Now, check whether the audio desync or lag problem on Twitch is fixed or not. If not, you can use the next fix to resolve it.
2] Update your graphics and audio drivers
The audio desync issues on Twitch could very well be facilitated due to outdated device drivers on your computer especially graphics and audio drivers. So, update your audio driver and graphics driver on Windows 11/10 to fix the problem.
To do so, open the Settings app using Win+I, move to the Windows Update tab, and press the Advanced options > Optional Updates option. Now, download and install audio and graphics driver updates. Alternatively, you can also visit the official website of the device manufacturer and download the latest audio and graphics drivers. Or, you can even use the conventional driver update method i.e., Device Manager.
Once your device drivers are updated, reboot your computer and open Twitch to check if the issue is fixed.
3] Clear cache and cookies from your web browser
You might be experiencing audio out-of-sync, delay, and lag issues on Twitch due to the corrupted or bulked-up cache and cookies in your web browser. Hence, if the scenario is applicable, you can clear web browser data including cache and cookies to fix the problem. Here, we are going to show you the steps to clear cache and cookies from Google Chrome, Mozilla Firefox, and Microsoft Edge. So, check them out below.
Google Chrome:
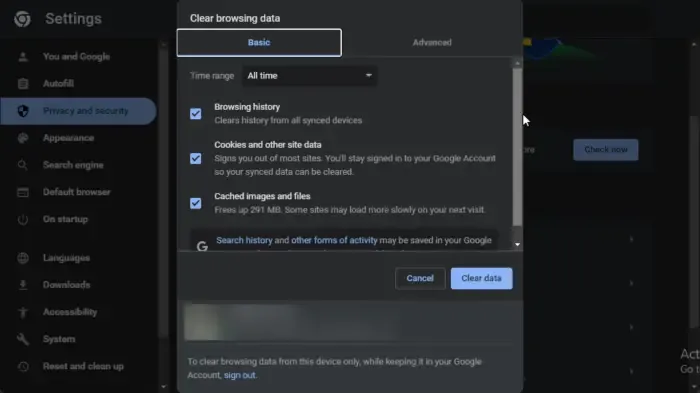
- First, go to Google Chrome, and from the top-right corner, tap on the three-dot menu option.
- After that, click on the More tools option and choose the Clear browsing data option. Or, you can press the Ctrl+Shift+Delete hotkey to clear browsing data.
- Now, choose All time as the Time range and checkmark the options including Cookies and other site data and Cached images and files.
- Next, hit the Clear data button and it will delete all the browser cache and cookies.
- Finally, open Twitch and check if the audio lag or desync issues are still there.
Mozilla Firefox:
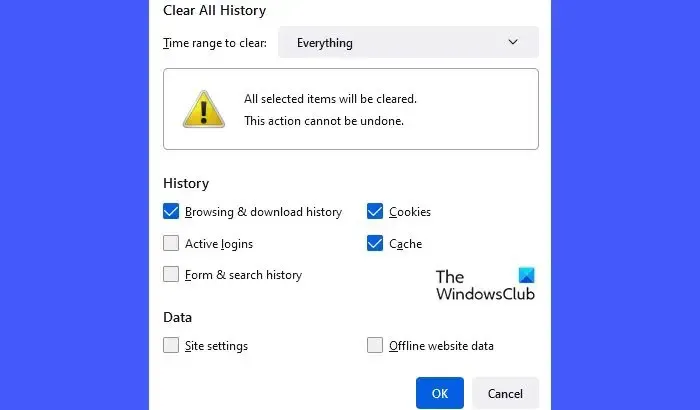
- First, open Firefox and press the three-bar menu button.
- After that, click on the History option and choose the Clear recent history option.
- Now, select the Time range to Everything, tick the Cookies and Cache checkboxes, and click on the OK button to delete the browsing data.
- Lastly, reload Twitch and see if the problem is gone.
Microsoft Edge:
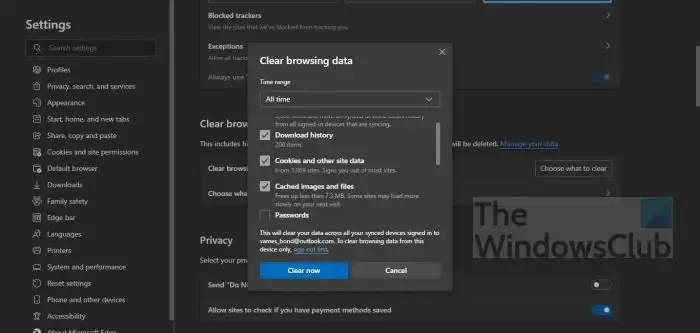
- First, open Microsoft Edge and choose the Settings and more (three-dot menu button) > Settings option.
- After that, navigate to the Privacy, search, and services > Clear browsing data section.
- Now, tap on the Choose what to clear button and then choose the Time range to All time.
- Next, tick the Cookies and other site data and Cached images and files checkboxes and press the Clear now button.
- Once done, reopen Twitch and check if the audio issues are resolved.
If you use some other web browser, you can delete cache and cookies using similar steps and see if the problem is resolved. However, if this fix doesn’t help, move on to the next solution to resolve the problems.
4] Disable hardware acceleration in your web browser
The next thing you can do is disable hardware acceleration in your web browser. Hardware acceleration is a handy feature that enables you to utilize your GPU to enhance its performance while watching video, streaming, etc. However, this feature can also cause issues and glitches like Twitch audio desync or lag issues in your web browser. So, if applicable, turn off the hardware acceleration feature in your browser and see if it helps.
Google Chrome:
- First, open Chrome and press the three-dot menu button.
- Next, click on the Settings option.
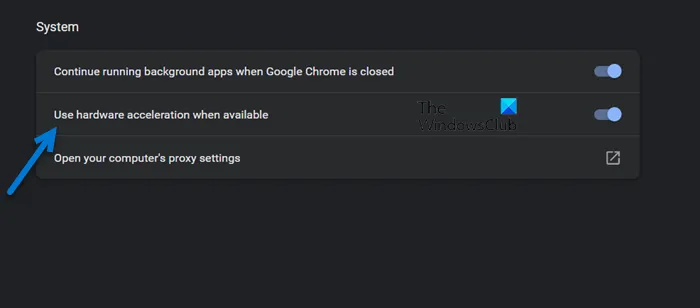
- After that, move to the System tab from the left-side pane.
- Now, disable the toggle associated with the Use hardware acceleration when available option.
- When done, reopen Twitch and see if the problem is fixed.
Mozilla Firefox:
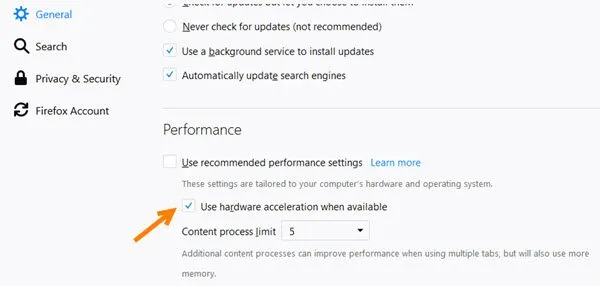
- First, launch Firefox and hit the three-bar menu button.
- Now, click on the Settings option.
- After that, under the Performance section in the General tab, uncheck the Use recommended preferences settings checkbox.
- Next, disable the Use hardware acceleration when available option.
- Finally, open Twitch and check if the Twitch audio lags are fixed or not.
Microsoft Edge:
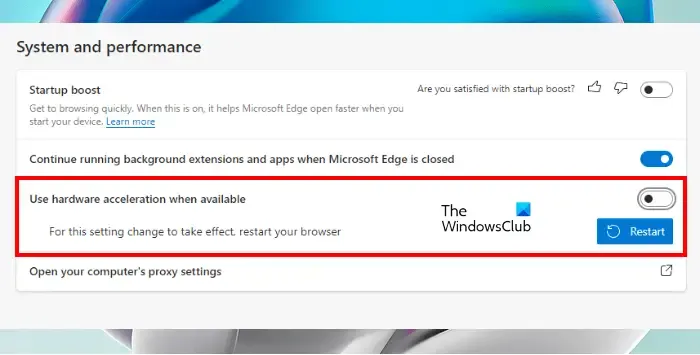
- First, go to the Microsoft Edge browser, click on the Settings and more (three-dot menu button) option, and then choose the Settings option.
- Now, navigate to the System and performance tab.
- Next, disable the Use hardware acceleration when available toggle.
- When done, you can try playing the videos on Twitch and see if the problem is resolved.
If this method doesn’t work for you, move on to the next solution.
5] Disable or remove web extensions
Some third-party problematic browser extensions might be causing audio lag or out-of-sync issues on Twitch. Hence, you can temporarily disable suspicious browser extensions or permanently uninstall/remove such extensions from your web browser.
Google Chrome:
- First, start Chrome, click on the three-dot menu button, and press the More tools > Extensions option.
- Now, check for suspicious extensions and turn them off one by one. Or, click on the Remove button to uninstall it.
Mozilla Firefox:
- First, open Firefox, tap on the three-bar menu button, and choose the Add-ons and themes option.
- After that, disable the toggle associated with the add-on you want to turn off or remove problematic add-ons by pressing the respective button.
Microsoft Edge:
- First, open Microsoft Edge, choose the Settings and more (three-dot menu button) option, and select the Extensions option.
- Now, turn off suspicious extensions or remove them.
6] Uninstall third-party audio drivers
A few affected users were reportedly able to resolve the Twitch audio desync issues by uninstalling third-party audio drivers. So, you can also uninstall the third-party audio driver from your PC and let Windows use the generic audio driver to handle audio on your PC.
To do so, open Device Manager and locate and expand the Sound, video, and game controllers category. Now, right-click on the third-party audio driver and select the Uninstall device option. Next, follow the prompted instructions to complete the driver uninstallation process. Once done, restart your PC and check if the audio issues on Twitch are resolved.
7] Turn off fast startup
The audio delay, out-of-sync, or lag issues on Twitch could be caused due to fast startup feature on Windows. So, if the scenario applies, you can disable the fast startup option and then see if it works.
To do that, open Control Panel and navigate to the Hardware and Sound > Power Options section. Now, click on the Choose what the power button does option and press the Change settings that are currently unavailable option. Next, uncheck the Turn on fast startup option and click on the Save changes button. You can now check if the Twitch desync or lag issues are fixed.
8] Turn off the Use Device Timestamps option (while using OBS)
If you are facing audio lag or desync issues on Twitch while streaming and using OBS Studio, you can disable the Use Device Timestamps option and see if it works. Here are the steps to do that:
- First, open OBS Studio and press the gear-shaped icon present under the audio stream for which you want to turn off the feature.
- Now, click on the Properties option.
- Next, in the opened Properties window, uncheck the Use Device Timestamps option and press the OK button.
- Finally, open Twitch and try playing streams to check if the problem is resolved.
9] Open Twitch in a different browser
You can also use Twitch in another web browser. There are tons of good free web browsers that you can use. Suppose, you are experiencing issues in Chrome, you can switch to Firefox or Edge or vice versa.
How do I fix out of sync audio streaming?
If you are facing an out-of-sync audio issue during live streaming, make sure your internet connection is stable and is working fine. Besides that, you also need to ensure that your graphics and audio drivers are updated to their latest versions. You can also delete browser cache and cookies, disable web extensions, or turn off hardware acceleration to fix the problem.
Leave a Reply