Fix: Memory Integrity Cannot be Turned On or Greyed Out
Memory Integrity is an important piece of Windows Security that protects your computer against outside attacks. Plus, it ensures all the installed devices come from trusted sources and work properly.
If you have turned it off in Windows Security, you should immediately turn it on. However, some users have reported Memory Integrity being greyed out, making it unable to be turned on.
Why can’t I turn on Memory Integrity?
There are a handful of reasons why Memory Integrity is strangely greyed out. But the one thing that all have in common is it’s due to some compatibility issue.
- Your system is out of date – If your computer is out of date, it can cause various incompatibility problems, including a greyed-out Memory Integrity.
- Corrupted files are messing with your computer – Malware can corrupt files. You’ll need some cleaning software to get rid of it.
- You downloaded some bad drivers – Incompatible drivers can also cause many problems. You’ll need to uninstall them.
- There is conflicting software on your computer – Recently installed apps can conflict with ones already on your computer.
How can I fix a greyed-out Memory Integrity?
Before going into the fixes, there are a handful of preparatory steps you should perform first.
- Restart your PC.
- Close and then reopen Windows Security.
- Contact your IT or system admin for help.
- Uninstall recently installed apps.
1. Update Windows 11
- In the Windows 11 search bar, type in settings and click the entry that appears.

- Go to the Windows Update section of the Settings menu. Windows 11 will immediately begin downloading available updates.
- Once done, click Restart now.

- Next, select click Advanced options under More options.
- Select Optional updates.

- On the following page, select the optional updates that you want to install. Click Download & Install to finish the process.

2. Double-check drivers
- In the Windows 11 search bar, type in windows security. Select Windows Security when it appears.

- Click Device Security on the left-hand side of Windows Security. Try to toggle Memory Integrity.

- If it fails, click Review incompatible drivers. Take note of the incompatible drivers being shown on the following page.

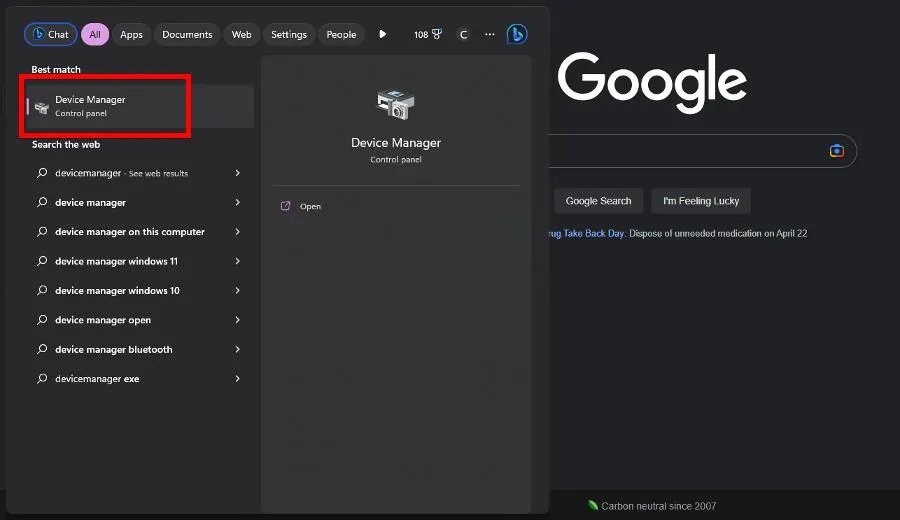
- Now type Device Manager into the Windows 11 search bar. Click Device Manager when it appears.

- Click View in the Device Manager. Select Show hidden devices in the drop-down menu.

- Locate the device with the problematic driver seen in Windows Security.
- Select Uninstall device in the context menu.
- Removal should happen automatically. In some cases, a window will appear where you can uninstall the driver.

This process can be tricky and time-consuming until you find driver incompatibilities or update old drivers that may determine this issue on your PC.
For this purpose, you can make use of dedicated software that can manage all drivers automatically, find missing ones, or install the latest driver version with one click.
3. Uninstall incompatible drivers
- Go to Microsoft Build and download Autoruns.

- Extract the zip file you just downloaded. Right-click Autoruns and select Run as administrator.

- Agree to the Autoruns License Agreement.
- Problematic drivers are highlighted yellow. Locate them and uncheck the box next to them to disable those drivers.

- If you cannot disable the driver, right-click it and select Delete.
4. Enable Memory Integrity via Registry Editor
- In the Windows 11 search bar, type in regedit. Click Registry Editor when it appears.

- In the Registry Editor, expand the following folders in this order: HKEY_LOCAL_MACHINE > SYSTEM > CurrentControlSet > Control.

- Now open the following: DeviceGuard > Scenarios > HypervisorEnforcedCodeIntegrity
- In HypervisorEnforcedCodeIntegrity, double-click Enabled.

- Set the Value Data to 1, then click OK. Restart your computer to enable the changes.

5. Reset the PC
- Type settings into the Windows 11 search bar. Click the entry that appears.

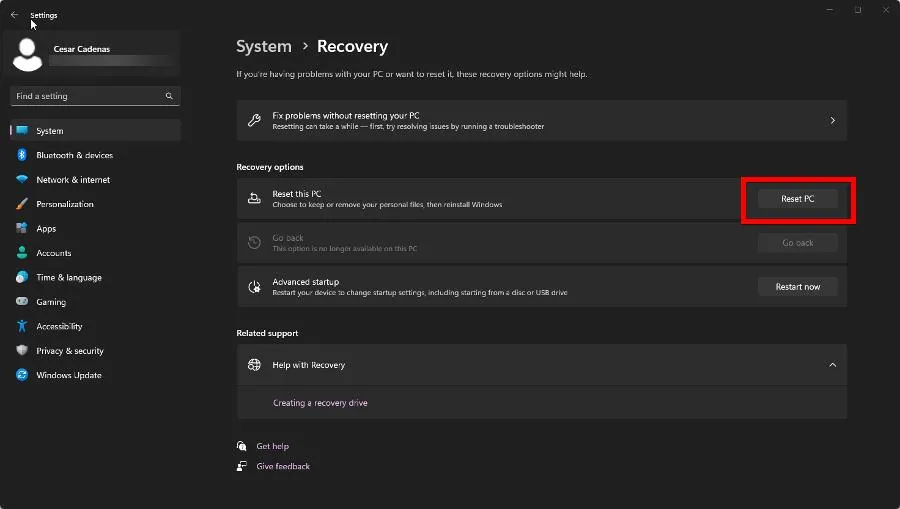
- In the System section, scroll down and select Recovery.

- Click Reset PC on the following page.

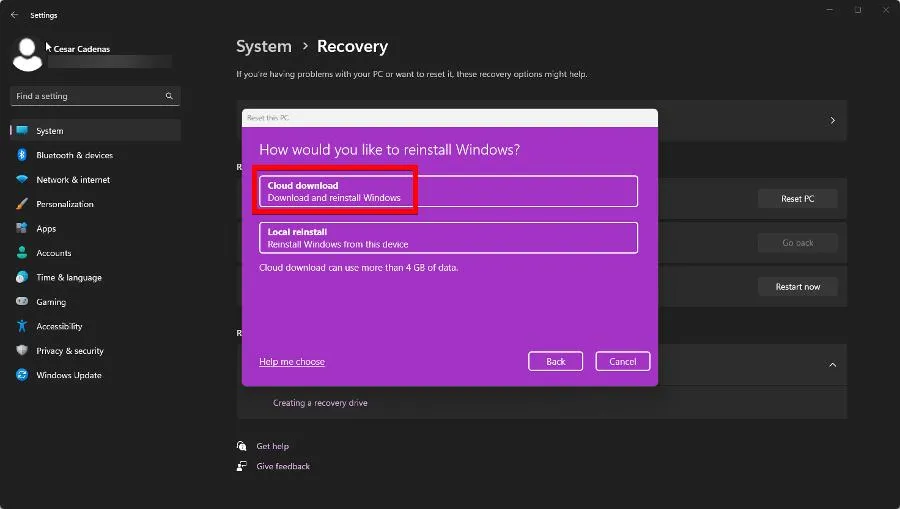
- In the popup window, we recommend selecting Keep my files.

- Click Cloud Download to reinstall Windows 11.

6. Run SFC and DISM scans
- In the Windows 11 search bar, type cmd to bring up the Command Prompt. Click Run administrator.

- Enter the following command:
sfc /scannow
- Give Command Prompt enough time to finish the process.
- When it’s done, enter the following commands one after the other:
DISM /Online /Cleanup-Image /CheckHealthDISM /Online /Cleanup-Image /ScanHealthDISM /Online /Cleanup-Image /RestoreHealth
- Restart your computer.
7. Reset Windows Security
- Type settings into the Windows 11 search bar. Select Settings when it appears.

- Click Apps on the left side, then select Installed apps.

- Scroll down until you locate Windows Security. Click the three dots to the right and select Advanced options.

- Scroll down here and click Reset.

- Click Reset in the small window that appears.

By following these instructions, you will hopefully not have any more issues with Windows Security. But note that it is prone to errors, like when it suddenly refuses to launch.
If this happens to you, run the SFC and DISM commands shown in an earlier solution. And if the Windows Security Protection History is missing, clear out the scan history files.
If you have any suggestions or guides you’d like to see, be sure to comment below.
Leave a Reply