How to Enable Remote Desktop Access with XRDP on Raspberry Pi
Key Notes
- xrdp enables a full desktop experience on Raspberry Pi.
- Ensure secure connections with TLS encryption.
- Configuring a static IP for your Raspberry Pi avoids connection issues.
Setup Remote Desktop Access on Your Raspberry Pi with xrdp
If you’re seeking a way to connect to your Raspberry Pi remotely and enjoy a full desktop experience, setting up xrdp is your best option. In this guide, we’ll walk you through the necessary steps to enable remote desktop access, allowing you to connect from various devices, including Windows PCs and mobile devices.
Understanding xrdp and Its Functionality
xrdp is an open-source application that facilitates remote access to Linux systems by utilizing Microsoft’s Remote Desktop Protocol (RDP).This tool allows users to enjoy a graphical desktop environment similar to what they experience on a Windows machine.
Key components of an xrdp setup include a xrdp server installed on your Raspberry Pi and a Remote Desktop client on your access device. Windows users typically have this client pre-installed, while alternatives are available for other platforms.
One notable feature of xrdp is its incorporation of TLS (Transport Layer Security) to encrypt your remote sessions, safeguarding your activities from potential security threats.
Although xrdp is a robust choice, some users might consider alternatives like VNC (Virtual Network Computing).However, many have found RDP offers a smoother user experience for multitasking and efficient system configurations.
How to Install and Configure the xrdp Server on Your Raspberry Pi
To initiate the setup, begin by launching your terminal and executing the installation command:
sudo apt install xrdpThis command installs xrdp along with its required dependencies.
Once installation is complete, you will need to add the xrdp user to the ssl-cert group to enable secure connections. Execute the command:
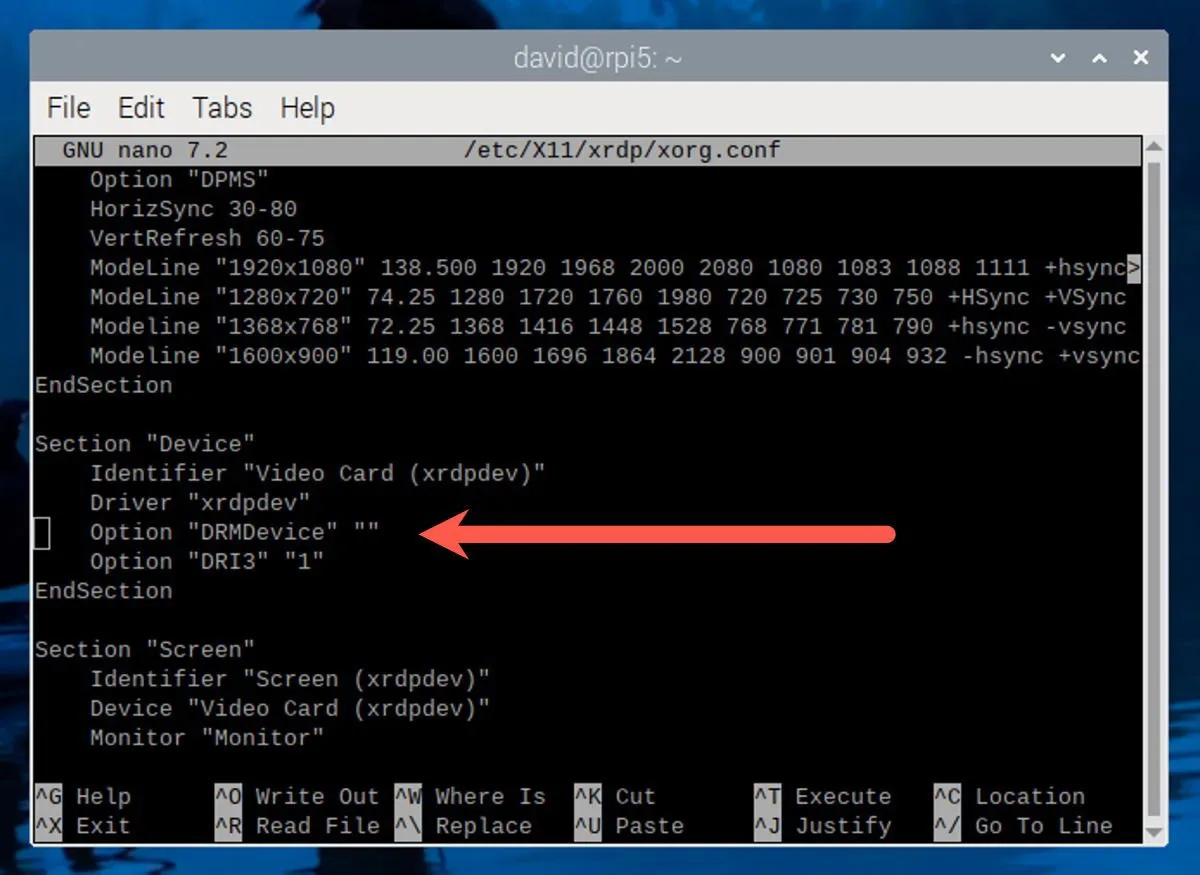
sudo adduser xrdp ssl-certIf you encounter a blank screen when connecting, you may need to adjust the xorg configuration. Open the file with this command:
sudo nano /etc/xrdp/xorg.confLocate a line containing Option “DRMDevice” and modify it to:

Press Ctrl + X, then confirm saving changes with Y. Restart your Raspberry Pi, and xrdp should now be ready to accept connections on boot.
Establishing a Connection to the xrdp Server on Your Pi
With the xrdp server running, you can connect from any device that supports a Remote Desktop client.
- Windows: Use the built-in Microsoft Remote Desktop application, available from the Microsoft Store.
- macOS: Download the Windows App from the App Store.
- Android: Access the Remote Desktop app on the Play Store.
- iOS: Find the Windows App Mobile in the App Store.
- Linux: Consider using Remmina for efficient RDP management.
Regardless of your client choice, the connection procedure is straightforward. For example, in macOS, click the Plus icon to add a new PC.
Enter your Raspberry Pi’s local IP address in the PC name field (find this using ifconfig in your terminal).You can assign a recognizable Friendly name like “Workshop Pi” as well. Click Add to save this connection, then double-click it to access the Raspberry Pi desktop.
Additional Tips
- To prevent connectivity issues, set a static IP address for your Raspberry Pi via your router’s settings.
- Consider regular updates to your xrdp server for enhanced security and functionality.
- Explore potential project ideas to maximize your Raspberry Pi’s capabilities, such as running a local LLM or setting up a media server.
Summary
By following this guide, you can effortlessly set up xrdp on your Raspberry Pi, allowing you to access its desktop environment securely. From Windows to mobile devices, the setup facilitates seamless remote connections while maintaining encryption for your safety.
Conclusion
Setting up xrdp on your Raspberry Pi opens up a vast array of possibilities for remote access. With a few simple steps, you can connect easily from any device and enjoy the full graphical interface that makes using your Raspberry Pi a breeze.
FAQ (Frequently Asked Questions)
What is xrdp and how does it work?
xrdp is an open-source software that allows remote access to a Linux machine using the Remote Desktop Protocol (RDP).It offers a graphical interface similar to Windows Remote Desktop.
Is it safe to use xrdp?
Yes, xrdp uses TLS encryption to secure your remote sessions, providing a secure connection to protect against eavesdropping.