DaVinci Resolve rendering zero-byte files on Windows 11/10
Some users are seeing DaVinci Resolve rendering zero-byte files on Windows 11/10. In this guide, we show you how to fix the issue and render videos normally.
There are a few professional video editing tools that are available for free. One such program is DaVinci Resolve. A lot of editors around the world use DaVinci Resolve to edit videos and deliver content based on their or clients’ needs. For additional features, that give some extra space for you to edit your videos and add some advanced effects, you need to use DaVinci Resolve Fusion which is a paid subscription program. If you own a Blackmagic camera, you can get it for free. After editing videos on DaVinci Resolve, we render the videos to export the final video.
DaVinci Resolve rendering zero-byte files on Windows 11/10
DaVinci Resolve might render zero-byte files on Windows for various reasons. Some of them are insufficient space to render, wrong codec and other render configurations, unsupported formats, or corrupted files, etc. You need to implement fixes that eliminate the possibilities and get rid of the issue. You can follow the below steps to fix the issue.
- Check if the Output folder is selected correctly
- Check the render settings
- Check if there are any updates available for DaVinci Resolve
- Disable Hardware Acceleration
- Reinstall DaVinci Resolve
Let’s get into the details of each method and fix the issue.
1] Check if the Output folder is selected correctly
If you have selected the wrong output folder that has less space than the required space for the video to render, you might see this error. You need to make sure you have selected the correct folder for the output video to save. If you have selected an external hard drive, please change the output location to an internal folder that has space.
2] Check the render settings
Make sure you have configured the render settings properly. The codec, output format, resolution, etc. need to be correct. If they are selected more than the performance capability of your PC, the program may give up rendering due to insufficient resources and you might see a zero-byte file instead of a full-length output video. Configure the render or export settings properly and see if it fixes the issue.
3] Check if there are any updates available for DaVinci Resolve

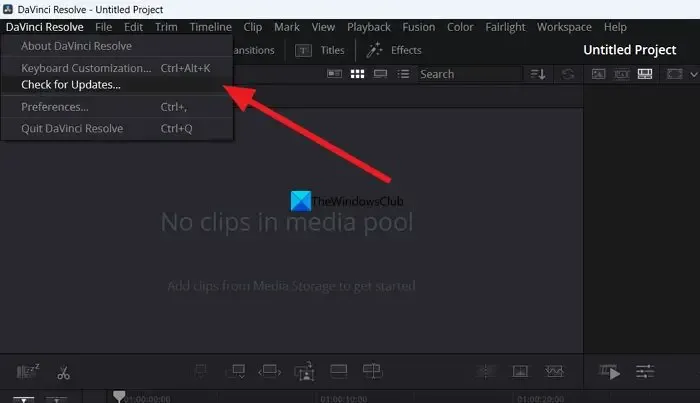
The error might also be caused by bugs in the previous updates. You need to update the program to the latest version to get rid of the bugs or eliminate the possibility of it. You can check for updates in the DaVinci Resolve program itself. Click on DaVinci Resolve in the menu bar and select Check for updates. It will automatically find available updates, download and install it on your PC.
4] Disable Hardware Acceleration

Hardware acceleration is enabled by default on DaVinci Resolve to ensure the smooth functioning of the program,. Sometimes, it may cause issues if the wrong GPU mode is selected. You need to disable the hardware acceleration and try rendering the timeline to see if it causes the issue and fix it.
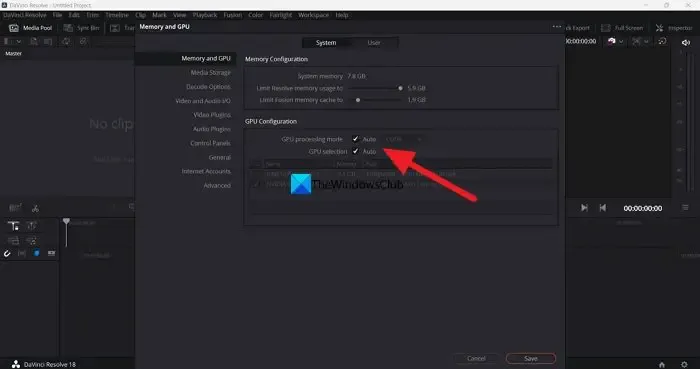
To disable hardware acceleration on DaVinci Resolve,
- Click on DaVinci Resolve in the menu bar
- Select Preferences.
- Click on Media and GPU tab
- Uncheck the boxes beside GPU processing mode and GPU selection.
- Click on Save to save the changes.
Then, restart DaVinci Resolve and open the project you were working on and render the timeline to see if it has fixed the issue.
5] Reinstall DaVinci Resolve
If none of the above methods helped in fixing the issue, you need to uninstall DaVinci Resolve, clear all the traces of the program on your PC, restart it, and install DaVinci Resolve again after downloading the latest version from the Blackmagic design website.
These are the different ways you can use to fix DaVinci Resolve when it is rendering zero-byte files on Windows 11/10.
Is DaVinci Resolve CPU or GPU intensive?
DaVinci Resolve needs both CPU and GPU for better performance. So, it is both CPU and GPU intensive. As it needs to work on videos that are high resolutions, DaVinci Resolve needs to have good CPU capabilities as well as GPU capabilities. That is the reason Blackmagic design laid out minimum system requirements to install and use DaVinci Resolve on your PC.
Is Windows 11 compatible with DaVinci Resolve?
Yes, DaVinci Resolve works fine on Windows 11. All you need to have is a good configuration of your PC that meets or exceeds the minimum requirements of DaVinci Resolve. Unless your PC does not meet the minimum requirements, the program cannot NOT be compatible with Windows 11.
Leave a Reply