How to Enable Night light on Windows 11

Working late at night on a computer heavily strains your eyes. There’s a great feature called Night Light available on Windows PC. Enabling this feature will not only reduce eye strain but also smoothes/helps to sleep well at the night. Let’s know how to enable Night light on Windows 11.
It is not possible to enable or disable this feature from time to time as you may forget about this for a long portion of the night. When you come to enable it, it might be already late. Microsoft has provided a solution to this problem as well. All you require is to schedule the Night light and this will turn ON and Off automatically.
Enable Night Light on Windows 11
To enable night light on your Windows 11 PC, follow these easy steps –
- Press Win + I to launch Settings.
- Select System on the left navigation and head over to the right pane.
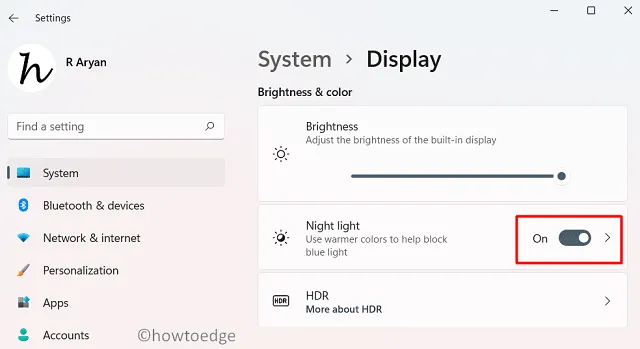
- Under “Brightness & Color“, locate the “Night light” and turn on its toggle switch.

Alternatively, one may also start or stop the Night light using the Quick Access window. Press Win + A to launch the Quick Settings flyout and click Night Light. To disable the night light on your computer, re-visit the flyout again by pressing Win + A. Click over its icon to stop displaying the warmer color.

Can I control the Night Light Strength in Windows 11?
Yes, it is possible to control the Night Light Strength on Windows 11 PC. To either reduce or increase this strength, follow these easy steps –
- Press Windows + I to launch Settings.
- Go to System > Display, and enable the Night light’s toggle switch on the right pane.
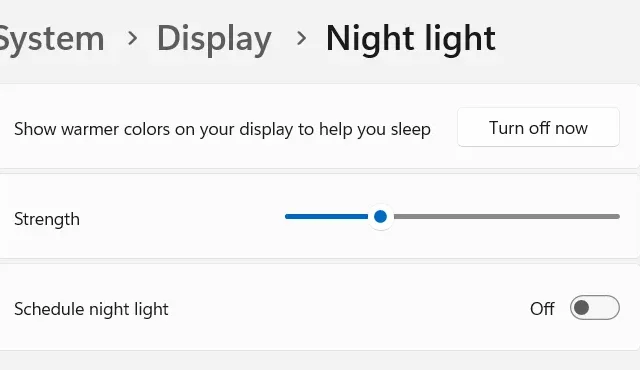
- Use the Slider next to Strength and slide it left side to reduce the night light intensity.
- In case you want to increase the intensity, slide the toggle switch to the right.
That’s it, you now know how to adjust the Night Light Strength on Windows 11.
How do I schedule Night light on Windows 11?
If for any reason you don’t want to enable this feature during the daytime, you may schedule this action to occur automatically. Here’s how to perform this task –
- First of all, launch Windows Settings and navigate to the following path –
Settings > System > Display
- On the right panel, click the right arrow available on the Night light.

- On the subsequent screen, you now have the following options to choose from –
Show warmer colors on your display to help you sleep: Click Turn on now and you will notice your display screen turning warmer.
Strength: Slide the glider to the right and your display screen will become warmer.
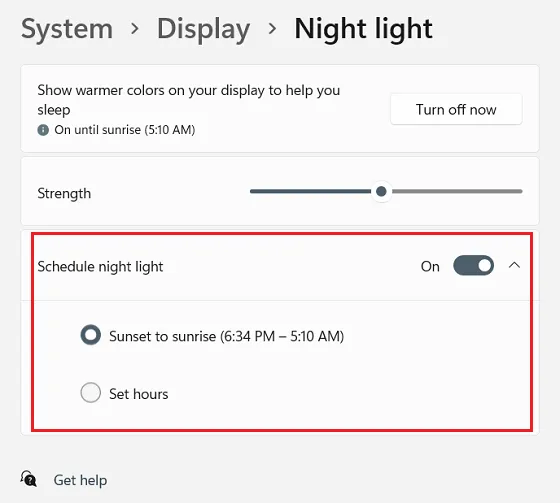
Schedule night light: Enable this toggle switch to automatically start or stop displaying the night light.
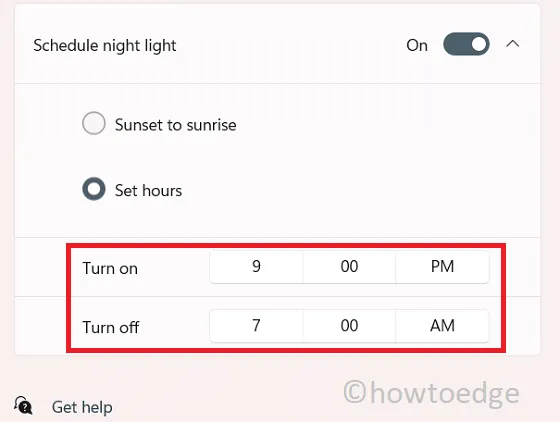
By default, the night light is scheduled from Sunset to Sunrise. If you want to change this timing, click “Set hours” and then choose a custom Turn on as well as Turn off timings on your Windows 11 PC.

That’s it, I hope you now know what Night light is, and how to activate or deactivate this feature on Windows 11 along with scheduling this feature. Ping us in the comment section if you face any difficulty following this guide.
How does Night light reduce eye strain?
In general, every smart device emits blue rays which are very bad for the eyes, especially at night. When you enable the night light feature, this reduces the amount of blue light emitted by the display screen. Doing so also displays warmer colors on your device thus making you fall asleep.
- How to Install Optional Features on Windows 11
- How to Solve 100% or High CPU Usage in Windows 11
- Download and Install Windows 11 ARM with ISO


Leave a Reply