Top Strategies for Efficiently Organizing Emails in Microsoft Outlook

Streamlining your Microsoft Outlook inbox is essential for decreasing clutter, freeing up storage, and improving overall productivity.
How can I enhance my productivity by organizing Outlook emails?
1. Set up folders in Outlook
1.1 Outlook desktop application
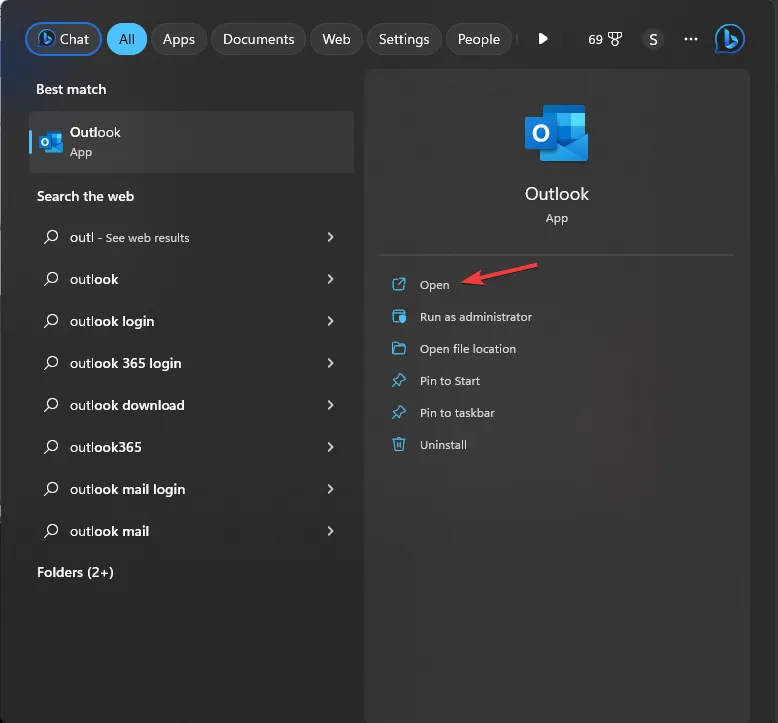
- Press the Windows key, enter Outlook, and click Open.
- Select the Folder tab and click on New Folder.

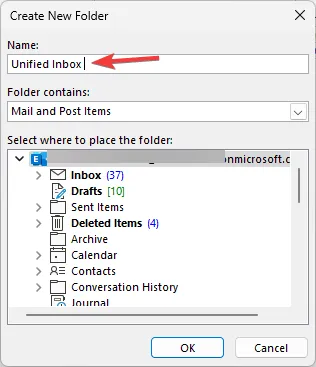
- In the New Folder dialog, name it Unified Inbox and click OK.
1.2 Outlook web version
- Open your browser and log into Outlook on the web.
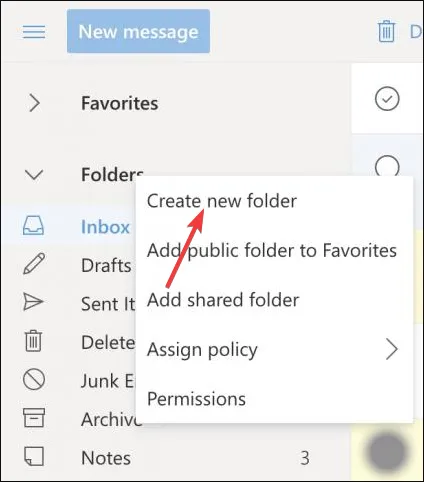
- Expand your folder list and either select Create new folder at the bottom or right-click on your Inbox and choose Create new folder.
- Type your desired folder name and press Enter.
Organizing your Outlook emails into folders and subfolders allows you to effectively categorize and prioritize messages. For example, you can create distinct folders for personal emails, financial records, or different client communications to minimize confusion.
This organization method accelerates the retrieval of emails and essential information, particularly when Outlook’s search functionality proves ineffective. If you create multiple folders, they may get collapsed, making them easy to overlook. To mitigate this, ensure the folder pane in Outlook remains expanded.
2. Relocate emails to folders
2.1 Manual email relocation
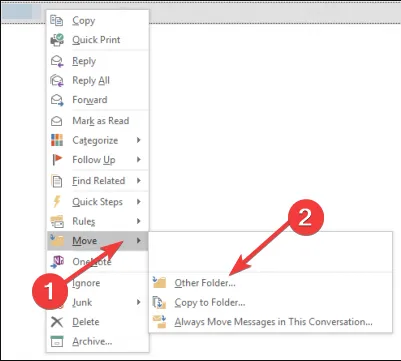
- Open your Outlook email, select a message, click on Move to, and look for the folder you just created.
- You can also drag and drop the email into the chosen folder.
2.2 Automate email relocation
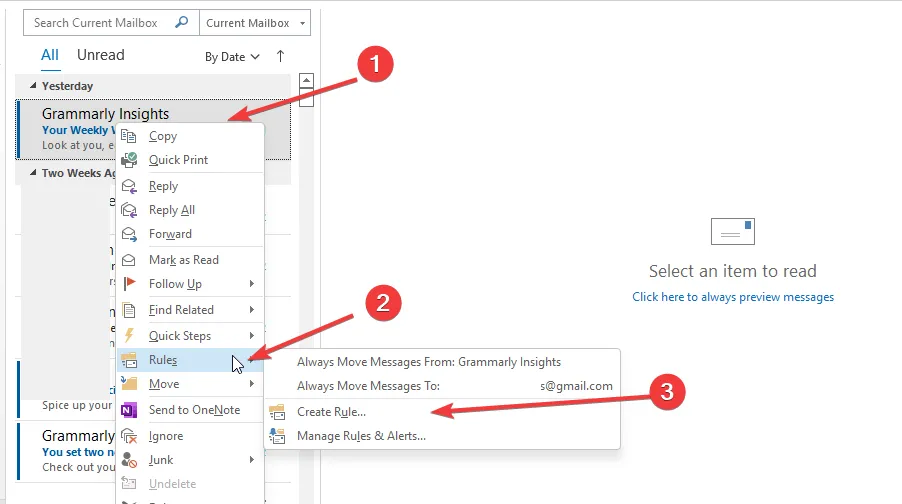
- In Outlook, right-click on an email, and select Create rule.
- Choose Message and then click on Rules.
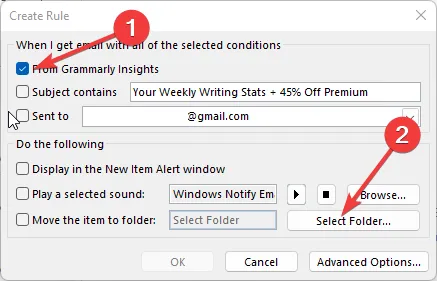
- In the Create rule dialog, check the From (sender) option.
- Select the folder you just created to ensure all future messages from that sender are automatically directed there.
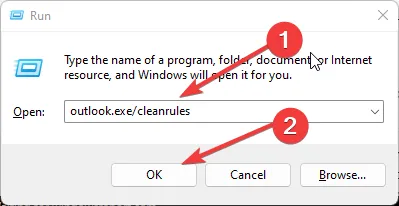
- To establish new rules, clear existing ones by pressing Windows + R to access the Run prompt.
- Type outlook.exe /cleanrules in the command box and hit Enter .
2.3 Alphabetically organize your email folders
- Open Microsoft Outlook.
- Navigate to the Folder tab.
- Click on Show All folders A-Z to enable this view.

3. Set Outlook categories
3.1 Desktop client
- Launch the Outlook desktop application.
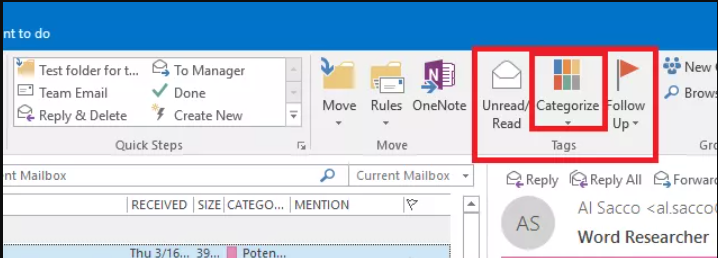
- In the Tags section, select Categorize.
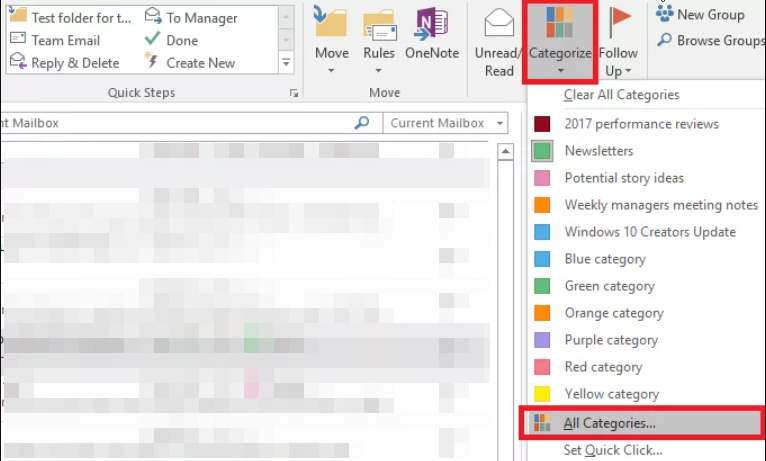
- Select All categories from the dropdown menu.
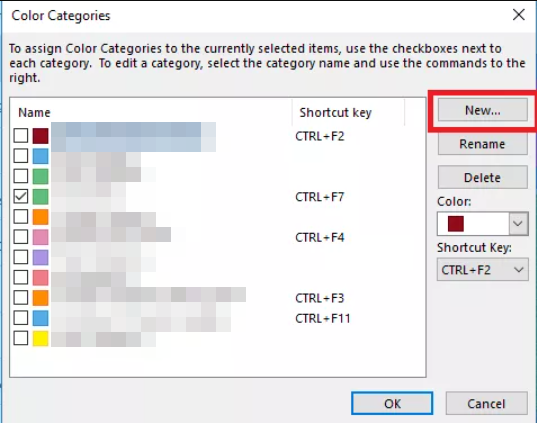
- Click the New button in the Color Categories box.
- Type a name for your new category in the Add New Category box.
- Choose a custom color from the Color dropdown.
- Assign a shortcut key to your category using the Shortcut Key option.
- Press OK to finalize the new category and click again to confirm your settings.
3.2 Web app
- Go to the official Outlook login page.
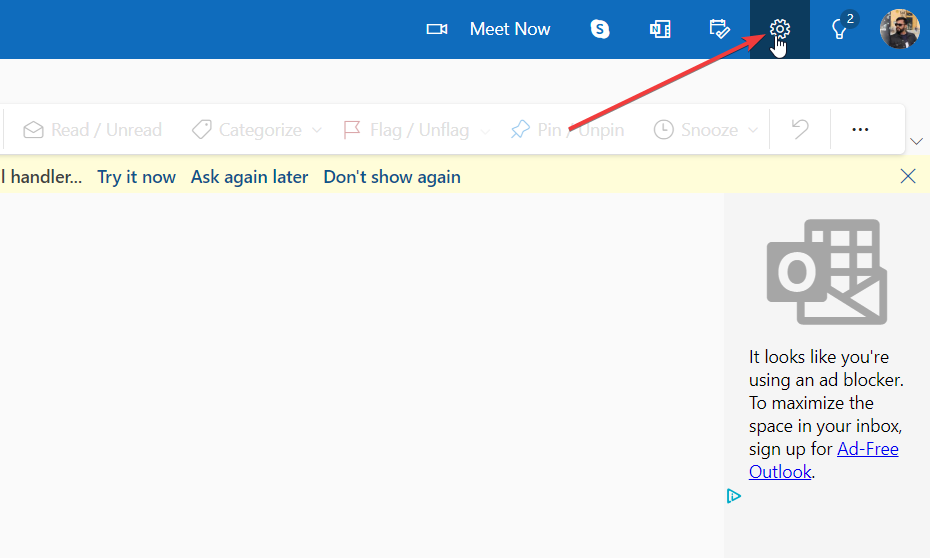
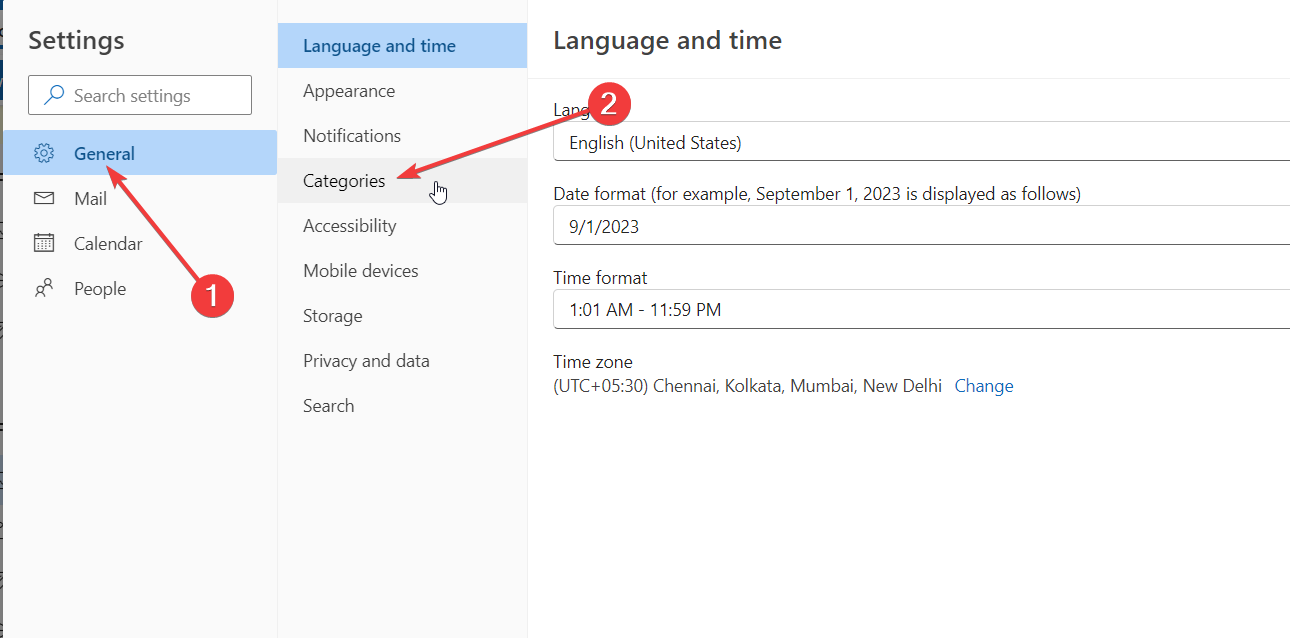
- Click on Settings.
- Select General followed by Categories.
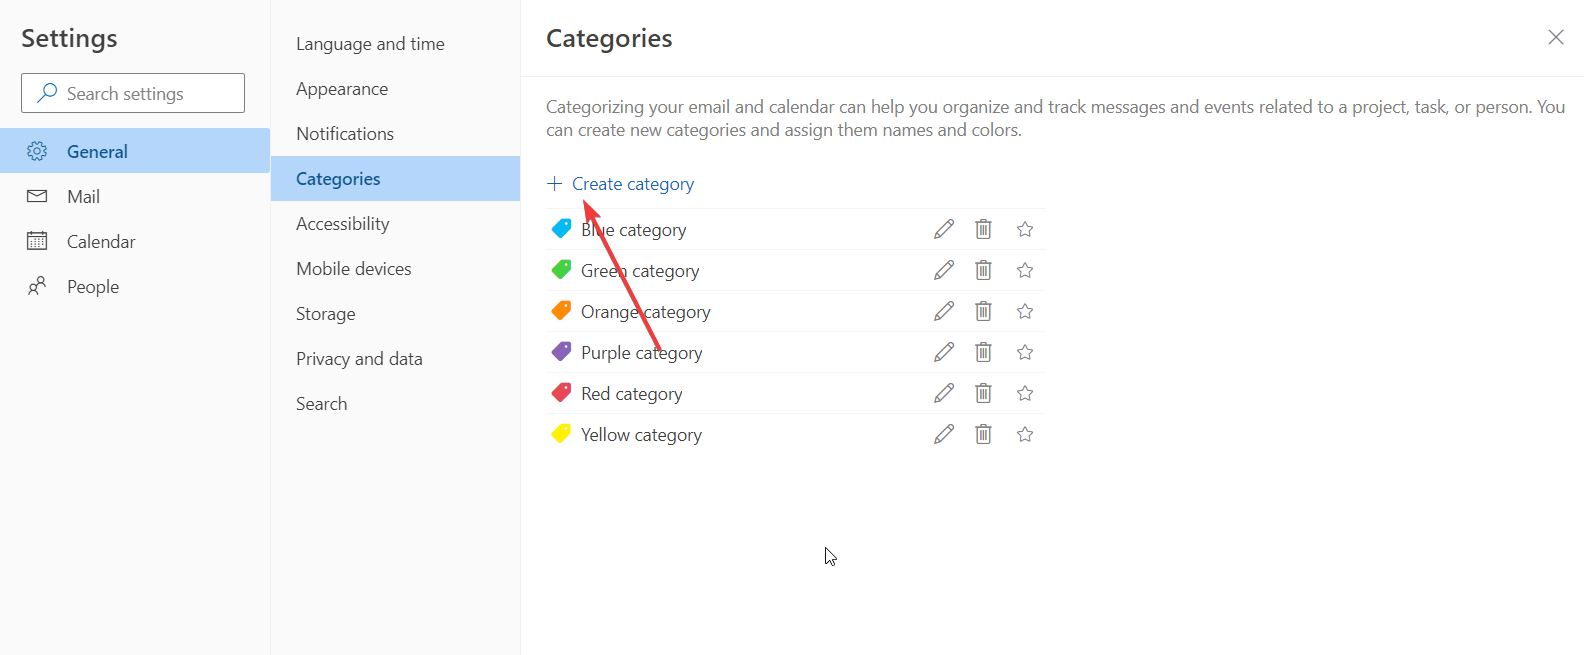
- Press + Create Category at the top of the category list.
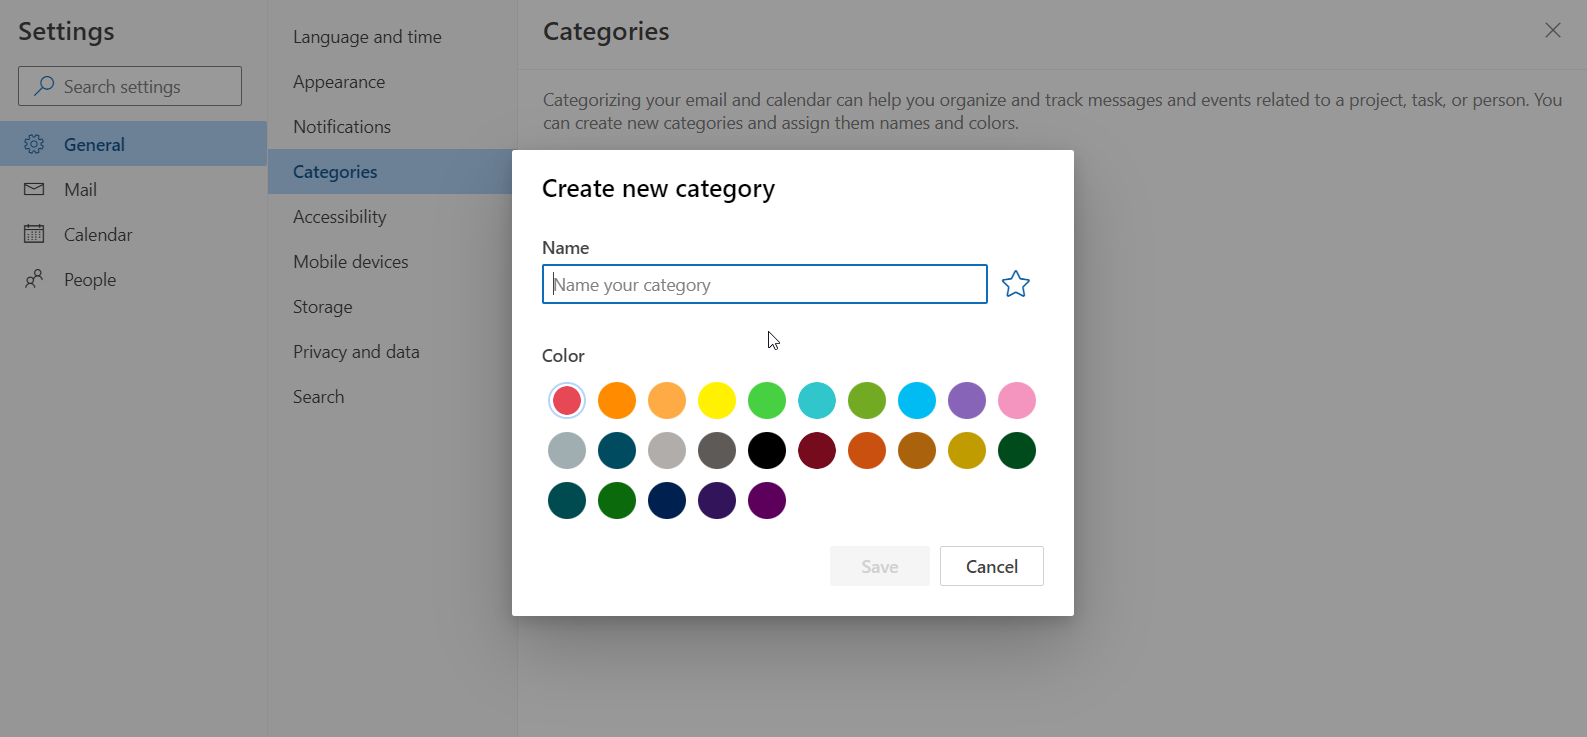
- Name the category, choose a color and click on Save.
3.3 Sort and filter by category
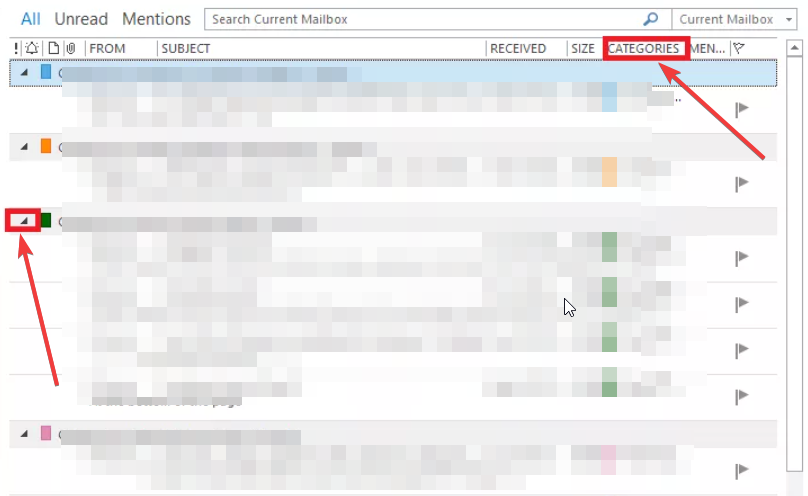
- To sort categorized emails, simply click the Categories column in the horizontal bar above your inbox.
- You can collapse or expand specific categories under the Categories section using the small triangle next to the Category header.
4. Set up Automatic replies
- Open the Outlook application, navigate to File > Info > Manage Rules & Alerts.
- Go to the Email Rules tab, selecting your email account in the Apply changes to this folder field.
- Click on New Rule.
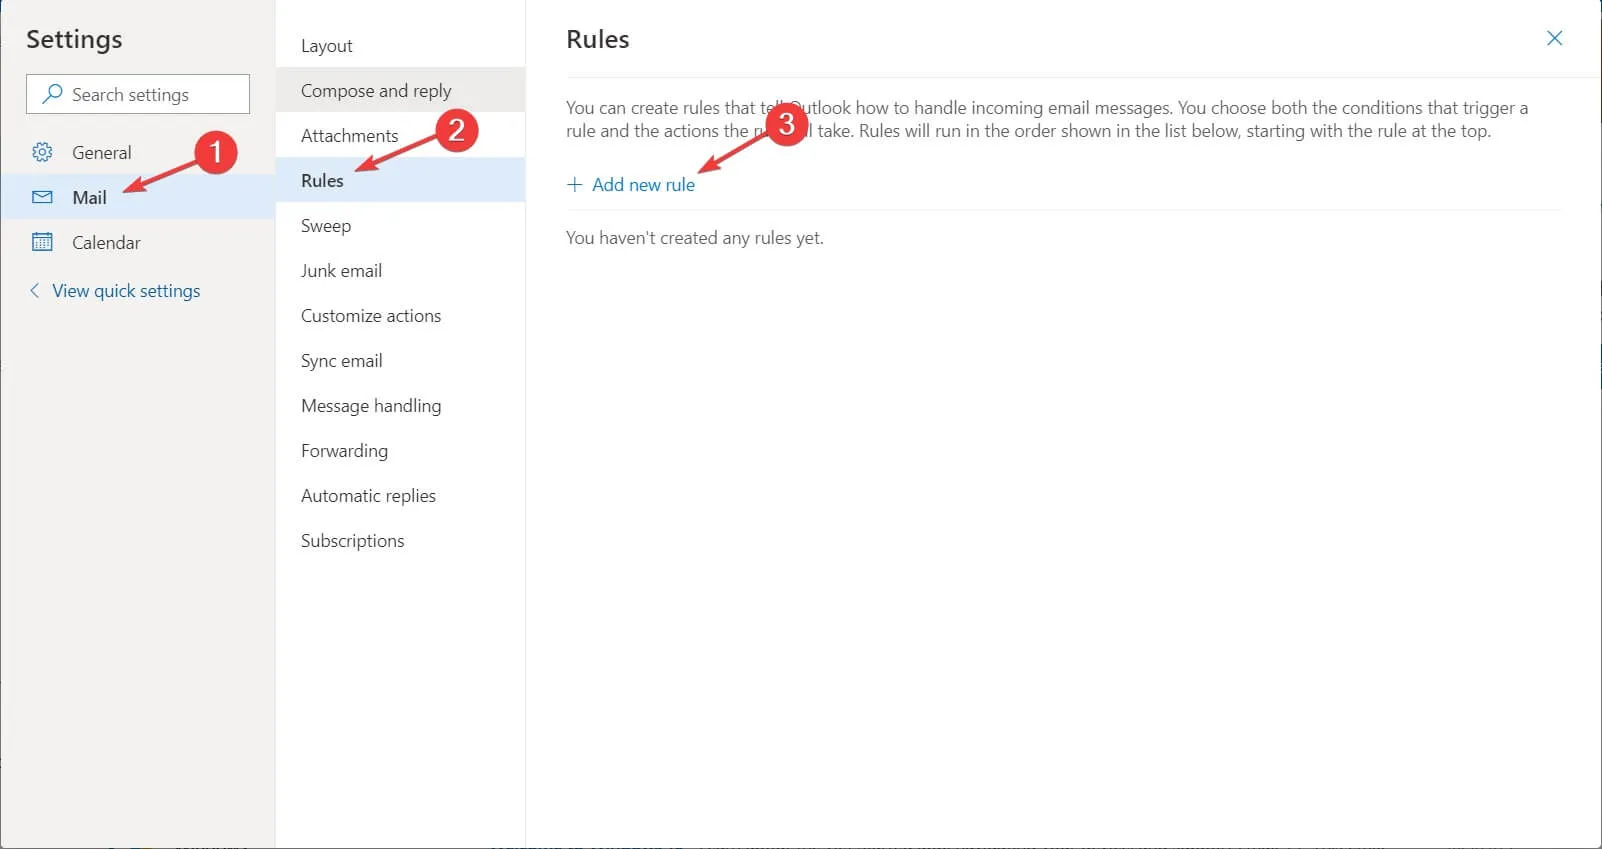
- Select Apply rule on messages I receive from the Start from a blank rule options.
- Check the option for Where my name is in the To box, and click Next.
- Select Reply using a specific template.
- In the Step 2: Edit the rule description section, click the template link.
- Set Look In to User Templates in File System.
- Choose the template you created in a prior step and click Next.
- In the Select exceptions list, check the box that says except if it is an automatic reply.
- Name the rule you desire and check the Turn on this rule box.
- Click Finish then OK to activate the automatic reply.
Automatic replies are particularly useful for notifying senders that you are out of the office or unavailable, avoiding perceptions of negligence regarding unanswered emails.
5. Create tasks within Outlook
5.1 Task setup
- On the main Outlook screen, go to the Home tab and locate Quick Steps.
- Click on Create New or find New Quick Step, then select Custom.
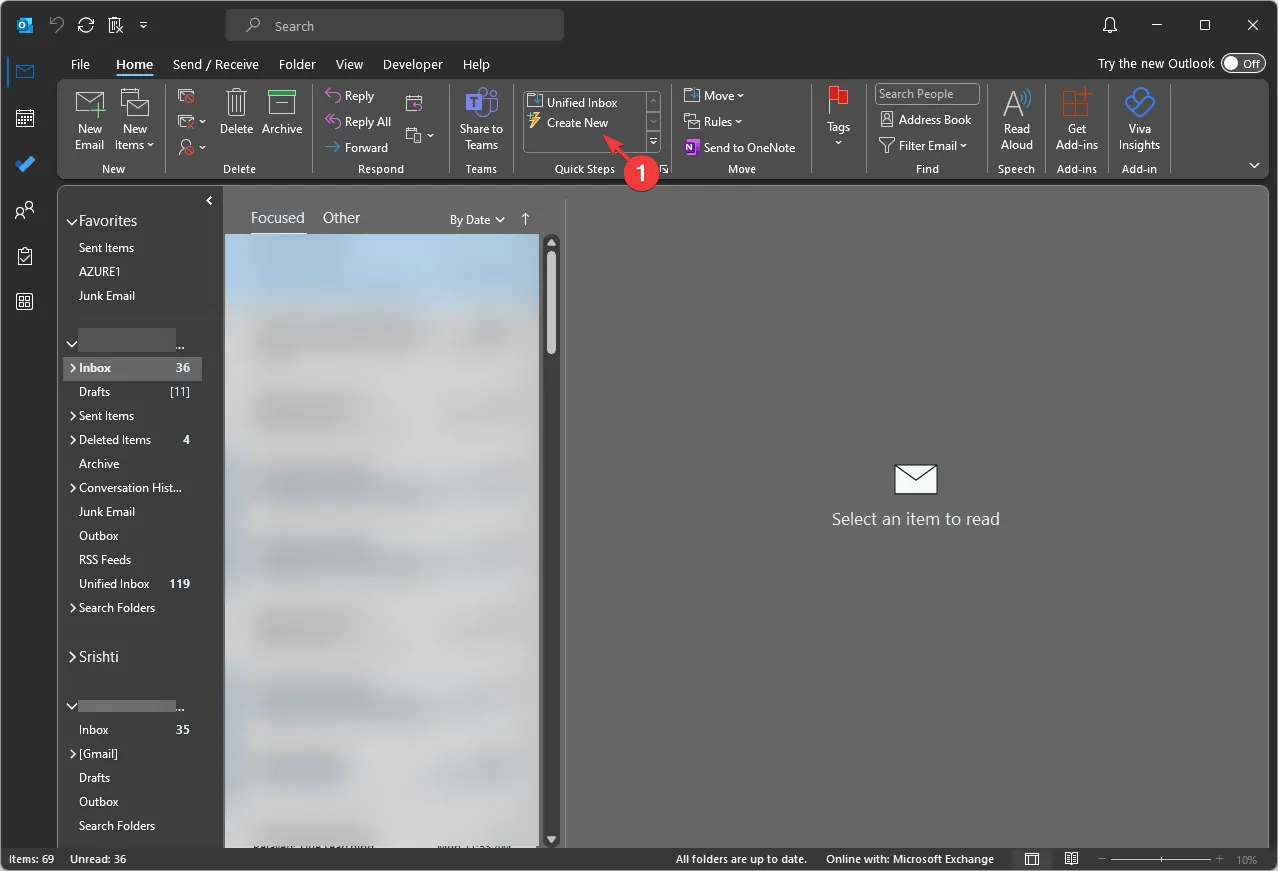
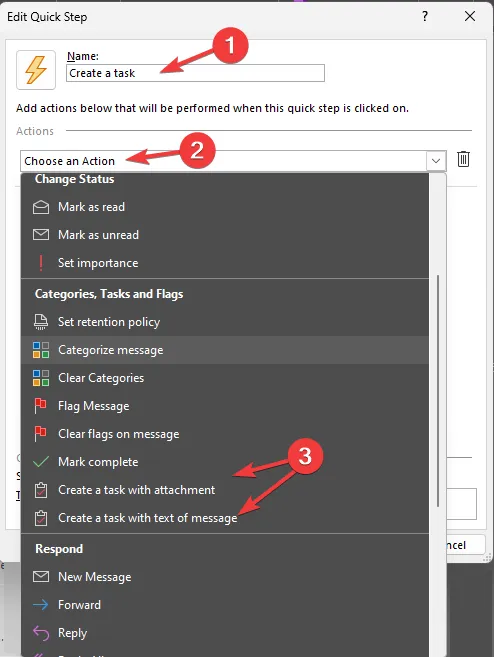
- In the Edit Quick Step window, give your Quick Step a name.
- For the Choose an Action dropdown, select a task-related action like Create a task with attachment or Create a task with text of message.
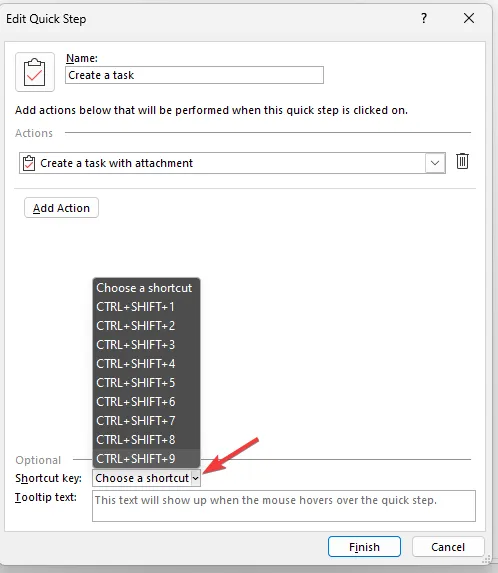
- You can assign a shortcut key using the option adjacent to the dropdown.
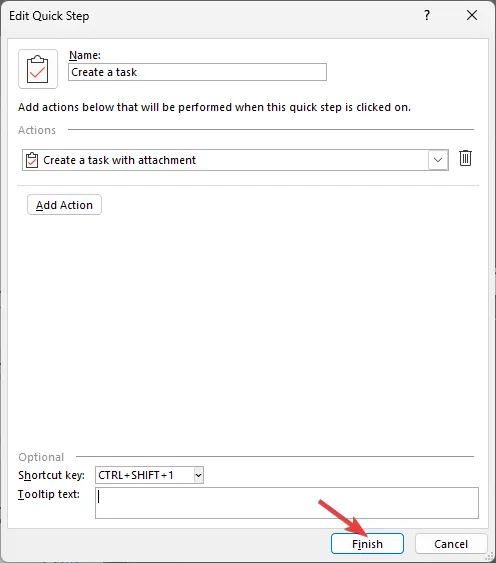
- Once all details are finalized, click Finish to save your Quick Step.
- This newly created Quick Step will be visible in the Quick Steps area. To utilize it, select an email in your Inbox and either choose your Quick Step or press the assigned Shortcut key.
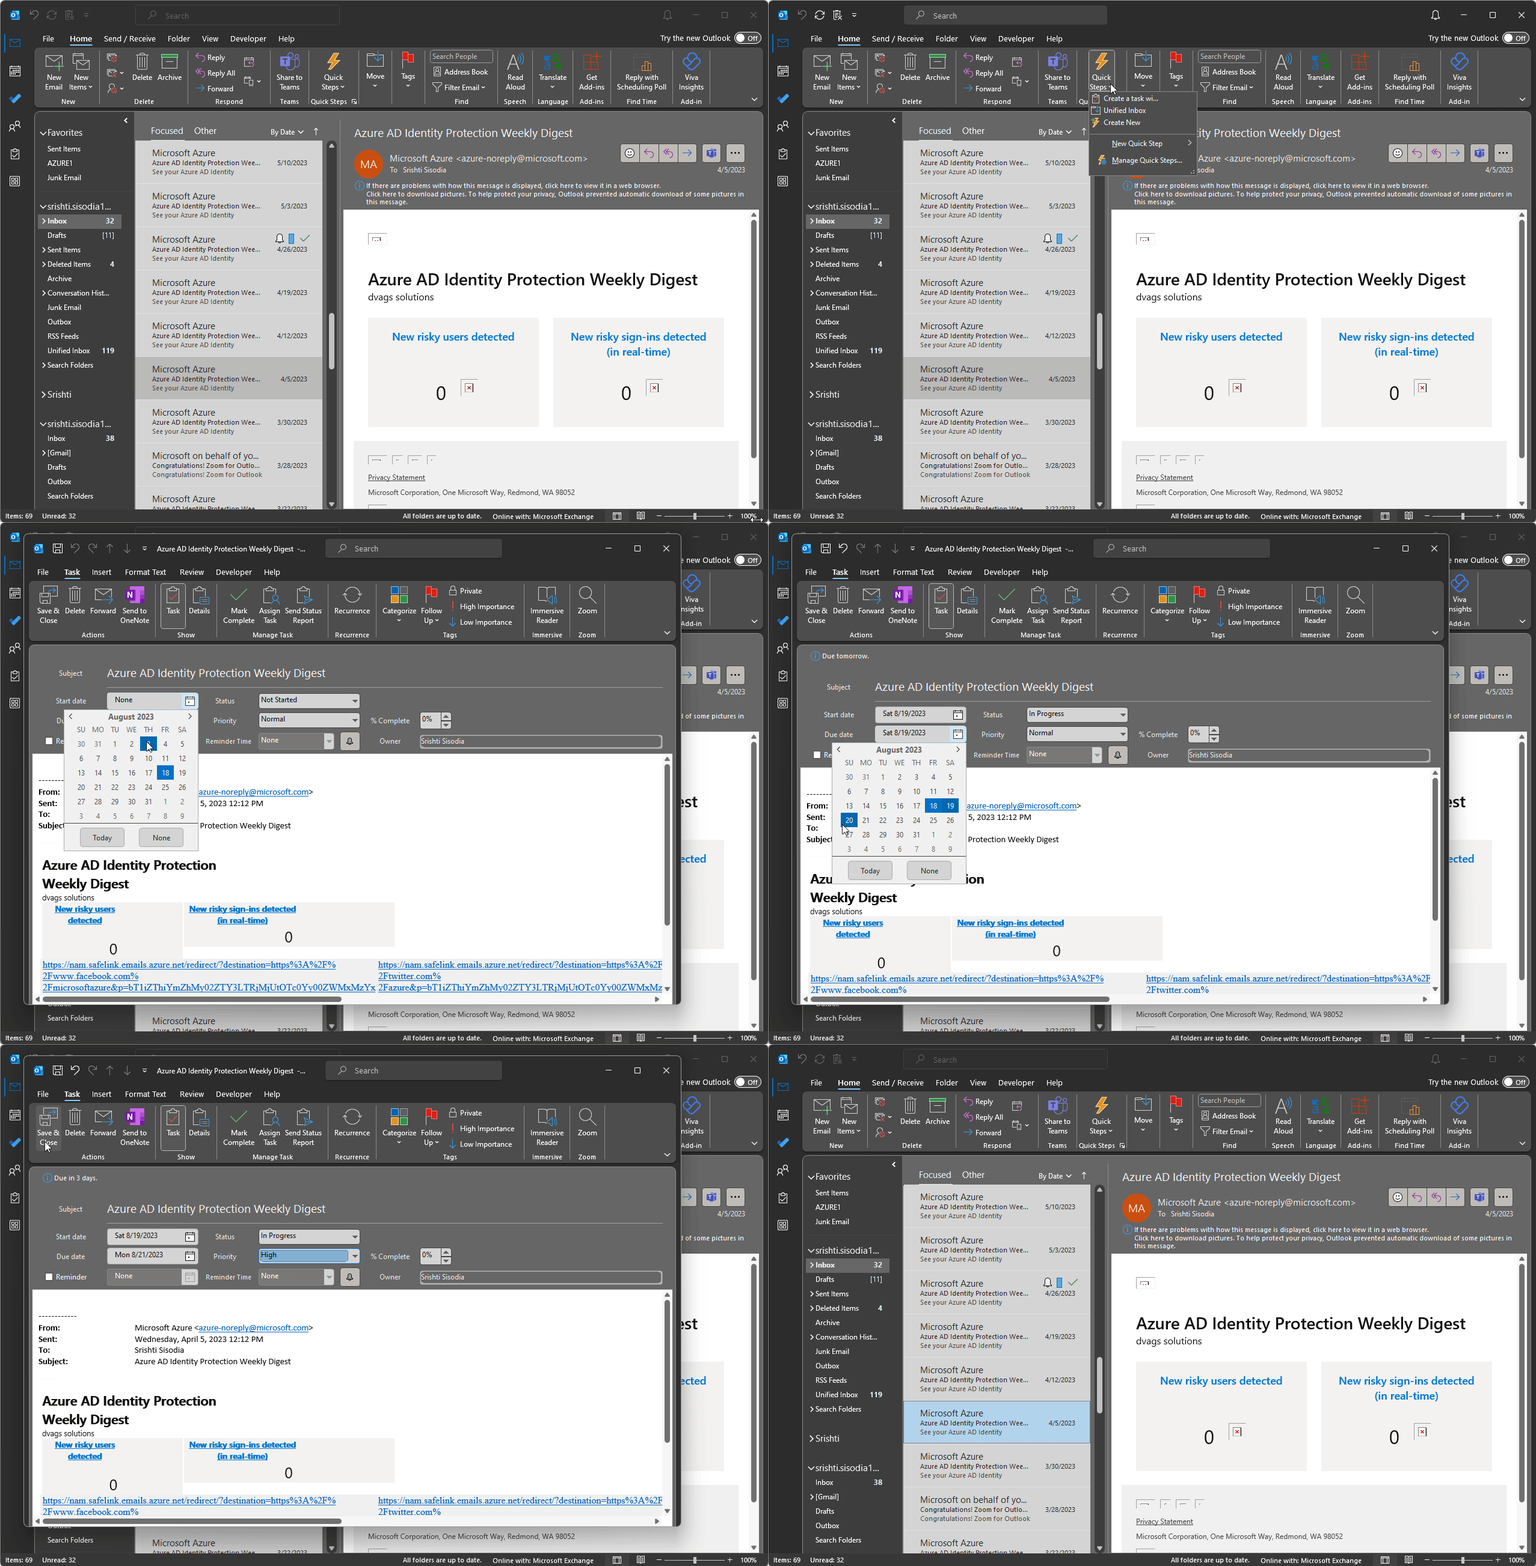
- A new task window will open; fill in the necessary information and click Save & Close.
5.2 Setting reminders
- Open Outlook and click the To Do icon.
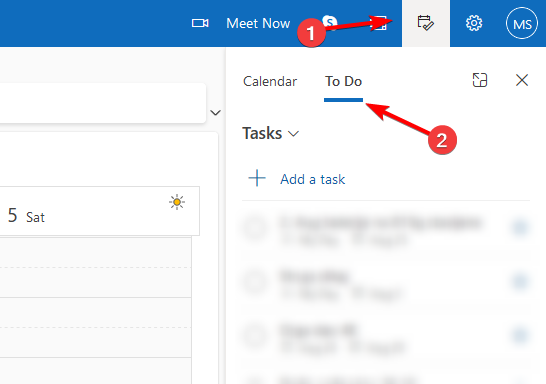
- Click on Remind me in the task details and select your desired reminder time.
- Save your changes.
When you receive actionable emails, creating tasks can aid in your recollection and prompt you to address them by the due date, enhancing your task management and ensuring you never overlook a deadline or critical activity.
6. Plan routine cleanups
- Access Outlook.com via your preferred browser.
- Log in with your Microsoft account, then choose Settings from the top right corner.
- Select General, then choose Storage. If you’re using New Outlook for Windows, click Settings, go to Accounts, and choose Storage.
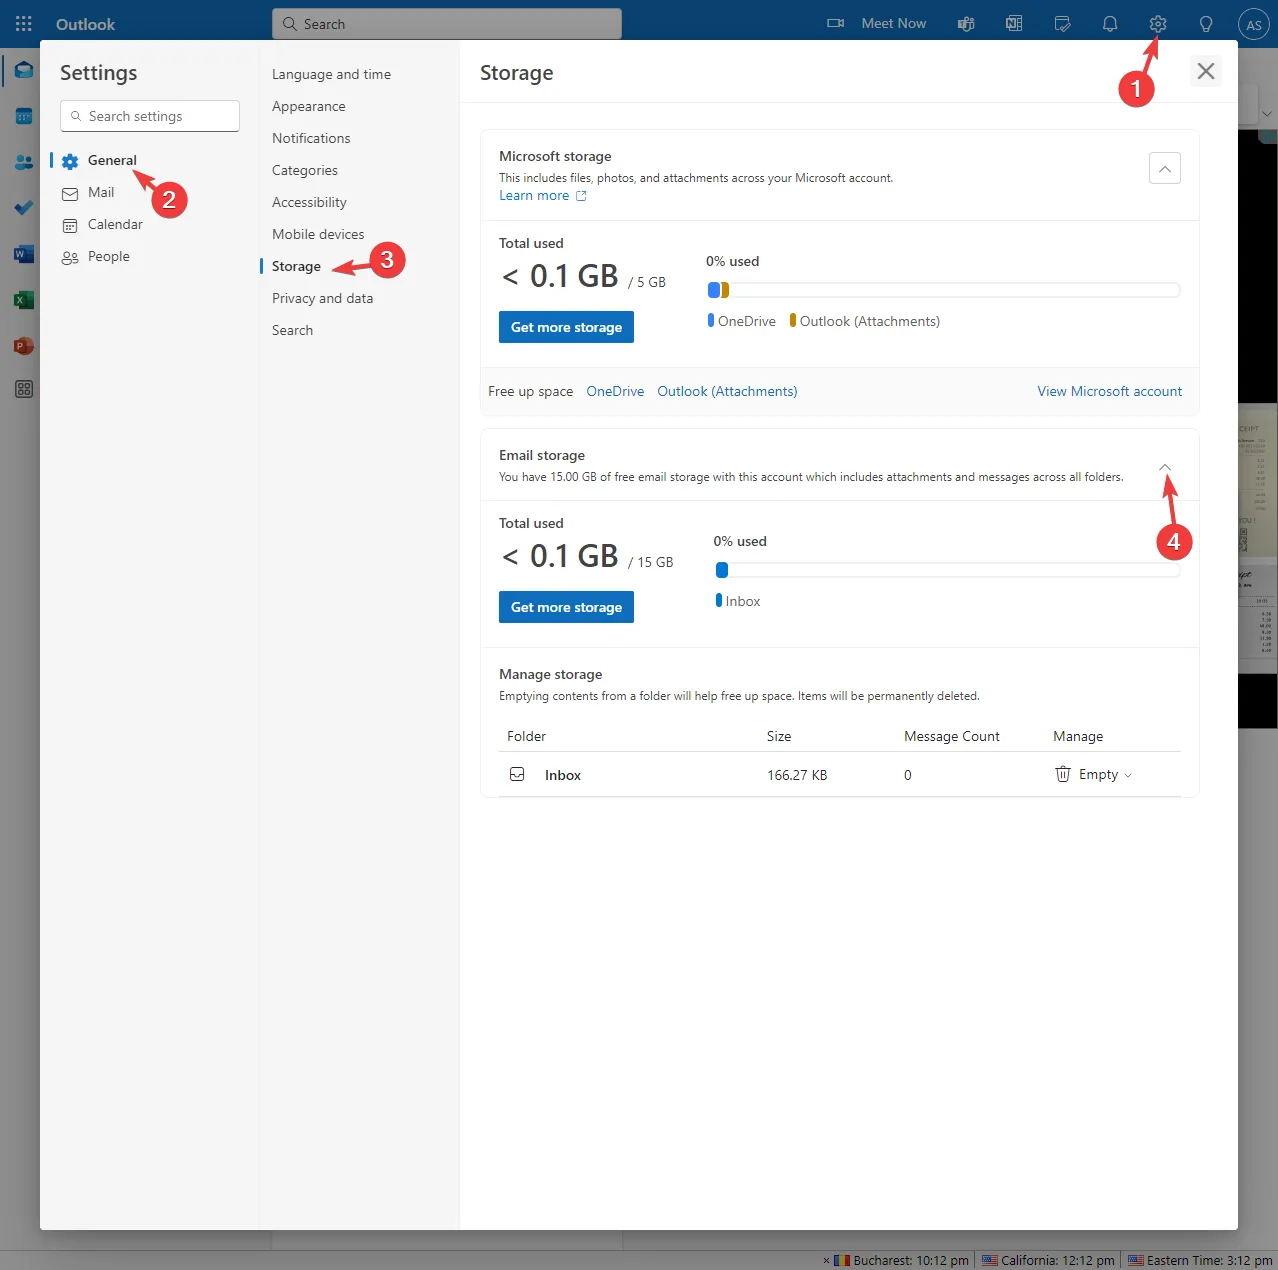
- You will see how much space each folder uses in your mailbox.
- Under Manage, you can set each folder’s retention period to 3, 6, or 12 months.
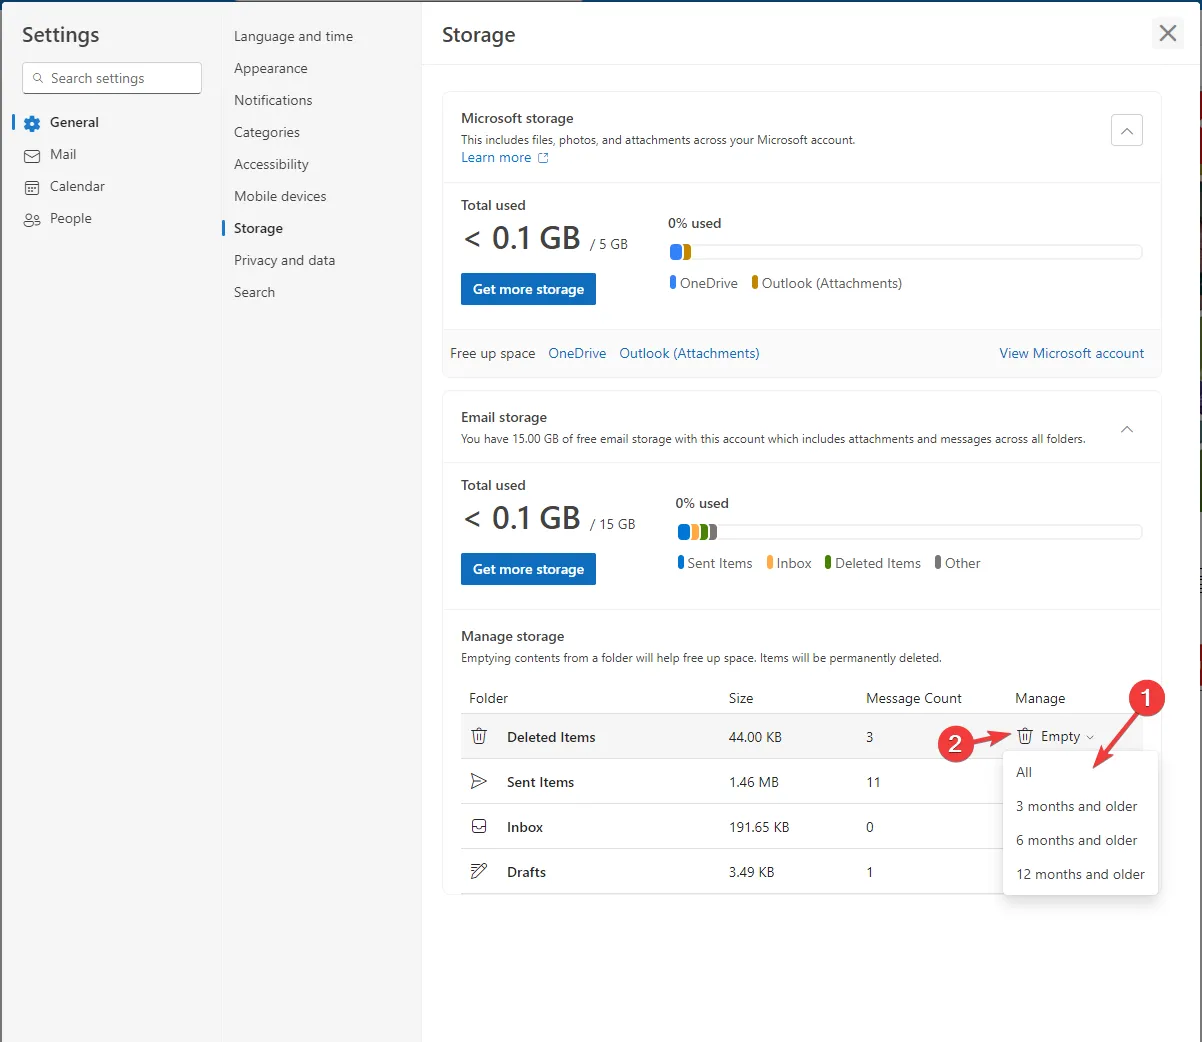
- Click on the Delete icon to erase emails and free up space.
Without routine cleanups, you might consume Outlook storage quickly, resulting in an inability to receive new messages. You may encounter a ‘recipient inbox full’ warning until you manage your junk mail effectively.
In addition to email organization, Outlook includes features that can significantly enhance efficiency. Utilize over 70 command-line switches to automate various tasks and streamline your workflow.
Moreover, we offer a cheat sheet for keyboard shortcuts in Outlook to further enhance your productivity. Following these strategies can transform your inbox from chaotic to organized.
Do you have additional suggestions for maintaining an organized Outlook email environment? Share your thoughts with us in the comments below.
Leave a Reply