How to Fix NVIDIA Web Helper Service High CPU Usage in Windows 11

If you’ve noticed that the NVIDIA Web Helper Service is consuming excessive CPU resources on your Windows 11/10 system, this guide will assist you in resolving the issue swiftly. Below, we outline the most prevalent causes of this problem along with effective solutions.

NVIDIA Web Helper Service Excessive CPU Usage in Windows 11/10
To address the issue of high CPU usage by the NVIDIA Web Helper Service in Windows 11/10, consider the following methods:
- Update your NVIDIA graphics driver.
- Reinstall the graphics driver.
- Disable NVIDIA In-Game Overlay.
- Remove GeForce Experience.
For a detailed exploration of these solutions, keep reading.
1] Update Your NVIDIA Graphics Driver

An outdated or malfunctioning graphics driver may lead to increased CPU usage. Hence, the first step is to check for updates for your NVIDIA graphics driver.
You can update your graphics driver in Windows 11/10 through two primary methods:
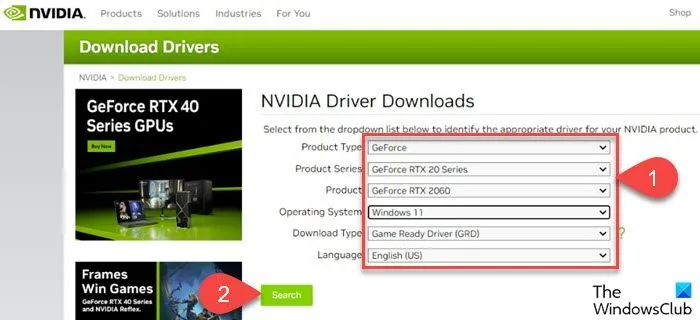
- Visit the official NVIDIA website to download the necessary driver.
- Alternatively, utilize Windows Update to automatically retrieve the most recent driver.
2] Reinstall the Graphics Driver

In some cases, a corrupted graphics driver may be the culprit. To remedy this, consider reinstalling your graphics driver by following these steps:
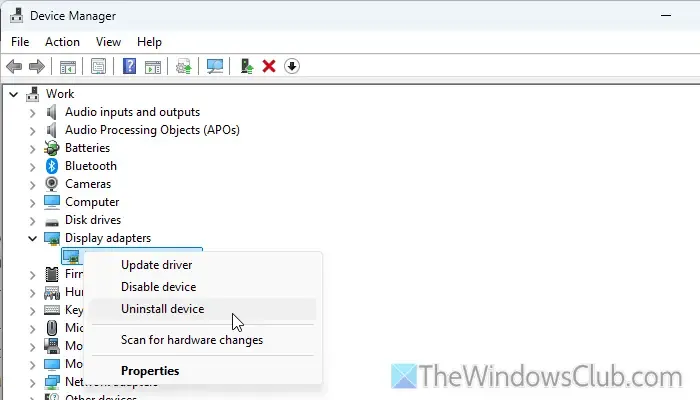
- Open the Device Manager.
- Expand the Display adapters section.
- Right-click on your NVIDIA driver and select the Uninstall device option.
- Confirm the uninstallation prompt.
- Head over to the official NVIDIA website to download the latest driver version.
- Install the newly downloaded driver according to the instructions provided.
3] Disable NVIDIA In-Game Overlay

To turn off the NVIDIA In-Game Overlay, follow these steps:
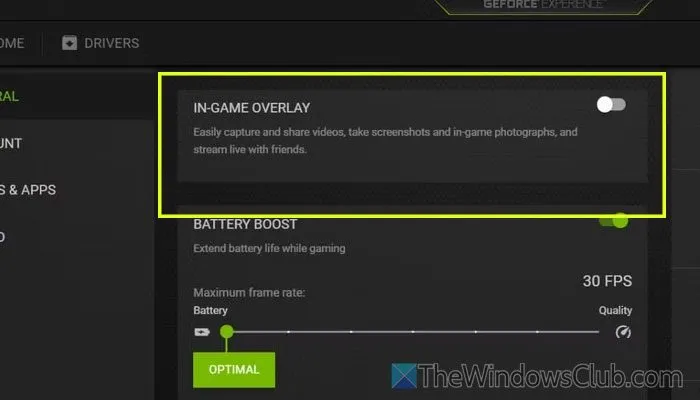
- Launch GeForce Experience and click on the settings gear icon.
- Navigate to the General tab, and locate the IN-GAME OVERLAY setting.
- Switch this option OFF by toggling the corresponding button.
4] Uninstall GeForce Experience
If the previous options do not yield results, uninstalling GeForce Experience can be a viable solution. While this application can be beneficial for frequent gamers, those who play infrequently can safely remove it. Here’s how to uninstall it:
- Press Win+R to open the Run dialog.
- Input appwiz.cpl and hit Enter.
- Locate NVIDIA GeForce Experience, then select Uninstall/Change.
- Follow the prompts to complete the uninstallation process and restart your PC.
We hope these suggestions help resolve your issue.
NVIDIA Web Helper Service and Internet Usage
The NVIDIA Web Helper Service is not designed to utilize the internet extensively. Instead, it operates silently in the background, supporting the NVIDIA GeForce Experience application’s functionality. Additionally, it facilitates ShadowPlay, which allows users to record or stream gameplay. If you observe the service using the internet, as long as ShadowPlay is executing in the background, there should be no concern.
How Can I Reduce NVIDIA’s High CPU Usage?
There are several strategies for mitigating NVIDIA’s high CPU usage. You may consider updating to the latest driver version, disabling the In-Game Overlay feature, removing GeForce Experience, or restarting the NVIDIA service. The effectiveness of these solutions largely depends on your specific graphics card issues.
Image Credits: Thewindowsclub.com


Leave a Reply