Activate System Guard Secure Launch to Enhance Firmware Security
Microsoft’s Secured-core PCs feature a seamless integration of hardware, firmware, and software aimed at strengthening security for devices, identities, and sensitive data. To initiate its functionalities, you must first activate System Guard Secure Launch for Firmware Protection. In this article, we will explore the process step-by-step.
Activating System Guard Secure Launch for Firmware Protection
In partnership with OEMs, Microsoft has introduced a distinctive line of devices known as Secured-core PCs. These devices are equipped with advanced security protocols at the firmware level, effectively thwarting malware threats and minimizing vulnerabilities. They boot up in a secure, trusted environment thanks to a hardware-enforced root of trust. This setup protects against both physical and virtual threats, ensuring that all software executions are validated by trusted authorities, thus preventing unauthorized access to sensitive code.
To enable Firmware Protection, you have two available methods:
- Activate Firmware Protection via Windows Security
- Enable Firmware Protection through the Registry Editor
Let’s dive into each method for a clearer understanding.
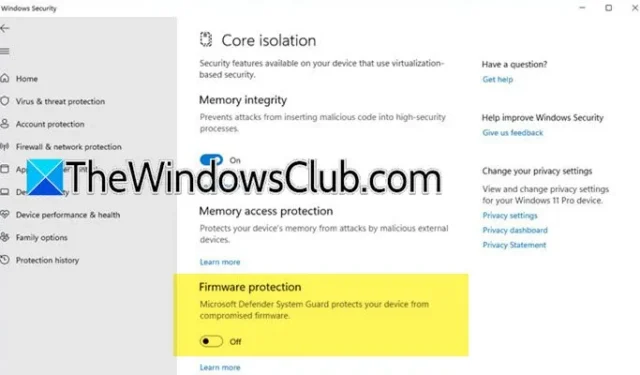
1] Activating Firmware Protection via Windows Security

First, we will utilize the Windows Security application to enable Firmware Protection. Follow these steps:
- Launch the Windows Security app by searching for it in the Start Menu.
- Select Device Security from the options on the left side of the interface.
- Navigate to the Core isolation section and click on the hyperlink for Core isolation details.
- You’ll be taken to the Core isolation settings where you can toggle the Firmware Protection option on or off.
- If prompted by User Account Control (UAC), click Yes or enter your admin credentials if required.
- Reboot your computer to apply the changes.
After restarting, Firmware Protection should be activated. If the toggle for Firmware Protection appears greyed out, you may need to contact your IT administrator for assistance in altering the registry settings or enabling the protection on your behalf.
2] Enabling Firmware Protection via the Registry Editor

Before making any alterations in the Registry, it’s advisable to create a backup. To do this, open the Registry Editor, go to File > Export, select a secure location, and save the backup. Once this is complete, open Notepad and insert the following lines of code.
To activate System Guard Secure Launch for Firmware Protection
Windows Registry Editor Version 5.00
[HKEY_LOCAL_MACHINE\SYSTEM\CurrentControlSet\Control\DeviceGuard\Scenarios\SystemGuard]
“Enabled”=dword:00000001
To deactivate System Guard Secure Launch for Firmware Protection
Windows Registry Editor Version 5.0
[HKEY_LOCAL_MACHINE\SYSTEM\CurrentControlSet\Control\DeviceGuard\Scenarios\SystemGuard]
“Enabled”=dword:00000000
Remember to create two separate files, each with distinct names but saved with the .reg file extension. To apply the changes, right-click on the file and select Open. This action will execute the script and adjust your registry settings accordingly.
How to Activate Secure Boot in System Firmware?
Secure Boot is generally enabled by default; however, if it isn’t, you can turn it on through the BIOS settings. First, verify whether Secure Boot is available on your device. To do this, access Windows Security, navigate to Device Security, and if the Secure Boot option is visible, it means your system supports this feature, and you can enable it from there.
How to Enable Firmware Protection?
Firmware Protection can be activated through the Windows Security application. Simply open the app, head to Device Security > Core isolation and look for the Firmware Protection option. Finally, toggle it to enable Firmware Protection. We recommend following the earlier outlined steps for a seamless activation process.


Leave a Reply