Top Windows Registry Tweaks for Enhanced Gaming Performance


While achieving high FPS and a stable Internet connection is straightforward, gaining a competitive advantage often requires adjustments that minimize latency. In the world of esports and fast-paced gaming, every millisecond counts. In this article, we’ll guide you through various Windows Registry modifications designed to enhance your gaming performance and provide you with that crucial edge.
Important: Making incorrect changes to the registry may lead to system issues and potential data loss. Always back up the Windows Registry prior to making any modifications.
Steps to Access the Windows Registry
There are numerous methods to launch the Windows Registry Editor. The simplest approach is to type “registry”into the Windows Search bar and select Registry Editor. Alternatively, you can press Win + R, input regedit, and hit Enter to access it.
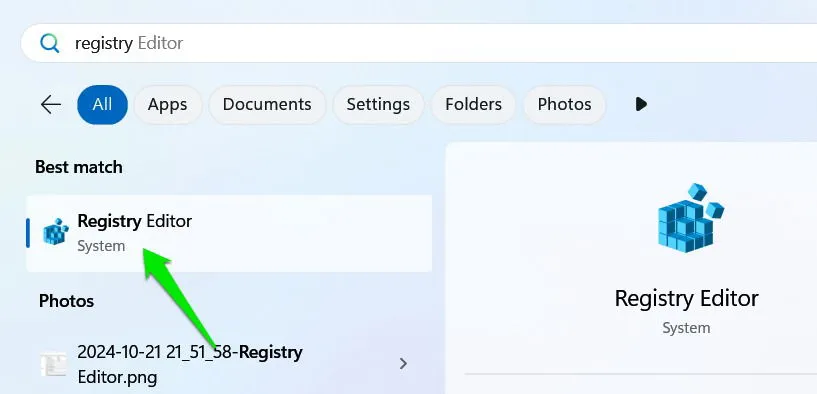
We’ll provide specific paths for each hack. You can either copy and paste the path into the address bar or manually navigate to each key by expanding the parent folders.
Disabling CPU Core Parking
Windows typically conserves power by disabling certain CPU cores when they’re idle. While beneficial for general usage, this feature can result in added latency during CPU-intensive tasks. In gaming scenarios, it may lead to stutters or delays in input response, negatively affecting performance in competitive gameplay.
To disable core parking, navigate to the following registry key:
In the right panel, double-click on Attributes and set the value to 0.
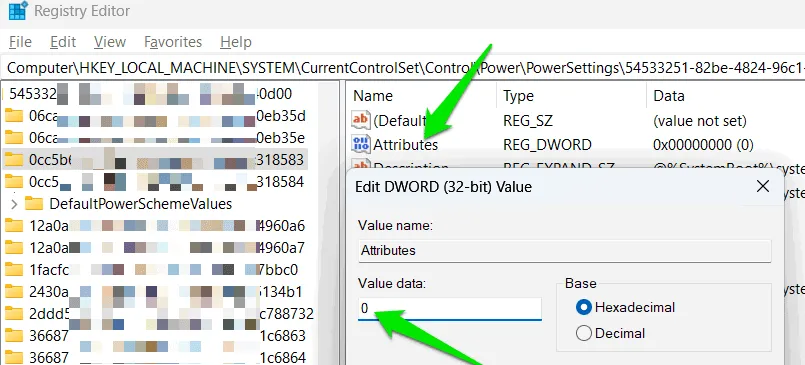
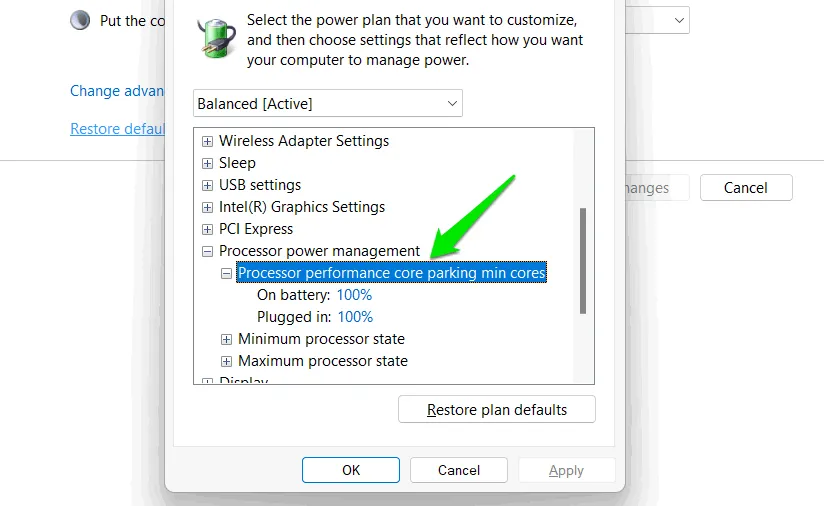
To verify the adjustment, search for “edit power plan”in Windows Search, then access the advanced options for your selected plan.
Look for a new entry termed Processor performance core parking min cores under the Processor power management. This should be set to 100%, effectively disabling core parking. While you can modify this percentage, maintaining it at 100% is recommended for optimal results.
Boosting TCP ACK Frequency
The Transmission Control Protocol (TCP) is responsible for managing the transmission of data by sending packets in an orderly fashion. It utilizes an ACK (Acknowledgement) process where the recipient confirms receipt of packets. By default, Windows waits for several packets before sending ACKs, which helps reduce network overhead but can also introduce latency.
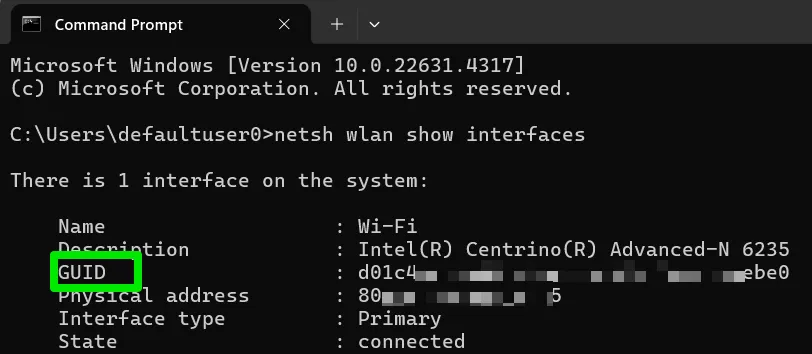
For competitive gaming, increasing the frequency of ACKs can reduce latency. First, you need your network adaptor’s GUID. You can find this by searching for “cmd”in Windows Search and launching Command Prompt. Enter netsh lan show interfaces for a wired connection or netsh wlan show interfaces for wireless. Note your GUID from the output.
Next, proceed to the following registry location:
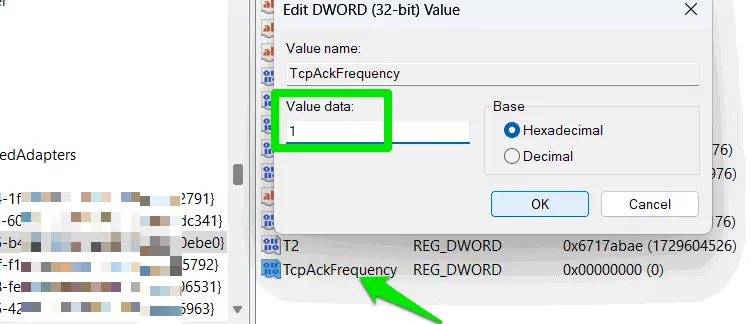
Select the key corresponding to your noted network GUID under Interfaces. Right-click in the right panel, choose New and then DWORD (32-bit) Value.

Name it TcpAckFrequency, double-click it to modify, and set the value to 1, mandating Windows to acknowledge each received packet.
Minimizing Deferred Procedure Call (DPC) Latency
Windows employs Deferred Procedure Calls (DPC) to prioritize high-urgency tasks while postponing less critical jobs. This deferment can result in input lag during gaming and even cause audio glitches. Although complete elimination of DPC latency isn’t feasible, you can somewhat minimize it by instructing the kernel to retain pageable data in physical RAM rather than utilizing the pagefile.
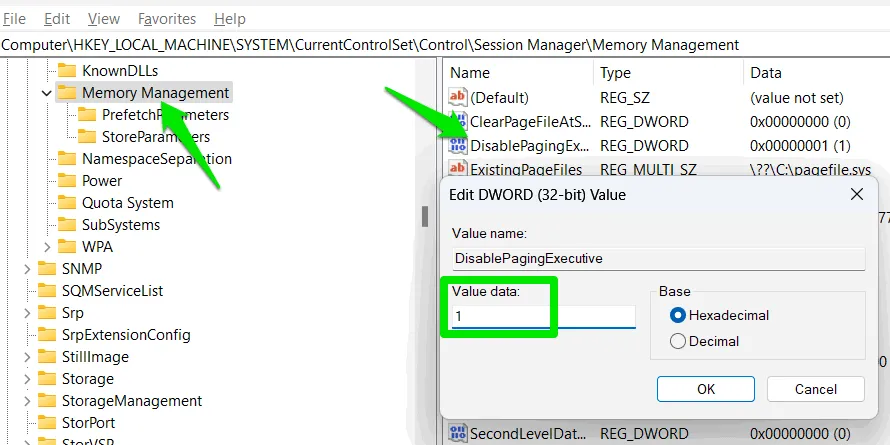
Navigate to the following registry key:
Locate DisablePagingExecutive in the right panel, double-click on it, and adjust its value to 1.
Refining Mouse Settings for Precision
While mouse settings can be adjusted via Windows settings, the Registry offers more detailed control over various parameters. This includes setting specific mouse acceleration thresholds and adjusting the speed of double-clicks in milliseconds.
HKEY_CURRENT_USER\Control Panel\Mouse
Numerous settings available here can enhance your gaming experience when configured appropriately:
- DoubleClickSpeed: Adjusts to prevent misclicks or ensure consistent double-click registration.
- MouseThreshold: Affects sensitivity levels when mouse acceleration activates.
- MouseSpeed: Influences the rate of mouse acceleration.
- MouseHoverTime: Determines the speed at which hover tips or information appear.
- DoubleClickHeight/Width: Set the permissible movement range during double-clicking to enhance accuracy.

Elevating Game CPU Priority
Various methods exist for managing CPU priority, but the Win32PrioritySeparation registry key grants more nuanced control over both latency and priority allocation for running processes. Adjusting this allows for reduced processing delays, improved resolution time, and better focus processing for games.
To reach the relevant section of the Windows Registry, go to:
HKEY_LOCAL_MACHINE\SYSTEM\CurrentControlSet\Control\PriorityControl
Find Win32PrioritySeparation, double-click it, and change its value to 26, which optimizes performance with the lowest possible latency and ensures that the game receives the highest CPU priority while in focus. If you experience any stuttering or stability problems, consider adjusting the value to 2A instead.

Prioritizing Gaming Network Traffic
By default, Windows allocates a portion of network bandwidth for its own processes. If your bandwidth runs low, Windows will often prioritize system operations over applications. Adjusting the Registry lets you shift this focus, ensuring your game runs smoothly even when bandwidth is constrained.
Head to the following location in the Registry:
HKEY_LOCAL_MACHINE\SOFTWARE\Policies\Microsoft\Windows\PSched
Right-click in the right pane, select New -> DWORD (32-bit) Value. Name this entry NonBestEffortLimit and assign it a value of 0.

Turning Off Full-Screen Optimizations System-wide
In general, Windows runs full-screen applications in a hybrid mode that maintains access to desktop features. Although convenient, this optimization can introduce minor input lag and performance stutters.
If you don’t utilize overlays or need multitasking capabilities while playing games, disabling full-screen optimizations may result in a slight advantage. While you can deactivate this feature for individual apps, you can apply this change system-wide through the Registry.
Navigate to the following registry path:
HKEY_CURRENT_USER\System\GameConfigStore
Locate GameDVR_FSEBehaviorMode within the right panel and change its value to 2. Should you encounter issues with any specific games, you can re-enable full-screen optimizations for those titles through their Properties -> Compatibility settings.

Disabling Power Throttling
Windows may reduce the power allocated to background tasks to conserve energy. While this typically doesn’t hinder game performance during active sessions, it can throttle secondary processes initiated by the game, subsequently affecting overall gameplay.
To prevent interruptions during gaming sessions, you can fully disable power throttling through the Registry.
Access the following path:
HKEY_LOCAL_MACHINE\SYSTEM\CurrentControlSet\Control\Power\PowerThrottling
Add a new DWORD value in the right pane by right-clicking, selecting New and then DWORD (32-bit) Value. Name it PowerThrottlingOff and set the value to 1. A system restart will be necessary for changes to take effect.

It’s important to note that these are advanced adjustments that should ideally be made after ensuring your system is already optimized for gaming performance. This is particularly crucial for laptop users, as thermal constraints may lead to power throttling.
Image credit: Freepik. All images are credited to Karrar Haider.


Leave a Reply