Fix Ctrl + Alt + Arrow Shortcut Issues in Windows 11

Many users have reported issues with the Ctrl + Alt + Arrow keys failing to function on their Windows 11/10 systems. This key combination may not perform any action or may inadvertently open a different program instead. For those encountering this challenge, the solutions provided in this article should prove beneficial.

The combination of Ctrl + Alt + Arrow keys (Up, Down, Left, or Right) is intended to easily adjust the display orientation on your Windows 11/10 device. Whether you’re engaged in a project or reading an eBook—especially in formats like ePub or PDF that may require rotation—this shortcut is quite handy. This default shortcut enables you to rotate your screen into different modes: Landscape, Flipped Landscape, Portrait, and Flipped Portrait. However, when these keys fail to respond properly,
How to Resolve Ctrl + Alt + Arrow Key Issues in Windows 11
If the Ctrl + Alt + Arrow key combination is unresponsive on your Windows 11/10 computer, refer to the solutions outlined below to address the problem:
- Verify if the Ctrl + Alt + Arrow key combination is linked to another application
- Activate Screen Rotation hotkeys via the Graphics Card Control Panel
- Adjust the Display orientation through the Settings app
- Manually rotate the display using the Graphics Card Control Panel
- Utilize a free Screen Rotate application.
Let’s delve deeper into these solutions.
1] Verify Key Combination Assignments
This step may seem basic, but it’s crucial. Ensure that the Ctrl + Alt + Arrow key combination hasn’t been inadvertently assigned to a different program or application. For instance, the Ctrl + Alt + Left arrow might have been linked as a shortcut on your desktop. This reassignment would prevent the expected screen rotation and instead trigger another function.
Thus, inspect your desktop shortcuts and the settings of any relevant apps to see if the key combination is being used. If it is, reassign the hotkeys of that specific app and try using the shortcut again to rotate your screen. While this can be a bit tedious, it is worth attempting.
2] Enable Hotkeys for Screen Rotation in the Graphics Card Control Panel

One effective method to rectify this issue is to ensure that hotkeys for screen rotation are enabled through the Graphics Card Control Panel. Every graphics card manufacturer—such as Intel, NVIDIA, or AMD—provides software to manage various settings, including the ability to configure the Ctrl + Alt + Arrow key combinations. If these hotkeys are disabled, the rotation function won’t work as intended.
For instance, if you’re using the Intel graphics card, follow these steps using the Intel Graphics Command Center:
- Download and set up the Intel Graphics Command Center from the Microsoft Store if it’s not already installed. Note that the stable version does not currently include screen rotation options; this feature is available in the beta version.
- Launch the app via the Search box or Start menu.
- Navigate to the System section from the left panel.
- Select the HotKeys tab.
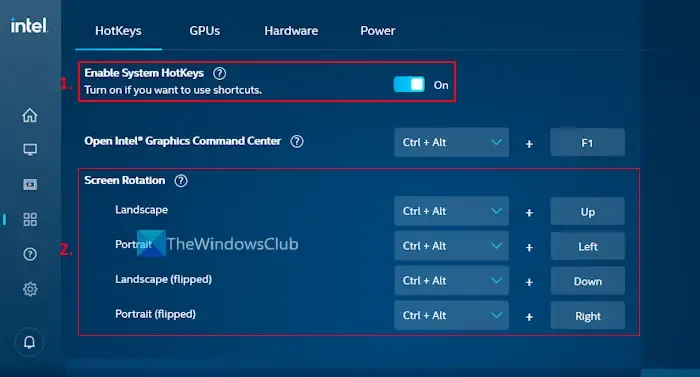
- Enable the Enable System HotKeys feature. This will activate the default hotkey (Ctrl + Alt + F1) for opening the Intel Graphics Command Center.
- Now, the standard hotkeys (Ctrl + Alt + Up, Left, Down, and Right) should be enabled for rotating the display into Landscape, Portrait, and their flipped versions.
You can adjust the hotkeys as per your preference whenever necessary. Exit the control panel and try changing the display orientation again—it should work flawlessly now.
In a similar manner, use your graphics card control panel to find these settings and enable the hotkeys for screen rotation.
3] Adjust Display Orientation Using the Settings App

To modify the display orientation through the Settings application in Windows 11, follow these steps:
- Right-click the Start button and choose the Settings option.
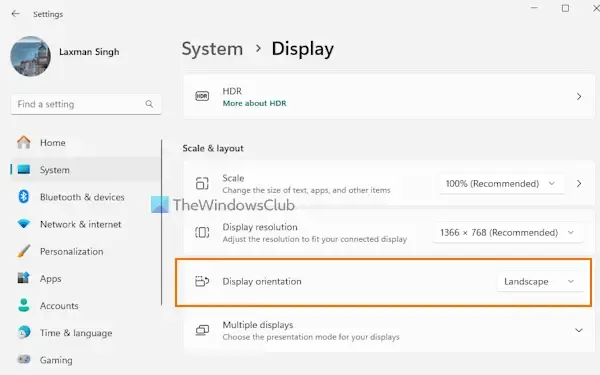
- Within the Settings app, go to System > Display.
- Locate the Display orientation dropdown menu under the Scale & layout section.
- Select your preferred mode (Portrait or Landscape) to adjust the display orientation.
- A prompt will appear where you can choose either Keep changes or Revert to maintain the previous settings.
This feature is handy but may not be practical for frequent changes.
4] Manually Rotate Your Display Using the Graphics Card Control Panel

Your graphics control panel provides manual display rotation options as well. To do this with the Intel graphics software, follow these steps:
- Open the Intel Graphics Command Center application.
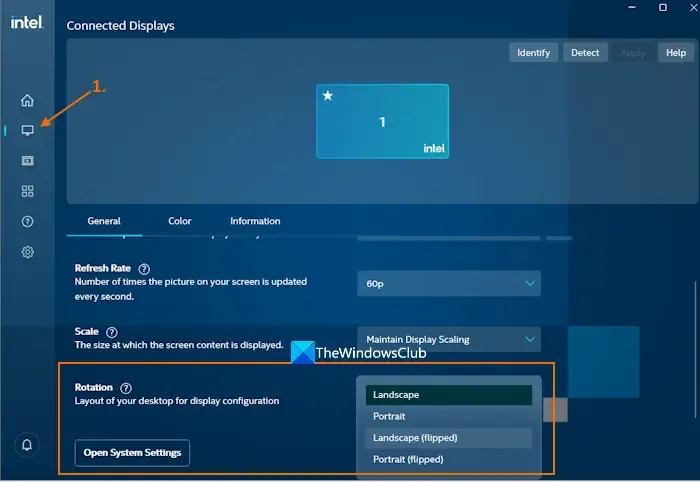
- Select the Display menu.
- In the General tab, locate the Rotation option.
- Click the dropdown for Rotation to choose from Portrait (flipped), Landscape (flipped), or other orientations.
- Press the Keep button to confirm your choice or select Revert to return to previous settings.
For those with NVIDIA graphics cards, similar options are available via the NVIDIA Control Panel:
- Open the NVIDIA Control Panel.
- In the navigation pane, expand the Display menu.
- Select the Rotate display option.
- If using multiple displays, select the appropriate one on the right side.
- Choose the preferred orientation.
5] Utilize a Free Screen Rotate Application

You can download a complimentary Screen Rotate application from the Microsoft Store that allows you to alter the screen orientation either via hotkeys or through manual commands. You can find the app at microsoft.com. While this app does not support the default Ctrl + Alt + Arrow key combinations, it offers other hotkeys for orientation changes.
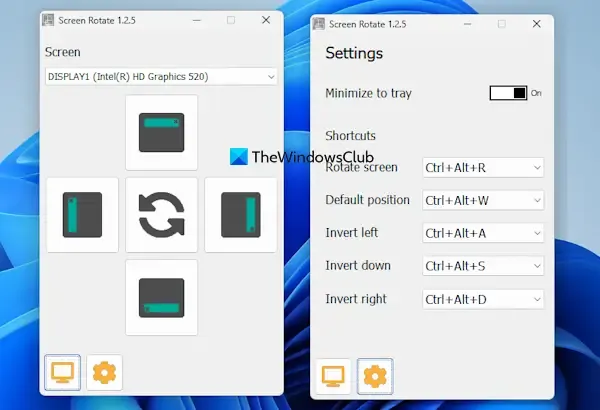
First, select your display from the drop-down menu within the app. Then, you can manually rotate the screen using the provided buttons.
To utilize hotkeys, click on the Settings icon to access options like Rotate screen, Invert left/right, Default position, and Invert down. Each option has an associated drop-down menu for selecting a hotkey. Once set, these hotkeys are ready for immediate use.
I hope you find these suggestions helpful.
Why Isn’t Ctrl+Alt+Down Arrow Functioning?
Typically, the Ctrl + Alt + Down arrow key rotates the screen to a flipped Landscape mode. However, if this key combination is already linked to another application, it will not work as intended. Additionally, newer graphics card versions may lack support for this hotkey and similar functions. In these situations, unassign the Ctrl + Alt + Down arrow key in the conflicting application first. If that provides no solution, manually rotate the display using the Settings app or the graphics card control panel.
Why Is Ctrl+Alt+Del Not Responding on Windows 11?
Third-party applications or tools might disrupt the functionality of the Ctrl + Alt + Del shortcut, which could explain its non-responsiveness on your Windows 11 system. There could also be hardware-related issues at play, so check if these keys are functional when pressed individually. Resetting your keyboard settings to default might also be a viable solution. If problems persist, consider booting your system in a Clean Boot state to identify and remove the problematic applications.


Leave a Reply