Step-by-Step Guide to Uninstall the Recall Feature in Windows 11
This guide will assist you in learning how to uninstall the Recall feature from your Windows 11 PC. Recall is an AI-driven feature exclusive to Copilot+ devices that, when enabled, captures and saves snapshots of every task displayed on your screen. Initially, users had no option to remove the Recall AI from their Windows 11 machines, but Microsoft has now authorized the complete uninstallation of this feature. This article outlines various methods to effectively eliminate Recall, complete with step-by-step instructions.
How to Remove the Recall Feature in Windows 11
You can entirely delete the Recall feature from your Windows 11 computer using three built-in methods:
- Uninstall Recall through Windows Features
- Remove Recall AI via Command Prompt
- Uninstall Windows Recall using Windows Terminal.
Let’s explore these methods in detail.
1] Using Windows Features to Uninstall Recall in Windows 11

The Windows Features interface (OptionalFeatures.exe) allows you to manage optional features in Windows, including Recall AI. Here’s how to uninstall the Recall feature using this interface on your Windows 11 device:
- Open the Settings app on your Windows 11 PC.
- Go to System > Optional features > More Windows features (found under the Related settings section). This will launch the Windows Features window. Alternatively, enter ‘windows features’ in the Search box and press Enter.
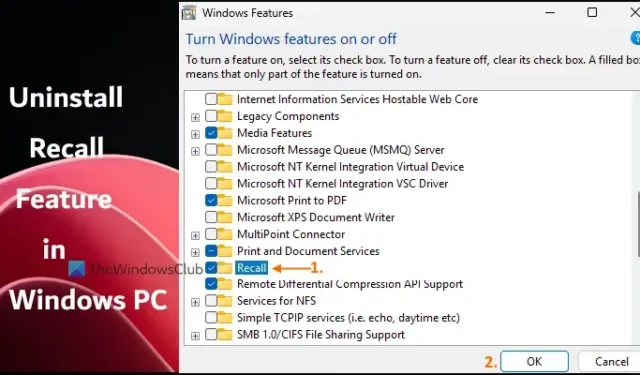
- Scroll through the list of features available.
- Uncheck the Recall box.
- Click the OK button.
- Restart your Windows 11 device.
It may take a moment for the changes to be implemented. Once completed, the Recall feature will be uninstalled. However, be aware that the installation files might still be present, allowing for future reinstallation of Recall if desired.
To reinstall the Recall feature, follow the earlier steps but check the Recall box before hitting OK. Then restart your device.
2] Removing Recall AI via Command Prompt in Windows 11

This approach utilizes the DISM (Deployment Image Servicing and Management) tool via Command Prompt. DISM allows you to service Windows images, including enabling or disabling optional features, like Recall. Follow these steps to uninstall the Recall feature:
- Launch the Windows Terminal with admin privileges (right-click the Start button and select Terminal (Admin)).
- Open a Command Prompt profile.
- Execute the following command to disable the Recall feature:
DISM /Online /Disable-Feature /FeatureName:"Recall"
After executing, restart your PC, and the Recall AI will be removed.
If you wish to reinstall the Recall feature, repeat the process in an elevated Command Prompt, using this command:
DISM /Online /Enable-Feature /FeatureName:"Recall"
3] Uninstalling Windows Recall with Windows Terminal in Windows 11

This method involves using Windows Terminal with a PowerShell profile, although you can also use the PowerShell interface directly. To remove Recall using Windows Terminal, follow these steps:
- Open Windows Terminal with administrator privileges.
- Open a new tab and select a PowerShell profile.
- Run the following command to disable the Recall feature:
Disable-WindowsOptionalFeature -Online -FeatureName "Recall"
Once this command completes, restart your PC, if necessary, and the Recall AI feature will be uninstalled.
To enable the Recall feature once again, open a PowerShell profile in an elevated Windows Terminal and execute the following command with the enable parameter:
Enable-WindowsOptionalFeature -Online -FeatureName "Recall"
After this, restart your PC to have the Recall feature reinstated.
We hope this guide proves beneficial.
How to Disable Recall AI in Windows 11?
During the initial setup process on your Copilot+ PC, the Recall AI feature will remain disabled unless you actively choose to enable it. When disabled, no snapshots will be captured or saved on your Windows 11 system. Be sure to select the “No, don’t save”option when prompted to utilize the Recall feature during setup.
How to Turn Off the Microsoft Recall Feature?
If you wish to disable Recall Snapshots in Windows 11, this can be accomplished using the Settings app. Open the Settings app, navigate to the Privacy & security section, and find the Recall & snapshots page. There, you can toggle off the Save snapshots option. Additionally, you can edit the Windows Registry or use the Group Policy Editor to disable the Recall Snapshots feature.


Leave a Reply