Step-by-Step Guide to Changing Execution Policy for PowerShell Script Execution
- To modify the PowerShell execution policy, launch PowerShell (admin) and execute the command “Set-ExecutionPolicy RemoteSigned” to enable script execution. Alternatively, the “Set-ExecutionPolicy AllSigned” command permits only scripts from verified publishers. The “Set-ExecutionPolicy Unrestricted” command, on the other hand, allows all scripts to run freely.
- If you wish to revert to the default settings, use the “Set-ExecutionPolicy Restricted” command to disallow script execution altogether.
- You can also adjust the PowerShell script permissions through the Windows 10 or 11 Settings application.
By default, on Windows 10 or 11, attempting to run a script in PowerShell may result in an error message stating “cannot be loaded because running scripts is disabled on this system” . This error occurs due to an execution policy that is in place for security, controlling how scripts and configuration files are executed to avoid malicious activity on your system.
To run a script on these operating systems, you have the option to change the execution policy for the local machine, current user, or the session itself.
When setting an execution policy for the current user or the local machine, this information is stored in the Windows Registry. However, if you set the policy for just a session, that change will only persist until you close PowerShell.
As stated by Microsoft, these execution policies do not impose restrictions on activities. You can circumvent them temporarily by entering the script directly in the command line. The intention behind these policies is to assist users in avoiding the execution of harmful scripts.
This guide will provide detailed instructions on modifying your execution policy to enable successful script execution within PowerShell on Windows 10 or 11.
- Modify execution policy on Windows 11 via PowerShell
- Modify execution policy on Windows 11 via Settings
- Modify execution policy to permit running unsigned scripts
Modify execution policy on Windows 11 via PowerShell
To change the PowerShell execution policy on Windows 10 or 11, follow these steps:
-
Hit Start on your Windows 11 device.
-
Search for PowerShell, right-click the top result, and select Run as administrator.
-
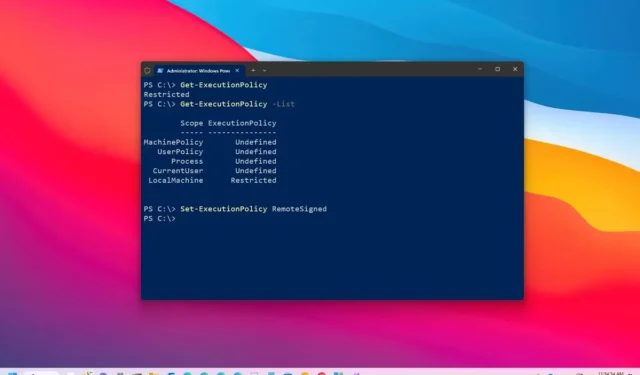
Input the following command to check the current execution policy and press Enter:
Get-ExecutionPolicy -
(Optional) To list the effective PowerShell execution policies, type the following command and hit Enter:
Get-ExecutionPolicy -List -
To allow scripts to run on your Windows 11 machine, enter the following command and press Enter:
Set-ExecutionPolicy RemoteSigned -
(Optional) To prevent any scripts from executing, you can enter this command and press Enter:
Set-ExecutionPolicy Restricted

After completing the steps, you should be able to run your script successfully on Windows 11. If at any point you want to revert script execution permissions, you can run the optional command outlined above.
Should you need to set the execution policy to allow script execution for just the current user or the local device, you can use the “Scope” option with your command, like so: Set-ExecutionPolicy -ExecutionPolicy RemoteSigned -Scope CurrentUser or Set-ExecutionPolicy -ExecutionPolicy RemoteSigned -Scope LocalMachine.
On Windows 11, you have four execution policies to control which scripts can run:
- Restricted — prevents all scripts from executing.
- RemoteSigned — allows locally created scripts, but requires scripts from other machines to be signed by a trusted publisher.
- AllSigned — permits all scripts, provided they are signed by a trusted source.
- Unrestricted — enables any script to run without limitations.
If your script does not require the specific parameters and provides no output, altering the execution policy may not be necessary. Instead, you can utilize the command PowerShell.exe -File "FILENAME"-ExecutionPolicy Bypass to bypass restrictions.
Modify execution policy on Windows 11 via Settings
On Windows 10 and 11, you can also change PowerShell script permissions through the Settings app.
For Windows 11
To update the execution policy using the Settings application, follow these steps:
-
Open Settings.
-
Select System.
-
Go to the For developers section.
-
Click on the PowerShell option.
-
Activate the toggle for “Change execution policy to allow local PowerShell scripts […]” .

If you decide you no longer want this option enabled, simply follow the same steps and in step 5, deactivate the toggle switch.
For Windows 10
To update the PowerShell execution policy through the Settings app, follow these steps:
-
Open Settings.
-
Select Update & Security.
-
Navigate to the For developers section.
-
Enable the “Change execution policy to allow local PowerShell scripts […]” option within the PowerShell settings.

-
Click on the Apply button to save the changes.
If you wish to disable this feature, repeat the same steps but in step 4, deactivate the option and apply your changes.
After completing the steps, the PowerShell execution policy will be set to “RemoteSigned,” permitting you to execute local scripts without requiring a signature, while insisting on verification for remote scripts.
Modify execution policy to run unsigned scripts
If you encounter a PowerShell script that originated from another computer or was downloaded online, attempting to execute it may generate an error stating “File […].ps1 cannot be loaded. The file […].ps1 is not digitally signed. You cannot run this script on the current system” , or “The script will not execute on the system” . However, if you are certain of its safety and the source is trustworthy, you can adjust the “Process” scope policy to authorize its execution.

To change the PowerShell execution policy to allow a non-digitally signed “.ps1” script to run, follow these steps:
-
Open Start.
-
Search for PowerShell, right-click the top result, and choose Run as administrator.
-
To amend the policy and allow unsigned PowerShell scripts, enter the following command and hit Enter:
Set-ExecutionPolicy -Scope Process -ExecutionPolicy Bypass

After executing these steps, run the script file with the command .\Your-PowerShell-Script.ps1 during your current session. Note that once you close the PowerShell session, the execution policy will reset to its previous state, preventing other scripts from running without further adjustments.
If you need to execute another script, you can repeat the outlined steps.
Update October 10, 2024: This guide has been revised to ensure accuracy and reflect recent adaptations in the process.


Leave a Reply