Clean Install and In-Place Upgrade Process for Windows 11 24H2 on Unsupported Hardware
- To execute a clean installation of Windows 11 24H2 on a device that is incompatible, generate a custom USB bootable media using Rufus, selecting options to bypass hardware restrictions. Then, initiate the setup and follow the on-screen prompts as you would in a standard installation process.
- Alternatively, you can mount the Windows 11 24H2 ISO in File Explorer and run the
setup.exe /product servercommand to quickly start the upgrade procedure while bypassing the standard requirements.
UPDATED 10/4/2024: If you currently possess a computer with unsupported hardware running either Windows 11 23H2 or 22H2, you can proceed to upgrade to Windows 11 24H2 through at least two methods: a clean installation or an in-place upgrade. This article will detail these two options. For devices operating on Windows 10, I strongly recommend utilizing the clean installation method without attempting an in-place upgrade.
Windows 11 24H2 (2024 Update) represents the next significant update for the operating system, which becomes available for compatible devices starting October 1, 2024. Given the multitude of devices using Windows 11 on hardware that does not meet the requirements, this feature update will not be available via the “Windows Update”settings, nor can users employ the “Installation Assistant”or create standard USB bootable media with the Media Creation Tool.
Nonetheless, it remains feasible to upgrade by erasing the hard drive and installing a fresh copy of the Windows 11 2024 Update, or you may upgrade your existing setup to version 24H2 using the in-place upgrade method. Based on my experience, opting for a clean installation typically serves as the most reliable route since it removes all existing data, including settings, applications, and files. This approach often resolves issues related to memory, performance, and startup, and reduces complications during the installation process.
Alternatively, you may choose to carry out the in-place upgrade; however, since you’ll be working on a computer that falls short of the stipulated processor, memory, or Trusted Platform Module (TPM) criteria, you’re likely to encounter more challenges than if you opted for a fresh installation.
It is essential to recognize that although you can proceed with the system installation, the computer will operate in an “unsupported state,” likely facing unexpected issues at any point. Additionally, Microsoft bears no responsibility for providing security updates, driver support, or technical assistance. Follow these guidelines with the understanding that outcomes cannot be guaranteed.
This guide will delineate the procedures for installing Windows 11 24H2 on unsupported hardware, utilizing custom USB bootable media for a fresh installation as well as an in-place upgrade. During the preparation for this guide, devices that did not fulfill the requirements for version 24H2 were tested, while running Windows 11 23H2. Note that the fresh setup procedure is applicable for both Windows 11 and Windows 10 devices, whereas the in-place upgrade is exclusively compatible with Windows 11. Regardless of your selected option, the computer is still required to have at least a TPM 1.2 chip, and the processor must possess the “POPCNT” (Population Count) instruction.
- Clean install Windows 11 24H2 on unsupported hardware
- Upgrade Windows 11 24H2 on unsupported hardware
Clean install Windows 11 24H2 on unsupported hardware
The clean installation process consists of downloading the ISO file and generating a custom USB bootable media before proceeding with the setup. You must also verify that the computer can boot from a USB flash drive, which may require modifying UEFI settings or accessing the boot menu during startup. Since firmware settings differ among devices, please consult your manufacturer’s support site for detailed guidance.
1. Download Windows 11 24H2 ISO file
To obtain the official Windows 11 24H2 ISO file, follow these steps:
-
Select the Windows 11 option under the “Download Windows 11 Disk Image (ISO) for x64 devices” section.

-
Click the Download button.
-
Select your desired installation language.
/li>

-
Click the Confirm button.
-
Click the Download button to save the Windows 11 24H2 ISO file on your computer.

After completing these steps, you can utilize the Windows 11 ISO file to create your installation media.
2. Create Windows 11 24H2 bootable media
To create Windows 11 24H2 bootable media, connect a USB flash drive with a minimum of 8GB and follow these instructions:
-
Download the latest version available in the “Download” section.
-
Select your USB flash drive from the “Device” dropdown menu.
-
Double-click the executable to launch the application.
-
Click the Select button.

-
Pick the Windows 11 24H2 ISO file.
-
Click the Open button.
-
Proceed with the default settings after the ISO loads.
-
(Optional) Assign a name to the drive within the “Volume label” setting.
-
Click the Start button.
-
Check the “Remove requirement for 4GB+ RAM, Secure Boot and TPM 2.0” option to install version 24H2 on unsupported hardware.

-
Check the “Remove requirement for an online Microsoft account” option to bypass the internet and Microsoft account requirements, enabling the creation of a local account.
-
(Optional) Select the “Create a local account with username” option and specify a username to automatically create a local account.
-
Check the “Disable BitLocker automatic device encryption” option to prevent the setup from enabling BitLocker during installation.
-
Click the OK button.
Once these steps are completed, Rufus will begin crafting a bootable media for Windows 11 installation, specifically for unsupported hardware.
If you opted to create a local account automatically, the setup will generate this account without a password. Post-installation, it’s advisable to create a password and PIN via the “Sign-in options” page.
3. Windows 11 24H2 unsupported PC clean install process
To execute a clean installation of Windows 11 24H2 on unsupported hardware, follow these steps:
-
Boot the PC with the Windows 11 24H2 USB flash drive.
-
Press any key to continue.
-
Select your desired installation language and format.

-
Click the Next button.
-
Select your keyboard and input method.

-
Click the Next button.
-
Select the “Install Windows 11” option.

-
Check the “I agree everything” option to confirm that this process will erase all data on your computer.
-
Click the “I don’t have a product key” option.
 Quick note: The computer will auto-activate if you’re reinstalling Windows. For a new device that previously did not have Windows, you will need to provide a product key.
 -
Choose the edition of “Windows 11” associated with your license key (if any).

-
Click the Next button.
-
Click the Accept button.
-
Select each partition on the hard drive where you want to install Windows 11 24H2 and click the Delete button (usually “Drive 0” holds all installation files).

-
Choose the hard drive (Drive 0 Unallocated Space) for installing the latest version of the operating system.

-
Click the Next button.
-
Click the Install button.

-
Select your region settings on the first page of the out-of-the-box experience (OOBE) after installation.

-
Click the Yes button.
-
Select your keyboard layout.

-
Click the Yes button.
-
Click the Skip button if you do not need to set a second layout.
-
Your computer will automatically connect using an Ethernet connection. For wireless setups, connect manually (you may need a security key).
-
(Optional) Confirm a name for your computer.

-
Click the Next button (the device will automatically restart).
-
Select the “Set up for personal use” option for Windows 11 Pro. This option is not available for the “Home” edition.

-
Click the Next button.
-
Click the Sign in button.
Quick note: If you select the option to bypass the internet and online accounts, opting to create a local account will skip this step in the setup process. -
Input your Microsoft account email to create a Windows 11 account.

-
Click the Next button.
-
Enter your Microsoft account password.
-
Click the Next button.
-
Click the Create PIN button.
-
Set a new four-digit PIN.

-
Click the OK button.
-
Adjust the privacy settings according to your preferences by toggling each option.
-
Click the Next button.
-
Click the Next button again.
-
Click the Accept button.

-
Click the More options setting.

-
Select the “Set up as a new PC” option.

-
Click the “Set up as a new PC” option again (if applicable).
-
(Optional) On the “Let’s customize your experience” page, choose any preferences on how you’ll use the device to allow setup suggestions for tool and service customization.

-
Click the Accept button to proceed. Or click the Skip button to bypass this stage of the setup.
-
(Optional) Use the code to link your Android phone or click the Skip option.
-
Click the Next button.
-
Click the “Not now” button if using a different browser than Microsoft Edge (if necessary).
-
Select “Skip for now” to omit the PC Game Pass promotion (if relevant).
-
Click the “No, thanks” button to bypass the Microsoft 365 setup (if applicable).
Once you’ve completed these steps, Windows 11 24H2 will finalize its clean installation on your unsupported hardware.
Keep in mind that Microsoft periodically updates the Out-of-box Experience, so your specific experience may vary based on when you perform the installation.
(Remember to like and subscribe.)
Upgrade Windows 11 24H2 on unsupported hardware
Alternatively, you can carry out an in-place upgrade from Windows 11 23H2 or 22H2 to version 24H2. However, this technique necessitates additional tools, as the USB flash drive created with Rufus will not allow file or app retention. Nonetheless, a workaround exists that supports commands for bypassing requirements, enabling you to advance with the upgrade process.
If your device is running Windows 10, I advise opting for the clean installation method instead.
1. Download Windows 11 24H2 ISO file
To download the ISO file for the new feature update applicable to unsupported hardware setups, follow these steps:
-
Select the Windows 11 option under the “Download Windows 11 Disk Image (ISO) for x64 devices” section.

-
Click the Download button.
-
Select the installation language.
/li>

-
Click the Confirm button.
-
Click the Download button to retain the Windows 11 24H2 ISO file on your computer.

After completing these steps, you’ll have the ISO file available to construct installation media.
2. Windows 11 24H2 unsupported PC upgrade process
If your system is already running Windows 11 and you’re looking to upgrade to version 24H2 without executing a clean installation, you can initiate the setup with a specific command to bypass the requirements for an in-place upgrade on unsupported hardware.
To upgrade a computer that does not comply with Windows 11 24H2 requirements, use these instructions:
-
Open File Explorer (Windows key + E).
-
Navigate to the location of the Windows 11 24H2 ISO file.
-
Right-click on the ISO file, navigate to the Open with submenu, and select the Windows Explorer option.
-
Verify the drive letter corresponding to the installation files.
-
Open Start.
-
Search for Command Prompt, right-click the top result, and select Run as administrator.
-
Type the following command to access the installation files’ location and press Enter:
J:In this command, replace the letter “J” with the actual letter of your drive.
-
(Optional) Click the “Change how Windows Setup downloads updates” option.

-
Select the “Not right now” option.

-
Click the Next button.
-
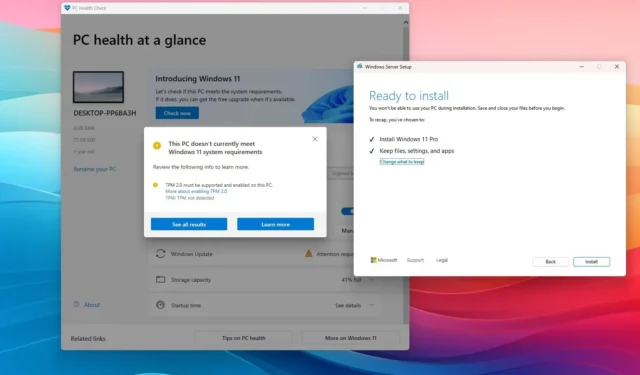
Tick the “Keep files, settings, and apps” option.
-
Click the Install button to upgrade while retaining your files and applications.

Once you finish these steps, the setup will proceed to upgrade to Windows 11 24H2. Since this is an upgrade, there will be no need to navigate through the Out-of-box Experience (OOBE), and your files and applications will be preserved. However, the new setup will function in an unsupported state, meaning you may have access to system updates, but their functionality is not guaranteed, and Microsoft will not provide support.
Even though this command is designed to facilitate upgrading from earlier versions of Windows 11 to version 24H2, it’s worth mentioning that occasionally, it may not perform as intended, resulting in a message indicating that setup cannot ascertain whether your computer is compatible. You can attempt the command multiple times, and should it fail, consider pursuing an alternative method.
You can also reference these instructions in additional detail through my video tutorial on my channel.
If you have any inquiries, feel free to leave them in the comments below.
Updated October 4, 2024: This guide has been refreshed to ensure clarity and reflect updates to the process.


Leave a Reply