Enable USB-C Charging on Your Laptop in Windows 11: A Step-by-Step Guide

In this article, we will guide you on how to enable USB-C charging on a laptop running Windows 11. USB-C has transformed the charging process and peripheral connectivity for modern laptops. This adaptable connection type allows users to charge their laptops directly through a USB-C port, delivering a seamless experience where a single cable can manage power delivery, data transfer for connected devices, and high-resolution video output to external displays.

Typically, USB-C charging is enabled by default on laptops that support USB Power Delivery (USB-PD). This protocol facilitates higher power levels, essential for charging larger devices like laptops, and promotes faster charging via USB-C connections. However, certain situations may require adjustments to specific BIOS settings to ensure that the USB-C port can receive power even when the laptop is asleep or powered off.
Enabling USB-C Charging on a Laptop in Windows 11
To enable USB-C charging on your laptop when it is off or in a low-power state, you will need to update the USB power state from the BIOS settings.
Begin by pressing Win + I to open the Settings window, navigate to System > Recovery, and click Restart now next to the Advanced startup option. Your PC will restart, leading you to the Advanced Start-up screen.

Next, click Troubleshoot > Advanced options > UEFI Firmware Settings. On the next screen, click the Restart button to boot your PC into the UEFI BIOS.
In the BIOS, options for enabling USB-C charging can vary based on your laptop’s motherboard brand. Check the manufacturer’s documentation or BIOS guide to locate the necessary settings and ensure that USB-C power delivery is correctly configured on your Windows 11/10 device.
After making the appropriate changes, press F10 to save and exit the BIOS. Confirm the prompt to save your settings and restart your laptop. Once your laptop is back on, try connecting the USB-C charger to see if it functions properly.
Here are the steps to follow for a few popular motherboard brands:
1] MSI Motherboards

- Access Advanced Mode in the BIOS.
- Select Settings > Advanced.
- Under Power Management Setup, disable ErP Ready.
- In Wake Up Event Setup, enable Resume by USB Device.
- Save and exit the BIOS.
- ErP Ready: By disabling this option, USB ports will remain powered when the system is off or in sleep mode. Enabling it may restrict power availability to USB ports in low-power states to comply with energy-saving regulations.
- Resume by USB Device: This feature allows the system to be awakened by a USB device (e.g., a mouse or keyboard), ensuring that the USB ports can detect activity and wake the system from sleep or low-power modes.
2] Gigabyte Motherboards

- Enter Advanced Mode in BIOS.
- In Power Management, disable the ErP setting.
- Save changes and exit the BIOS.
3] Asus Motherboards

- Navigate to Advanced Mode in the BIOS.
- Select the Advanced option.
- Expand APM Configuration and disable ErP Ready.
- Return to the Advanced section and select Onboard Devices Configuration.
- Enable Asmedia USB 3.1 Battery Charging Support or USB power delivery in Soft Off state (S5), depending on your motherboard model.
- Save your changes and exit.
4] AsRock Motherboards

- Enter Advanced Mode in the BIOS.
- Select the Advanced option.
- Under Chipset Configuration, disable the Deep Sleep setting.
- Save and exit the BIOS.
Deep Sleep refers to a low-power state typically linked with the S4 (Hibernate) or S5 (Shutdown) modes of the system. Disabling Deep Sleep allows certain components, including USB ports, to remain powered even when the system is off, facilitating USB charging for connected devices.
Additionally, review the specific settings for your motherboard and adjust them as needed.
Laptop Not Charging via USB-C
In most situations, USB-C charging operates smoothly on compatible laptops without manual configuration. However, if your laptop’s battery is not charging via USB-C, ensure you are using a compatible charger that can provide sufficient wattage (typically 45W, 65W, or more). Verify that it is connected to the appropriate port that supports charging, and ensure the USB-C cable you are utilizing is designed for power delivery and is not damaged. Moreover, check that the port is free of obstruction and not damaged.
Make sure to configure the necessary power settings within the BIOS as detailed in this article.
This setting enables Windows to shut off USB ports (including USB-C) when they are idle or inactive to conserve power. If enabled, this could impede the USB-C port’s capability to remain powered, especially when the laptop is in sleep mode or low-power states.
Disabling the Power Management Setting for USB Root Hub

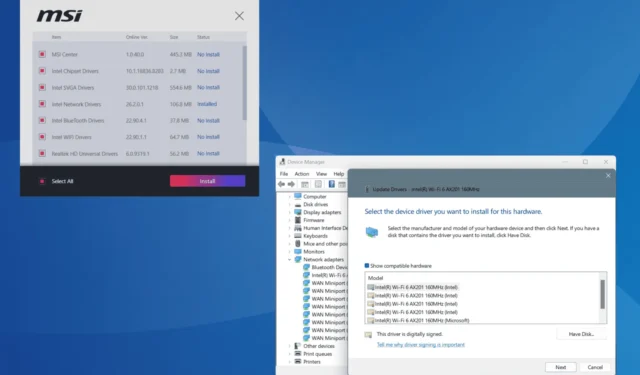
- Open Device Manager.
- Scroll down and expand Universal Serial Bus controllers.
- Access the Power Management tab.
- Uncheck the box for Allow the computer to turn off this device to save power.
- Click OK and repeat for other USB Root Hubs as necessary.
Also, make sure to disable USB Selective Suspend. This option allows Windows to suspend individual USB ports to save power when devices connected to them are not in use. It plays a significant role in the system’s power management and can impact all USB ports, including USB-C.
Disabling USB Selective Suspend

- Press Win + S and type ‘power‘, then select Edit power plan.
- In the Edit Plan Settings window, click on Change advanced power settings.
- In the Power Options dialog, expand USB settings.
- Expand USB selective suspend setting. There will be two options: On battery and Plugged in.
- Set both options to Disabled. Click Apply and then OK.
By disabling Selective Suspend, you ensure that the setting does not interfere with USB-C charging, particularly when the laptop is in idle or sleep mode.
How to Determine if My Laptop Supports USB-C Charging?
If your laptop includes a USB-C power adapter, it likely supports USB-C charging capabilities. Refer to your laptop’s user manual or visit the manufacturer’s website for your model’s specifications. This should specify whether USB-C is configured for power delivery (PD) or charging. Additionally, inspect the USB-C port on your laptop; it may have a small power icon or battery symbol indicating charging support.
Can a Dell Laptop Charge via USB-C?
Most contemporary Dell laptops, particularly those in the XPS, Inspiron, Latitude, and Vostro series, feature USB-C ports that support Power Delivery, allowing them to be charged through the USB-C port. Nevertheless, not all USB-C ports are designated for charging. Be sure to review your device’s documentation for specific information on features that are available through USB Type-C.


Leave a Reply