Fixing the Custom Scale Factor Error in Windows 11 and Windows 10
You can adjust the display resolution and scaling settings in Windows 11 and Windows 10. However, some users encounter issues when trying to modify Display Scaling, as the option appears greyed out due to the “A custom scale factor is set” error. If you are facing this error in your Windows 11 or Windows 10 Settings and are unable to change your display scaling, this article provides several fixes that may help.

Resolving the A Custom Scale Factor is Set Error in Windows 11/10
If you encounter the “A custom scale factor is set”error while trying to modify Display Scaling settings on your Windows 11/10 device, consider the following solutions:
- Turn off the custom scaling
- Reboot your monitor and install its latest firmware
- Investigate the problem in Clean Boot mode
- Perform a clean installation of your graphics card driver
- Repair your system image files
- Restore your system or reset your PC
The details for each solution are provided below:
1] Disable Custom Scaling
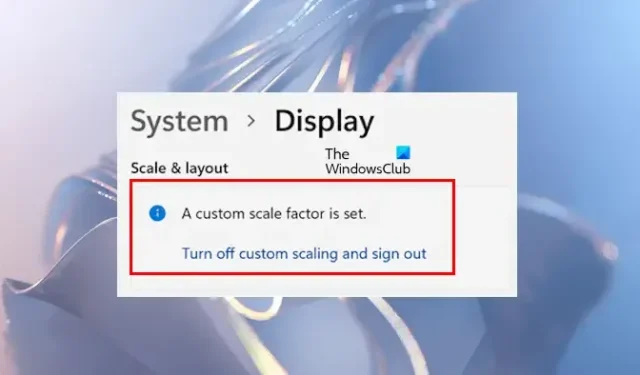
Activating custom scaling on your display disables the scale option and prompts the “A custom scale factor is set” message. To resolve this and re-enable the scale option, you must disable the custom scaling. Try this method to see if it alleviates the issue.

If you see the message with a link stating “Turn off custom scaling and sign out,”click on it and sign out of your system. After signing back in, check if you can now modify the display scaling or if the error persists.
This solution should generally work, but some users have reported that the issue remained even after following this step. If you belong to this group, please try out the additional solutions listed.
2] Restart Your Monitor and Update Its Firmware

Sometimes, the problem lies with your monitor itself. To diagnose this, attempt to restart your monitor. If the issue continues after rebooting, please check for firmware updates. Visit your monitor manufacturer’s official website to obtain the latest firmware version and detailed installation instructions.
3] Check the Issue in Clean Boot State
Next, check if you can modify the display scaling while in Clean Boot mode. Boot your computer into Clean Boot mode, then navigate to display settings to see if the display scaling option is now accessible. If it is, you can proceed with the adjustments.

If the issue resolves in Clean Boot mode, suspect that a third-party application or service may be interfering. Did you install software meant to change display resolution or scaling? If so, uninstall that software to fix the issue.
4] Clean Install Your Graphics Card Driver

This error may be linked to your graphics card driver. It’s advisable to update your graphics driver. Visit your computer manufacturer’s official site and download the latest version of the graphics card driver. Then, run the installation file. Alternatively, you can utilize specialized tools from the manufacturer for driver updates, like AMD Software or Intel Driver & Support Assistant.

If updating does not resolve the problem, perform a Clean Installation of the graphics card driver. For this, use a third-party tool called Display Driver Uninstaller (DDU). Download and install DDU, boot into Safe Mode, and run it to completely remove the existing graphics driver. Afterwards, install the new graphics driver again. If you have an NVIDIA GPU, you can directly execute a clean installation from the GeForce Experience application.
5] Repair Your System Image Files

Corrupted system image files may also cause this problem. You can repair your system files using System File Checker (SFC) and DISM tools. Run both tools separately. After completing the scans, check to see if the issue is resolved.
6] Restore Your System or Reset Your PC

Alternatively, you can restore your system to a previous restore point if it’s available. You may also opt to reset your PC to its factory default settings without data loss. Nonetheless, create a backup of your data before proceeding with a reset.
We hope this guide helps you navigate the issue.
What is a Custom Scale Factor?
A Custom Scale Factor enables you to set a unique scaling for your display. If you wish to choose a scaling factor other than the standard scaling options present in Windows 11 and Windows 10, this feature allows you to do so. Enter System > Display > Scale in Windows 11 Settings to enter a value between 100% to 500% based on your display size.
Is Custom Scaling Below 100% Possible in Windows 10?
The custom scaling feature permits users to define a scaling factor that ranges from 100% to 500%. Thus, setting a custom scaling factor below 100% is not permitted for your display.


Leave a Reply