How to Use Keepass2Android for Autofilling Passwords in Android Web Browsers
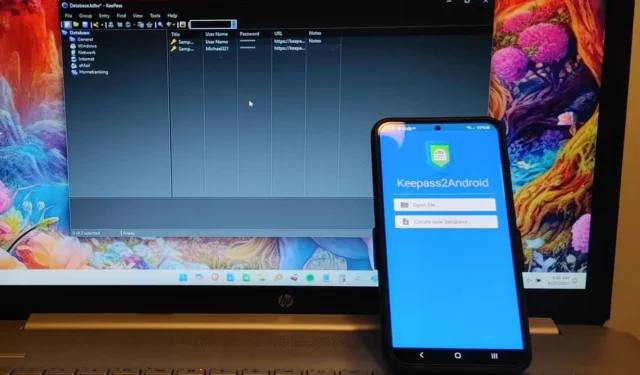

Remembering a growing number of passwords can be frustrating, especially when it comes to typing lengthy passwords filled with random characters on a mobile device. Fortunately, with Keepass2Android, I can efficiently autofill passwords on Android while utilizing my preferred password manager, KeePass.
Select the Correct Version of Keepass2Android
Keepass2Android is the mobile version of the renowned open-source desktop password manager KeePass. Unlike its desktop counterpart, which requires a plugin for autofilling passwords, Keepass2Android simplifies the process with minor modifications to your device’s settings.
There are two distinct versions of Keepass2Android available on the Play Store. The full version supports both local storage and multiple cloud storage services. For online storage of my database file, I would opt for the Keepass2Android Password Safe. The second option is Keepass2Android Offline, tailored for those preferring only local storage without cloud access.
Both apps support KeePass 1.x and 2.x databases, making the choice between them purely a matter of personal preference. I personally favor local storage, but for this guide, I’ll be demonstrating the cloud storage version, as they function similarly aside from the storage method.
Setting Up Your KeePass Database
After installing Keepass2Android, launch the app and connect to your KeePass database by selecting your database file from local or cloud storage. If you are new to KeePass, select Create new database instead and choose between local or cloud storage options during the setup process.

Once you establish a connection between the selected service and Keepass2Android, enter your master password (and complete any additional security steps needed) to unlock your database. For this tutorial, I’ll use Dropbox, as I prefer it over Google Drive for storing sensitive passwords.
How to Autofill Passwords in Android
Keepass2Android does not enable autofilling passwords in Android by default, which I find to be an advantage as it encourages users to configure the feature rather than assuming it’s set up. Upon my first login to the app, a prompt appeared at the bottom of the screen suggesting enabling autofill.

If the prompt does not appear, navigate to your phone’s Settings, and under General Management (or Language & Input depending on your device), scroll down to Passwords, Passkeys, and Autofill. If this option isn’t visible, utilize the search feature within Settings to look for autofill. I encountered slightly different steps across three Android devices during testing. Make sure to select Keepass2Android.

Return to General Management, tap Keyboard List and Default, and enable Keepass2Android. Then, tap Default Keyboard at the top of the screen and choose Keepass2Android. This adjustment adds an autofill button to your keyboard, making it more convenient.

Although I had to confirm the use of Keepass2Android twice, the process may differ somewhat depending on your device.
Now, open your preferred mobile browser and visit a login page or directly open Keepass2Android, select an entry, and tap the URL to access the login site. Be sure this site has your credentials saved.
Touch the username and password fields on the website, then tap the adorable droid icon on the keyboard’s bottom row. Depending on your device, you might see a Fill with Keepass2Android button appearing just above the keyboard.
To simplify the process, the app allows users to enter the last three characters of their master password to access the database. However, if you’ve powered off your device, you may have to input the full master password again to unlock the database.
When prompted, select the entry and touch the username field. The keyboard will adjust to a single row. Use the arrow button to choose either username or email address. For example, if you’re logging into your email, select email address.
After your first use of Keepass2Android, you might encounter a pop-up (not always guaranteed) when tapping a login field, suggesting autofill with Keepass2Android.

Next, tap the password field and repeat the autofill process. In my case, after entering the email address, a password autofill pop-up appeared, though this doesn’t occur on all websites.
Furthermore, tapping the droid icon displays a list of fields. While it may not work for autofilling usernames on various sites, it does successfully autofill passwords. This inconsistency is something to keep in mind.
Although it may feel a bit complex initially, trust me that with practice, using Keepass2Android to autofill passwords in Android will become much more intuitive.
Activating QuickUnlock
In addition to the autofill feature, Keepass2Android includes a QuickUnlock function, allowing users to quickly unlock an accessed database without retyping their full password. This feature was enabled by default for me; however, if you are wondering how to find it after following the steps above, here’s what to do.
Launch Keepass2Android, log in to your database, and click the three-dot menu icon in the top right corner. Choose Settings -> App -> QuickUnlock, and switch on QuickUnlock. You can also customize the length of the required password and choose to conceal the password length.

Locating Entries in Extensive Databases
While I utilized a temporary database containing only a few entries for this guide, my regular Keepass2Android database is home to over two hundred entries—demonstrating the necessity of a password manager. To efficiently find what I need, I leverage the Advanced Search feature.
When prompted to select an entry while logging into a site, tap the three-dot menu within Keepass2Android and choose Advanced Search. You can use filters to narrow your search and input specific search terms. Additionally, there’s a Regular Expression option available.

Personally, I prefer KeePass due to its robust encryption, open-source nature, and user-friendliness. However, if the autofill service doesn’t suit your needs, consider exploring alternative password managers. For Windows users, don’t miss out on learning how to secure your files and folders with passwords.
All images and screenshots by Crystal Crowder.


Leave a Reply