Step-by-Step Guide to Installing and Configuring File Server on Windows Server
In this article, we will explore how to install and configure a File Server on Windows Server. We will cover the installation of essential roles, configuration of shared folders, management of permissions, and ensuring security.
If your business manages numerous digital files that need to be shared across various departments and locations using file sharing over your company’s network, setting up a Windows file server is essential. The process of installing and configuring a file server on Windows Server is straightforward, and we’re here to guide you through it.
What is a File Server System?
A File Server system is a computer or server designed to store and manage files, enabling users on networks to quickly access, share, and store data. It offers a centralized location where users can upload, download, modify, and organize files, eliminating the need for local storage on individual devices.
How to Install and Configure a File Server on Windows Server?
- Install the File Server role
- Set up Network File Sharing
- Configure Advanced Network File Sharing Settings
- Map the network folder and access it
Let’s get started.
1] Install the File Server Role

The first step is to install the File Server role on your computer, which allows you to manage shared folders and enable user access over the network. Follow the steps below:
- Open Server Manager, select Add Roles and Features, and click the Next button.
- Select Role-based or feature-based installation, click on Select a server from the server pool, choose a host to which you will add services, and click Next.
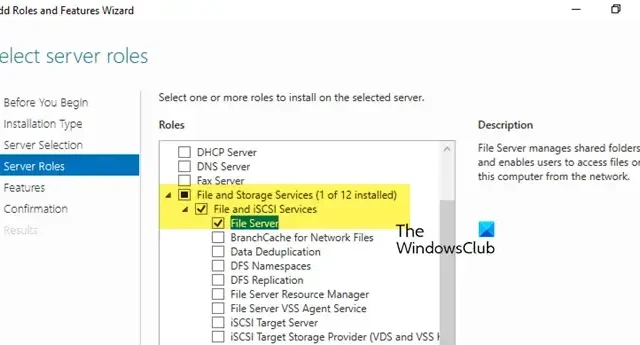
- Navigate to File and Storage Services > Files and iSCSI Services, and then select the File Server option. Continue clicking Next through each step.
- Select one or more features to add to the installation on the selected server, such as. NET Framework 4.7 Features if necessary.
- Finally, click the Install button, and once the installation is complete, click on the Close button.
Allow some time for your system to install the features.
2] Set Up Network File Sharing
Once the File Server role is installed, the next step is to configure basic network file sharing. This allows users on the network to access and collaborate on shared files.
- Navigate to the folder you want to share, right-click on it, and select Properties.
- Go to the Sharing tab, click on the Share button, and select users or groups you want to share access with.
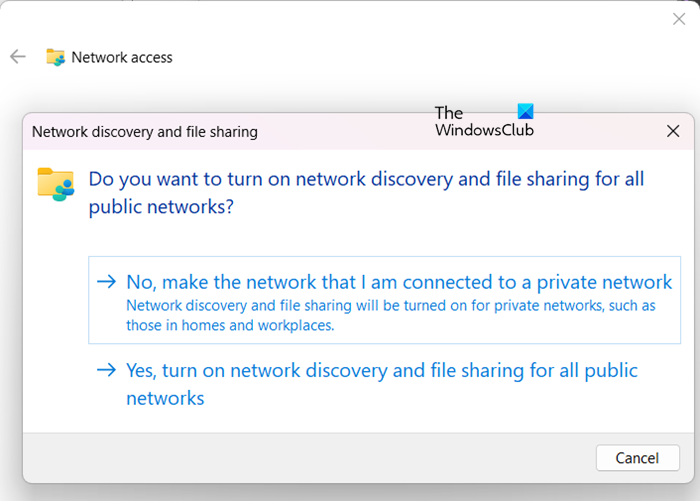
- Set the Access permissions by selecting an option in the Network Discovery and File Sharing window, then click the Done button.
If you want to grant permission to everyone, you can use the group “Everyone” when asked to Choose people to share with.
3] Configure Advanced Network File Sharing Settings
For more granular control over file access, you can optimize advanced settings to refine permissions. This step ensures precise control over who can access and modify files, enhancing security and usability.
- Right-click on the folder, select Properties, and navigate to the Sharing tab.
- Click on the Advanced Sharing button, check the box for Share this folder, and provide a name for the share in the Share Name field.
- Select the Permissions option, and if you don’t want to include Everyone, click the Remove button for the default permissions.
- Click on the Add button, enter the usernames, and click Ok.
- Assign necessary permissions for the added users and click Done.
- Again, right-click on the folder, select Properties, and go to the Security tab to add NTFS access permissions.
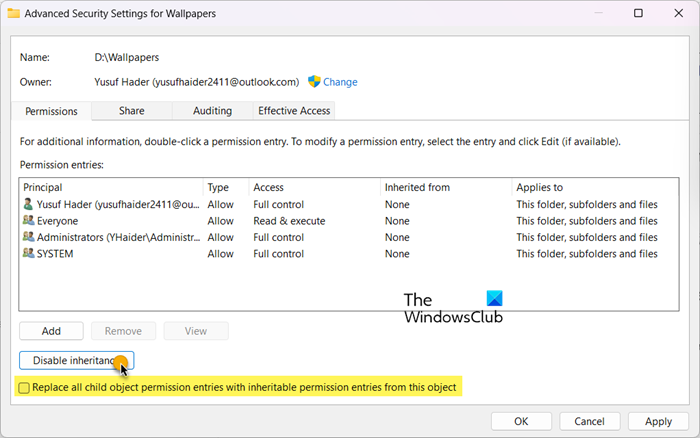
- Click on Advanced Sharing, click on Disable Inheritance (if necessary), and select Convert inherited permissions into explicit permissions on this object.
- Then click the Remove button to eliminate unnecessary permissions. Afterward, click Add to include the appropriate users or groups.
- In the next window, click on Select a Principal and enter the user or group.
- Set specific permissions, and finally click OK to save your changes.
After these steps, both sharing and NTFS permissions are configured.
4] Map the Network Folder and Access It
To access shared folders over the network, users can map the shared folder to a drive letter using File Explorer. This enables easy and persistent access to the folder as if it were a local drive. Here’s how:
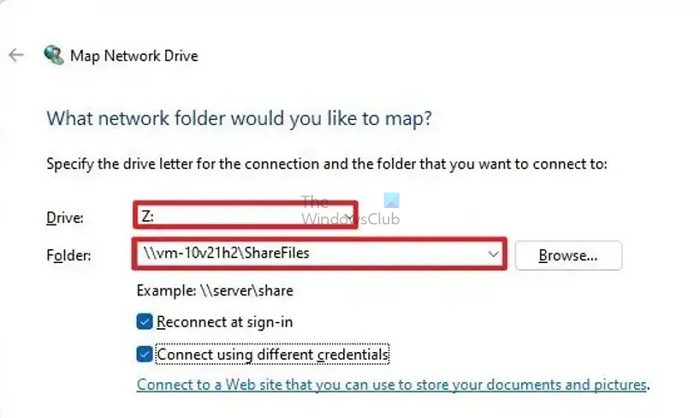
- Press Win + E to open File Explorer, right-click on Network, and select Map network drive.
- In the Drive field, choose a desired drive letter, enter the path to the shared folder, and click the Finish button.
- Type in the credentials when the user authentication prompt appears.
Once authenticated, the shared folder will be accessible.
Alternatively, users can access the shared folders directly without assigning a drive letter by following these steps:
- Press Win + R to open the Run dialog box, then type in the network path and share folder in the format: \\server_name\Share_Name
- Press Enter, and enter credentials if prompted.
- Once authenticated, the shared folder can be accessed.
Users can now read, write, or modify files within the shared folder based on the permissions granted to them.
How Do I Install and Configure a File Server?
To install and configure a file server, users must first install a Windows Server via ISO or installation media. Afterward, they must add file server roles, create, and configure shared folders, and set NTFS permissions. For detailed step-by-step instructions on setting up a file server on Windows Server, refer to the guide shared above.
How to Install a File Server in Windows Server?
To install a file server in Windows Server, you need to begin by installing the File Server role from Server Manager, configuring the properties of the folder to share, granting access to the required users, and mapping the network drive. We recommend following the previously mentioned steps for a successful setup.


Leave a Reply