Guide to Installing a Network Camera on Windows 11 and 10

This comprehensive guide will cover the installation process for a network camera on Windows 11, Windows 10 version 21H2, Windows 10 version 21H1, and older versions. Given the ongoing updates to Windows 11, the method for adding a network camera can frequently change, which may cause confusion for users trying to connect a new camera.
Understanding the installation steps is essential, especially since previous methods may no longer be applicable.
What is a Network Camera?
Network cameras differ significantly from standard built-in or USB-connected webcams. These devices allow for seamless data streaming over a local area network (LAN) or via TCP/IP configuration. Here, TCP stands for Transmission Control Protocol, while IP refers to Internet Protocol.
How to Install a Network Camera on Windows 11
To install a network camera on your Windows 11 computer, follow these straightforward steps:
- Press Win + I to open Settings.
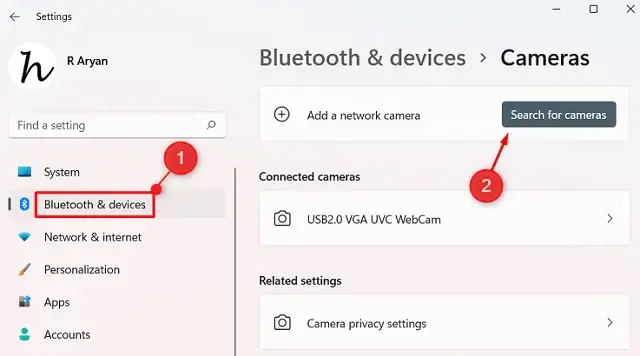
- Choose Bluetooth & devices from the left sidebar.
- Navigate to the right pane and click on Cameras.
- In this section, expand the options and click Search for Cameras under the “Add a network camera” heading.
- Select your camera from the search results and add it to your Windows 11 system.
That’s it! You can now utilize your connected network camera to record, stream, or capture photographs.
How to Install a Network Camera on Windows 10
If you are using Windows 10 version 21H2 or higher, follow these steps to add a network camera:
- First, press Win + I.
- In the Settings menu, select Devices, then click on Cameras.
- In the right pane, click on the “+” sign next to “Add a network camera” .
- Your system will then scan for available network cameras and present a list.
- Select the camera you wish to connect your PC to.
- Wait for the installation to complete, and you will be able to use your network camera afterward.
If you are operating on Windows 10 version 21H1 or earlier, please follow these alternate instructions:
- Right-click the Windows icon and select Settings.
- Select Bluetooth & other devices from the left sidebar.
- In the pop-up window, click on Everything Else.
- The system will scan for available network cameras; once done, add the detected camera to your Windows 10 PC.
Whether you are using Windows 10 version 21H1 or earlier, or Windows 10 version 21H2 and above, the network camera should install without any issues. You are now ready to stream, record, or take pictures using either the built-in camera or third-party software.
We hope this guide has helped you successfully install a network camera on your Windows 11/10 device. Please let us know in the comments if you encounter any difficulties while following these instructions.
How to Fix Webcam Issues in Windows 11/10?
If you are experiencing errors or a black screen when launching the Camera app, the issue may be related to outdated drivers. Ensure all your drivers are updated, paying particular attention to the display adapter. If the camera issue persists, try the following steps in Device Manager:
- Press Win + X and select Device Manager.
- Expand the list of Display adapters by clicking the “>” icon.
- Right-click on the driver and choose Uninstall device.
- Check the option to Attempt to remove the driver for this device.
- Close Device Manager and restart your Windows Explorer.
Upon your next logon, the recently removed driver should install automatically, resolving your webcam issue.


Leave a Reply