Resolving SMB Signing Errors for NAS Access on Windows 11 24H2
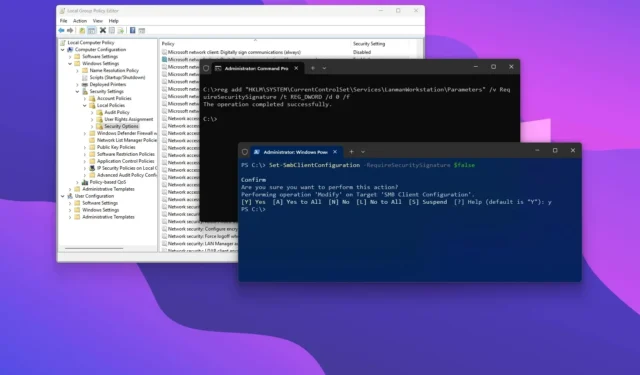
- To disable the SMB Signing requirement on Windows 11, open the “Group Policy Editor” and disable the “Microsoft network client: Digitally sign communication (if server agrees)” policy.
- Alternatively, you can achieve this using Command Prompt or PowerShell.
If you’ve upgraded to Windows 11 version 24H2 (2024 Update), you may find that access to your network-attached storage (NAS) has been disrupted. This guide will explain the reasons for this change and how to resolve the issue.
Along with numerous new features introduced in Windows 11 24H2, Microsoft has implemented important security enhancements that now mandate Server Message Block (SMB) signing for all communications. This requirement can lead to compatibility issues, particularly with many existing file server devices that do not support this feature, resulting in several error messages.
Common error notifications include “The cryptographic signature is invalid,” “STATUS_INVALID_SIGNATURE,” “0xc000a000,” and “1073700864.”
If you encounter these errors, you have a couple of options. The most recommended solution is to enable SMB Signing on your NAS. Brands like Synology provide this feature within their “Domain/LDAP” and “File Services” settings, depending on your specific model. Alternatively, you can disable SMB Signing on the affected Windows machine.
This guide will detail the steps necessary to verify and enable SMB Signing on Windows 11 24H2 and other impacted versions of the operating system.
- Disable SMB Signing on Windows 11 from Group Policy
- Disable SMB Signing on Windows 11 from Command Prompt
- Disable SMB Signing on Windows 11 from PowerShell
Disable SMB Signing on Windows 11 from Group Policy
Follow these steps to turn off the SMB Signing feature via Group Policy on Windows 11 Pro, Enterprise, or Education:
-
Open Start on Windows 11.
-
Search for gpedit and right-click on the top result to access the Group Policy Editor.
-
Navigate to the following path:
Computer Configuration > Windows Settings > Security Settings > Local Policies > Security Options -
Right-click the “Microsoft network client: Digitally sign communication (if server agrees)” policy and select Properties.
-
Select the Disabled option.
 policy")
-
Click the Apply button.
-
Click the OK button.
-
Restart your computer.
After completing these steps, SMB Signing will be disabled, allowing you to access the NAS without any further issues.
Disable SMB Signing on Windows 11 from Command Prompt
To disable SMB Signing using Command Prompt, follow these instructions:
-
Open Start.
-
Search for Command Prompt (or Terminal), right-click the top result, and choose Run as administrator.
-
Enter the following command to disable SMB Signing and press Enter:
reg add "HKLM\SYSTEM\CurrentControlSet\Services\LanmanWorkstation\Parameters"/v RequireSecuritySignature /t REG_DWORD /d 0 /f

-
Restart your computer.
Upon completing these steps, error messages when trying to access the file server via the SMB protocol should no longer occur.
If you want to reverse these changes, simply repeat the steps, but in step 3, execute the following command: reg add "HKLM\SYSTEM\CurrentControlSet\Services\LanmanWorkstation\Parameters"/v EnableSecuritySignature /t REG_DWORD /d 1 /f.
Disable SMB Signing on Windows 11 from PowerShell
To turn off the SMB Signing feature on Windows 11 using PowerShell, follow these instructions:
-
Open Start.
-
Search for PowerShell (or Terminal), right-click the top result, and select Run as administrator.
-
Type the following command to disable SMB Signing and press Enter:
Set-SmbClientConfiguration -RequireSecuritySignature $false

-
Type “Y” and press Enter to confirm the changes.
-
(Optional) To verify the SMB Signing status on Windows 11, you can run the following command:
Get-SmbClientConfiguration | Format-List EnableSecuritySignature,RequireSecuritySignature -
Restart your computer.
Once these steps are completed, you should be able to access and browse your file server on the network without encountering errors.
If you need to revert this change later, just follow the same instructions, but execute the command Set-SmbClientConfiguration -RequireSecuritySignature $true in step 3.
Considerations for SMB Signing
In networking terms, SMB Signing is a security feature integrated into the CIFS (Common Internet File System) and SMB file-sharing protocols utilized in Windows storage systems. This feature ensures that messages sent over the protocol contain a signature in their header, which can be validated to confirm that the message contents remain unchanged during transmission. Essentially, this mechanism helps prevent potential security threats, such as man-in-the-middle attacks.
Although this feature has existed for a long time, it was only enforced by the operating system starting from version 24H2.
Ultimately, enabling SMB Signing enhances network security between client and server devices. However, it does demand additional processing resources, which may impact performance and transfer speeds between devices.
Whenever feasible, configuring your NAS to support the SMB Signing feature is the best practice. If this is unattainable or adversely affects performance, several methods are available to disable it on Windows 11.
These instructions may also be helpful should Microsoft choose to mandate this feature in older operating system versions, including Windows 10.


Leave a Reply