Step-by-Step Guide to Upgrade from Windows 8.1 to Windows 10
- To upgrade from Windows 8.1 to Windows 10, start by opening the Media Creation Tool, select “Upgrade this PC now,” and click Install.
- You can also download and mount the Windows 10 ISO file on your Windows 8.1 system to initiate the upgrade process.
- Although your files and applications will be retained, it’s highly advisable to create a backup of your entire system.
- A new Windows 10 product key will be required, as the Windows 8.1 product key cannot be used for activation.
UPDATED 9/17/2023: Support for Windows 8.1 ended on January 10, 2023. Therefore, upgrading to Windows 10 should be done as soon as possible. Fortunately, the upgrade from Windows 8.1 to Windows 10 can preserve your files and apps via the Media Creation Tool or ISO file, which are also compatible with Windows 7 machines. However, ensure your hardware meets the minimum requirements before proceeding.
Before starting the upgrade, it’s recommended to uninstall any programs that could interfere, such as antivirus software, security tools, or outdated third-party applications. Additionally, disconnect any peripherals, including printers, smartphones, cameras, external drives, and other USB devices, since they can sometimes cause upgrade failures.
Since there’s always the potential for upgrade issues, creating a comprehensive backup is essential to roll back if necessary. Both Windows 7 and Windows 8.1 include the System Image Backup tool, allowing you to back up your entire system without the need for third-party solutions.
This guide will provide you with the necessary steps to successfully upgrade to Windows 10 from Windows 8.1 while minimizing potential upgrade issues.
- Upgrade Windows 8.1 to Windows 10 using Media Creation Tool
- Upgrade Windows 8.1 to Windows 10 using ISO file
Upgrade Windows 8.1 to Windows 10 using Media Creation Tool
Follow these steps for an easy upgrade from Windows 8.1 to Windows 10:
-
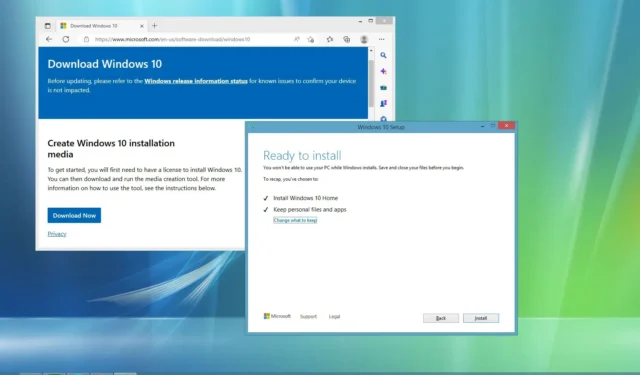
Locate the “Create Windows 10 installation media” section and click on the Download Now button.

-
Double-click the MediaCreationTool22H2.exe file to launch the Windows 10 setup wizard.
-
Accept the licensing agreement by clicking Accept.
-
Select the “Upgrade this PC now” option.

-
Click on the Next button.
-
Click Accept again.
-
(Optional) Click on the “Change what to keep” option.
-
Select “Keep personal files and apps” . Alternatively, you can choose the “Change what to keep” option if you prefer not to preserve your files and applications.
-
Click the Install button.

After completing these steps, you’ll need to finalize the out-of-box experience (OOBE) to set up your preferences, after which you’ll be greeted with your familiar desktop environment and the array of new features included with Windows 10.
Upgrade Windows 8.1 to Windows 10 using ISO file
Follow these steps to upgrade to Windows 10 using an ISO file:
-
Download the Windows 10 ISO without utilizing the Media Creation Tool.
-
Right-click on the ISO file and select the Mount option.

-
Select the virtual drive from the left pane of File Explorer.
-
Double-click on Setup.exe to initiate the Windows 10 installation.

-
(Optional) Click on the “Change how Windows Setup downloads updates” option.

-
Select “Not right now” .

-
Hit the Next button.
-
Click on the Accept button once more.
-
(Optional) Click on the “Change what to keep” option.
-
Select “Keep personal files and apps” . You can also choose the “Change what to keep” option to proceed without keeping your files and applications.
-
Click on the Install button.

After completing these steps, your computer running Windows 8.1 will be successfully upgraded to the latest version of Windows 10.
Moreover, ensure that you use “Device Manager” to verify that all components are installed correctly, and be sure to reinstall your antivirus and any other software you temporarily removed before the upgrade.
Windows 10 Hardware Requirements
Your device must meet the following minimum system requirements to install Windows 10:
- Processor: 1 GHz or faster processor or SoC.
- RAM: 1 GB for 32-bit or 2 GB for 64-bit.
- Hard Disk Space: 16 GB for 32-bit OS and 20 GB for 64-bit OS.
- Graphics Card: DirectX 9 or later with WDDM 1.0 driver.
- Display: 1024×600.
On Windows 8.1, you can review your system specifications via the Settings app under “PC info” . Additionally, ensure you are operating the Windows 8.1 Update release (KB2919355).
Microsoft no longer allows the use of a Windows 8.1 or 7 product key to activate Windows 10, necessitating the purchase of a new license post-upgrade.
You may also upgrade to Windows 10 by performing a clean installation and restoring files from a prior backup.
It’s critical to note that Microsoft will end support for Windows 10 on October 14, 2025. If your system meets the required specifications, you might consider upgrading directly to Windows 11 instead of Windows 10.
Update September 17, 2024: This guidance has been revised to ensure accuracy and reflect updates in the upgrade process.


Leave a Reply